PDF p. 2056 · 24-4
Check the rear seat belts for damage, and replace them if necessary. Be careful not to damage them during removal and installation.
Rear seat belt (5D):
- 1.Remove:
- Rear centre shelf
- Spare tyre lid
- Rear floor bucket
- Rear trim panel
- Rear seat cushion (see section 20)
- Rear seat-back (see section 20)
- Rear side trim (see section 20)
- Rear side shelf (see section 20)
- Trunk side trim panel (see section 20)
- 2.Remove the lower anchor bolt.
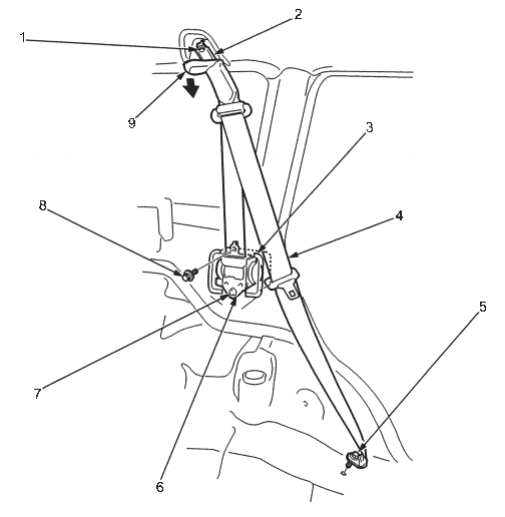
- 1. UPPER ANCHOR BOLT 7/16-20UNF 32 Nm (3.3 kgf/m, 24 lbf/ft)
- 2. GUIDE STAY
- 3. RETRACTOR PROTECTOR
- 4. REAR SEAT BELT
- 5. LOWER ANCHOR BOLT 7/16-20UNF 32 Nm (3.3 kgf/m, 24 lbf/ft)
- 6. RETRACTOR
- 7. RETRACTOR BOLT 7/16-20UNF 32Nm (3.3 kgf/m, 24 lbf/ft)
- 8. RETRACTOR MOUNTING BOLT
6 x 1.0 mm 9.8 Nm (1.0 kgf/m, 7.2 lbf/ft) - 9. UPPER ANCHOR COVER
- 3.Pull the upper anchor cover back, then remove the upper anchor bolt. Take care not to damage the upper anchor cover.
- 4.Remove the retractor mounting bolt and the retractor bolt, and remove the rear seat belt retractor.
PDF p. 2057 · 24-5
- 5.Install in the reverse order of removal, and note these items:
- Apply liquid thread lock to the upper anchor bolt before installation.
- Check that the retractor locking mechanism funtions as described (See Page 24-6).
- Assemble the collar on the upper anchor bolt as shown.
- Before installing the anchor bolts, make sure there are no twists or kinks in the rear seat belt.
Upper anchor bolt construction:
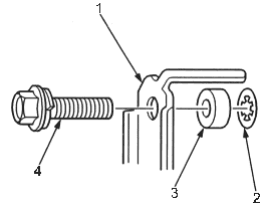
- 1. GUIDE STAY
- 2. TOOTHED LOCK WASHER
- 3. COLLAR
- 4. UPPER ANCHOR BOLT Apply liquid thread lock.
Lower anchor bolt construction:
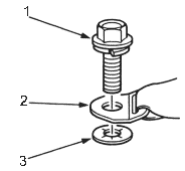
- 1. LOWER ANCHOR BOLT
- 2. LOWER ANCHOR
- 3. TOOTHED LOCK WASHER
Retractor bolt construction:
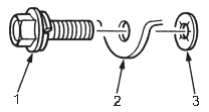
- 1. RETRACTOR BOLT
- 2. RETRACTOR
- 3. TOOTHED LOCK WASHER
Centre belt and seat belt buckles (5D):
- 1.Slide the front seat forward fully.
- 2.Remove the rear seat cushion (see section 20).
- 3.Remove the centre anchor bolts, and remove the centre belt (for some models) and seat belt buckles.
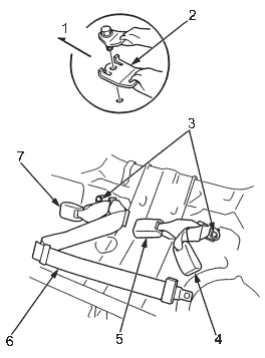
- 1. Outside
- 2. For some models.
- 3. CENTRE ANCHOR BOLT 7/16-20UNF
32 Nm (3.3 kgf/m, 24 lbf/ft) - 4. SEAT BELT BUCKLE
- 5. CENTRE BELT BUCKLE (For some models)
- 6. CENTRE BELT (For some models)
- 7. SEAT BELT BUCKLE
Centre anchor bolt construction:
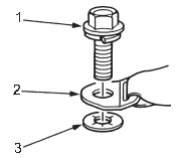
- 1. CENTRE ANCHOR BOLT
- 2. CENTRE ANCHOR
- 3. TOOTHED LOCK WASHER
- 4.Install in the reverse order of removal, and before installing the centre anchor bolt, make sure there are no twists or kinks in the centre belt (for some models).