PDF p. 1095 · 22-40
NOTE:
- Use only a gauge set for refrigerant HFC-134a (R-134a).
- Use a vacuum pump adapter which is equipped with a check valve to prevent backflow of the vacuum pump oil.
If accidental system discharge occurs, ventilate work area before resuming service.
R-134a service equipment or vehicle air conditioning systems should not be pressure tested or leak tested with compressed air.
Additional health and safety information may be obtained from the refrigerant and lubrication manufacturers.
- 1.After the leak test, check that the high pressure valve is closed and start the engine.
- 2.
Open the front door.
Turn the A/C switch ON.
Set the temperature control dial to MAX COOL. Set the mode control dial to VENT.
Turn the fan switch to MAX.
- 3.Open the low pressure valve and charge with R-134a refrigerant.
- 4.
Charge the system with refrigerant capacity. Do not overcharge the system; the compressor will be damaged.
Refrigerant capacity:
KY model, 650 +0, - 50g (22.9 +0, -1.8 oz) Except KY model, 600 +0, - 50g (21.2 +0, -1.8 oz)
- 5.When fully charged, close the low pressure valve and the refrigerant cans. Check the system.
- 6.Stop the engine and disconnect he charge hose quickly.
- 7.
Check the system for leaks using a leak detector for refrigerant R-134a.
NOTE: Particularly check for leaks around the compressor, condenser and receiver/dryer.
THREE VALVE GAUGE TWO VALVE GAUGE
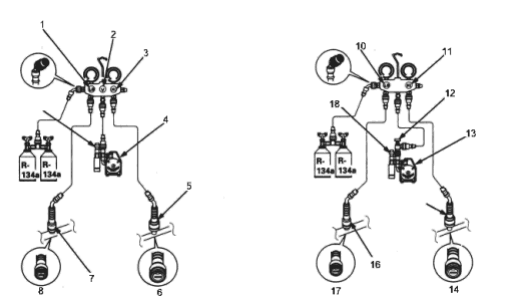
- 1. LOW PRESSURE VALVE
- 2. EVACUATION VALVE
- 3. HIGH PRESSURE VALVE
- 4. VACUUM PUMP
- 5. HIGH PRESSURE QUICK JOINT
- 6. 16 mm
- 7. LOW PRESSURE QUICK JOINT
- 8. 13 mm
- 9. CHECK VALVE
- 10. LOW PRESSURE VALVE
- 11. HIGH PRESSURE VALVE
- 12. EVACUATION STOP VALVE
- 13. VACUUM PUMP
- 14. 16 mm
- 15. HIGH PRESSURE QUICK JOINT
- 16. LOW PRESSURE QUICK JOINT
- 17. 13 mm
- 18. CHECK VALVE