PDF p. 1983 · 20-34
5D:
NOTE:
- Take care not to scratch the body or tear the seat covers.
- When removing the seat-back, release the rear centre shelf net and spare tyre lid mat from the seat-back. Remove in numbered sequence.
 : Bolt locations
 : Nut locations, 4
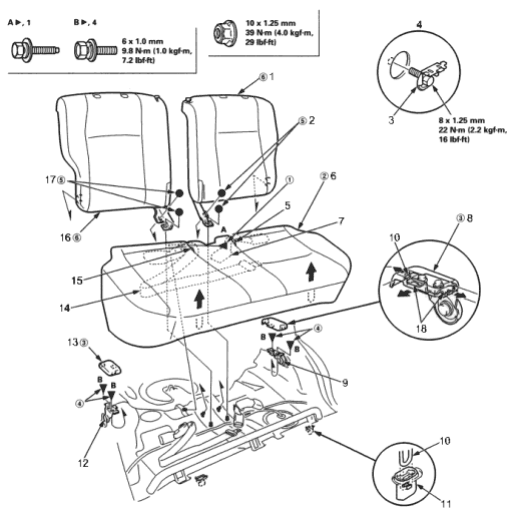
- 1. LEFT SEAT BACK
- 2. SELF LOCKNUTS
- 3. PIVOT BRACKET
- 4. Pivot bracket removal
- 5. SLIT
- 6. SEAT CUSHION
- 7. CENTRE BELT BUCKLE (For some models)
- 8. PIVOT BRACKET COVER
- 9. PIVOT BRACKET
- 10. HOOK
- 11. CLIP
- 12. PIVOT BRACKET
- 13. PIVOT BRACKET COVER
- 14. CENTRE BELT (For some models)
- 15. SLIT
- 16. RIGHT SEAT-BACK
- 17. SELF LOCKNUTS
- 18. HOOKS
Install in the reverse order of removal, and note these items:
- Before attaching the rear seat-back and seat cushion, make sure there are no twists or kinks in the rear seat belts and centre belt.
- When installing the seat cushion, slip the seat belt buckles and centre belt (for some models) through the slits in the seat cushion.