PDF p. 1982 · 20-33
5D:
NOTE:
- When prying with a flat-tip screwdriver, wrap it with protective tape, and apply protective tape around the related parts, to prevent damage.
- Take care not to scratch the dashboard and related parts.
- LHD is shown, RHD is similar.
- 1.Carefully insert a flat-tip screwdriver to the notch of the switch trim, and gently pry the switch trim out to detach the lower clip.
 : Clip locations, 2
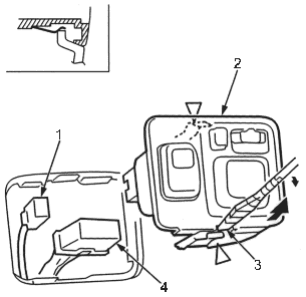
- 1. REAR FOG LIGHT SWITCH CONNECTOR (For some models)
- 2. SWITCH TRIM
- 3. NOTCH
- 4. POWER MIRROR SWITCH CONNECTOR
- 2.Detach the upper clip, and pull the switch trim out.
- 3.Disconnect the power mirror switch connector and rear fog light switch connector (for some models).
- 4.Install in the reverse order of removal, and note these items:
- Make sure the connector(s) is plugged in properly.
- Push the clip portions into place securely.