PDF p. 980 · 20-44
NOTE:
- When prying with a flat tip screwdriver, wrap it with protective tape to prevent damage.
- Take care not to bend and scratch the headliner.
- Be careful not to damage the dashboard and other interior trim.
- 1.Remove:
- Interior light (see section 23)
- Rearview mirror (without roof garnish spoiler, (See Page 20-16).
- Front pillar trim (both sides, (See Page 20-41).
- Centre pillar trim (both sides, (See Page 20-41).
- Rear pillar trim (both sides, (See Page 20-41).
- Lock cover (with sunroof, (See Page 20-35).
- 2.Remove the sun visor and holder from each side.
- 3.Remove the caps and the screw, then remove the grab handle.
- 4.Remove the roof trim (with sunroof).
- 5.Remove the clip, then remove the headliner through the tailgate opening.
 : Screw locations
 : Clip locations
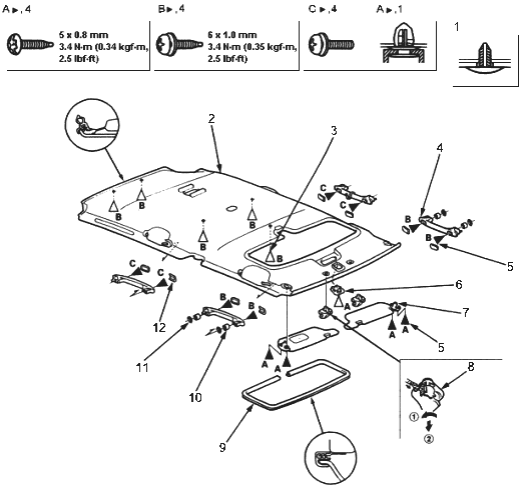
- 1. 4 (with sunroof), 5 (without sunroof)
- 2. HEADLINER
- 3. Without sunroof.
- 4. GRAB HANDLE
- 5. ET SCREW
- 6. ROOF MAINTENANCE CAP
- 7. SUN VISOR
- 8. HOLDER
- 9. ROOF TRIM
- 10. COLLAR
- 11. LOCK WASHER
- 12. CAP
PDF p. 981 · 20-45
- 6.Remove the roof side pad and roof side absorber.
 : Clip locations, 7 1. ROOF SIDE ABSORBER
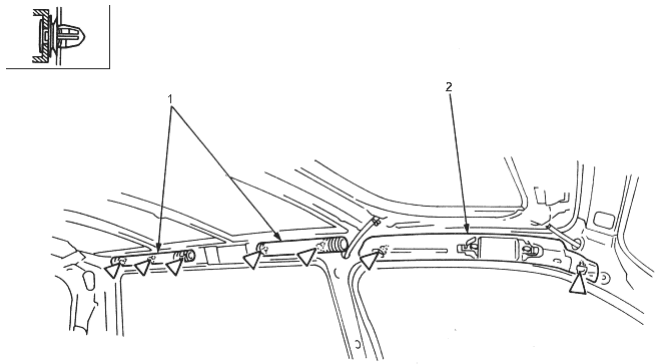
- 2. ROOF SIDE PAD
- 7.Install in the reverse order of removal.