PDF p. 1988 · 20-39
5D:
NOTE: The steel core in the fenderwell trim cannot be restored to its original shape once it is bent. Replace the fenderwell trim when the steel core is bent.
- 1.Remove the fenderwell trim by pulling it out.
- 2.Clean the body bonding surface with a sponge dampened in alcohol. After cleaning, keep oil, grease and water from getting on the clean surface.
- 3.
Apply clear sealant in the groove of the trim at the area indicated by the arrow.
Sealant: Cemedines P/N 08712 - 0004, or equivalent
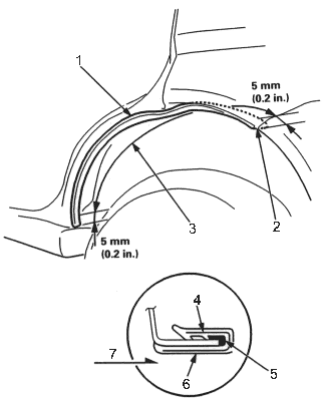
- 1. FENDERWELL TRIM
- 2. Align.
- 3. Sealant area.
- 4. STEEL CORE
- 5. SEALANT
- 6. TRIM
- 7. Inside
- 4.Install the fenderwell trim.
- 5.Scrape or wipe the excess sealant off with a towel. To remove sealant from a painted surface, wipe with a soft shop towel dampened in alcohol.
Fenderwell Protection Tape Replacement
For some 5D models:
- 1.Remove the fenderwell trim as necessary.
- 2.Remove the fenderwell protection tape, and clean the body bonding surface with a sponge dampened in alcohol. After cleaning, keep oil, grease and water from getting on the clean surface.
- 3.Peel the adhesive backing off from the protection tape.
- 4.Align the protection tape with the edge of the body flange, as shown, then press the protection tape into place.
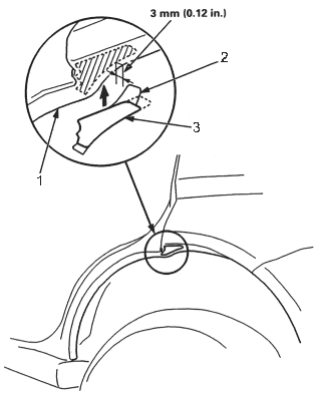
- 1. Edge of the body flange.
- 2. ADHESIVE BACKING
- 3. FENDERWELL PROTECTION TAPE
- 5.Reinstall the fenderwell trim.