PDF p. 901 · 19-A-24
NOTE:
- Do not spill brake fluid on the vehicle; it may damage the paint; if brake fluid does contact the paint, wash it off immediately with water.
- Clean all parts in brake fluid and air dry; blow out all passages with compressed air.
- Before reassembling, check that all parts are free of dust and other foreign particles.
- Replace parts with new ones whenever specified to do so.
- Make sure no dirt or other foreign matter is allowed to contaminate the brake fluid.
- Do not reuse the drained fluid.
- Use only clean Genuine Honda brake fluid or an equivalent DOT3 or DOT4 brake fluid.
- Lubricate all parts with clean brake fluid during reassembly.
- Replace all rubber parts with new ones whenever disassembled.
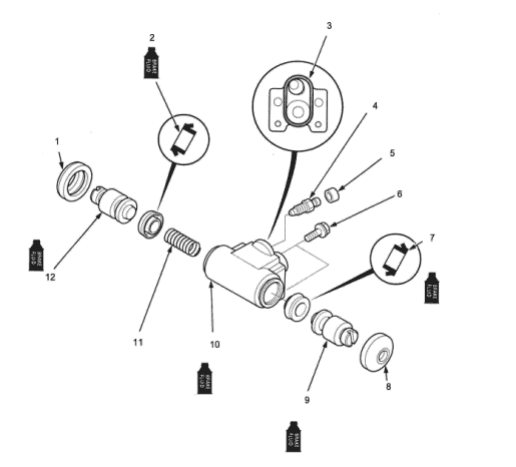
- 1. DUST COVER, Replace
- 2. PISTON CUP, Replace
NOTE: Install with the lip facing in. - 3. Apply sealant to this area when installing the wheel cylinder onto backing plate.
NOTE: Do not apply sealant to the threads. - 4. BLEED SCREW, 7 Nm (0.7 kgf/m, 5 lbf/ft)
- 5. BLEED SCREW CAP
- 6. 6 mm BOLT, 9 Nm (0.9 kgf/m. 7 lbf/ft)
- 7. PISTON CUP, Replace
NOTE: Install with the lip facing in. - 8. DUST COVER, Replace
- 9. PISTON
Inspect for scoring and grooving - 10. WHEEL CYLINDER
Check the bore for scratches and scoring - 11. WHEEL CYLINDER SPRING
Check for weakness and damage - 12. PISTON
Inspect for scoring and grooving