PDF p. 897 · 19-A-20
NOTE:
- Contaminated brake linings or drums reduce stopping ability.
- Block the front wheels before jacking up the rear of the vehicle.
- 1.Raise the rear of the vehicle, and make sure it is securely supported.
- 2.Release the parking brake and remove the rear brake drum (see section 18).
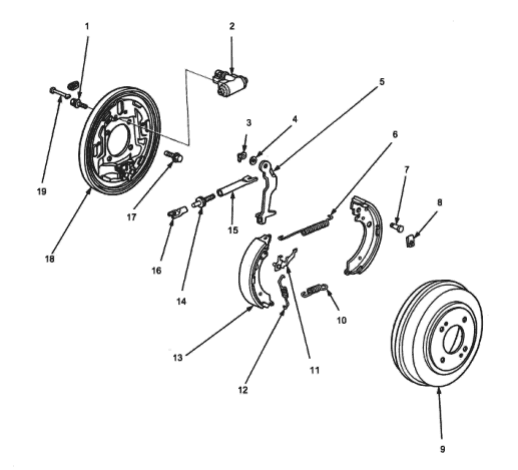
- 1. 9 Nm (0.9 kgf/m, 7 lbf/ft)
- 2. WHEEL CYLINDER
Inspect for leakage. Disassembly/Inspection, (See Page 19-A-24) - 3. U-CLIP, Replace
- 4. WAVY WASHER
- 5. PARKING BRAKE LEVER
Marked left and right - 6. UPPER RETURN SPRING
Check for weakness and damage - 7. PIVOT PIN
- 8. RETAINER SPRING
Install securely on tension pin - 9. BRAKE DRUM
Inspection, (See Page 19-A-21) - 10. LOWER RETURN SPRING
Check for weakness and damage - 11. SELF-ADJUSTER LEVER
- 12. SELF-ADJUSTER SPRING
Check for weakness and damage - 13. BRAKE SHOE
Inspection, (See Page 19-A-21)
If brake shoes are to be reused, mark and reassemble in same position - 14. ADJUSTER BOLT
Check ratchet teeth for wear and damage - 15. CLEVIS A
- 16. CLEVIS B
- 17. 10 mm BOLT, 64 Nm (6.5 kgf/m, 47 lbf/ft)
- 18. BACKING PLATE
Marked left and right - 19. TENSION PIN
PDF p. 898 · 19-A-21
- 1.Check the wheel cylinder for leakage.
- 2.Check the brake linings for cracking, glazing, wear or contamination.
- 3.
Measure the brake lining thickness.
Brake Lining Thickness:
Standard: 4.0 mm (0.157 in) Service Limit: 2.0 mm (0.08 in)
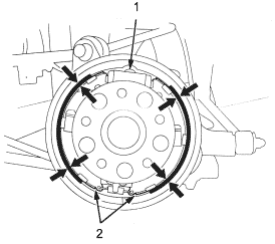
- 1. WHEEL CYLINDER
- 2. LININGS
NOTE: Measurement does not include brake shoe thickness.
- 4.If the brake lining thickness is less than service limit, replace the brake linings as a set.
- 5.Check the bearings in the hub unit for smooth operation. If defective refer to section 18.
- 6.
Measure the inside diameter of the brake drum using the inside vernier calipers.
Drum Inside Diameter:
Standard:
199.9 - 200.0 mm (7.870 - 7.874 in) Service Limit:
201.0 mm (7.913 in)
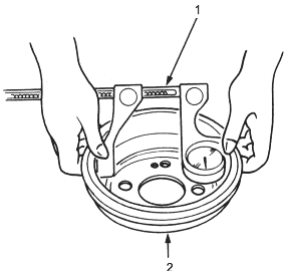
- 1. INSIDE VERNIER CALIPERS
- 2. BRAKE DRUM
- 7.If the inside diameter of the brake drum is more than the service limit, replace the brake drum.
- 8.Check the brake drum for scoring, grooves and cracks.