PDF p. 894 · 19-A-17
NOTE: Master cylinder pushrod-to piston clearance must be checked and adjustments made, if necessary, before installing master cylinder.
- 1.Set the special tool on the master cylinder body; push in the centre shaft until the top of it contacts the end of the secondary piston by turning the adjusting nut.
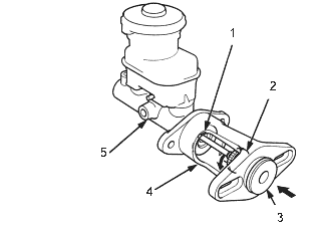
- 1. SECONDARY PISTON
- 2. ADJUSTING NUT
- 3. CENTRE SHAFT
- 4. PUSHROD ADJUSTMENT GAUGE, 07JAG-SD40100
- 5. MASTER CYLINDER
- 2.Without disturbing the centre shaft’s position, install the special tool upside down on the booster.
- 3.Install the master cylinder nuts and tighten to the specified torque.
- 4.Connect the booster in-line with a vacuum gauge 0 - 101 kPa ( 0 - 760 mmHg, 30 in.Hg) to the booster’s engine vacuum supply, and maintain an engine speed that will deliver 66 kPa (500 mmHg, 20 in.Hg) vacuum.
- 5.
With a feeler gauge, measure the clearance between the gauge body and the adjusting nut as shown.
Clearance: 0 - 0.4 mm (0 - 0.02 in)
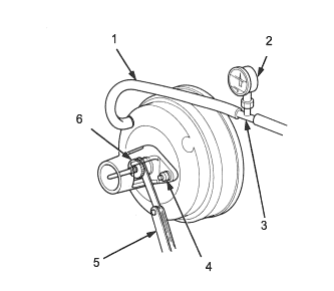
- 1. HOSE, Connect a hose of suitable diameter
- 2. VACUUM GAUGE, 07404-5790301, 0 - 101 kPa ( 0 - 760 mmHg, 30 in.Hg)
- 3. TUBE JOINT ADAPTOR, 07410-5790501
- 4. MASTER CYLINDER NUT, 15 Nm (1.5 kgf/m, 11 lbf/ft)
- 5. FEELER GAUGE
- 6. ADJUSTING NUT
NOTE: If the clearance between the gauge body and adjusting nut is 0.4 mm (0.02 in), the pushrod-to-piston clearance is 0 mm. However, if the clearance between the gauge body and adjusting nut is 0 mm, the pushrod-to-piston clearance is 0.4 mm (0.02 in) or more. Therefore it must be adjusted and rechecked.
- 6.
If the clearance is incorrect, loosen the star locknut and turn the adjuster in or out to adjust.
NOTE:
- Adjust the clearance while the specified vacuum is applied to the booster.
- Hold the clevis while adjusting.
- 7.Tighten the star locknut securely.
- 8.Remove the special tool.
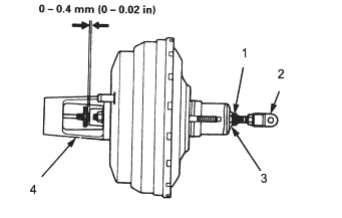
- 1. STAR LOCKNUT, 22 Nm (2.2 kgf/m, 16 lbf/ft)
- 2. CLEVIS
- 3. ADJUSTER
- 4. PUSHROD ADJUSTMENT GAUGE, 07JAG-SD40100
- 9.Adjust the pushrod length as shown if the booster is removed.
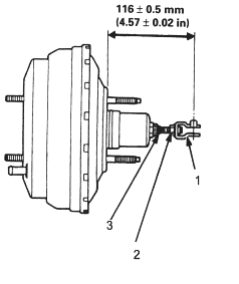
- 1. CLEVIS
- 2. PUSHROD LOCKNUT, 15 Nm (1.5 kgf/m, 11 lbf/ft)
- 3. PUSHROD
- 10.Install the master cylinder (See Page 19-A-13).