PDF p. 884 · 19-A-7
NOTE:
- Do not reuse the drained fluid.
- Use only clean Genuine Honda brake fluid or an equivalent DOT3 or DOT4 brake fluid.
- Make sure no dirt or other foreign matter is allowed to contaminate the brake fluid.
- Do not spill brake fluid on the vehicle, it may damage the paint; f brake fluid does contact the paint, wash it off immediately with water.
- The reservoir on the master cylinder must be at the MAX (upper) level at the start of bleeding procedure and checked after bleeding each brake caliper. Add fluid as required.
- 1.Make sure the brake fluid level in the reservoir is at the MAX (upper) level line.
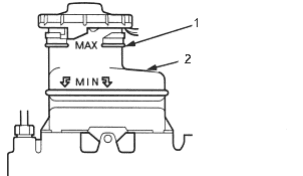
- 1. MAX (UPPER) LEVEL LINE
- 2. RESERVOIR
- 2.Have someone slowly pump the brake pedal several times, then apply steady pressure.
- 3.Loosen the brake bleed screw to allow air to escape from the system. Then tighten the bleed screw securely.
- 4.
Repeat the procedure for each wheel in the sequence shown below, until air bubbles no longer appear in the fluid.
NOTE: LHD type is shown, RHD type is symmetrical.
- 5.Refill the reservoir of master cylinder to the MAX (upper) level line.
BLEEDING SEQUENCE:
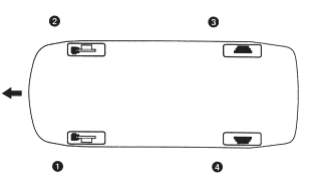
- 1. Front Left
- 2. Front Right
- 3. Rear Right
- 4. Rear Left
FRONT
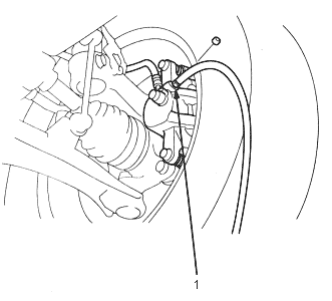
- 1. BLEED SCREW, 9 Nm (0.9 kgf/m, 7 lbf/ft)
REAR
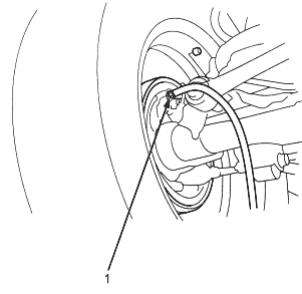
- 1. BLEED SCREW, 7 Nm (0.7 kgf/m, 5 lbf/ft)