PDF p. 876 · 18-22
- 1.Raise the rear of the vehicle and make sure it is securely supported. remove the rear wheel.
- 2.Remove the flange bolt from the rear axle beam.
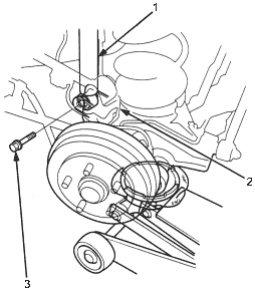
- 1. REAR DAMPER
- 2. REAR AXLE BEAM
- 3. FLANGE BOLT, 10 x 1.25 mm
- 3.Remove the damper access panel.
- 4.Remove the self-locking nut.
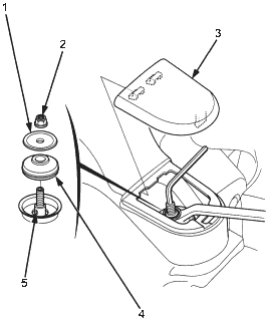
- 1. WASHER
- 2. SELF-LOCKING NUT, 10 x 1.25 mm, Replace.
- 3. DAMPER ACCESS PANEL
- 4. DAMPER MOUNTING RUBBER
- 5. DAMPER ROD
- 5.Remove the damper from the vehicle.
Inspection
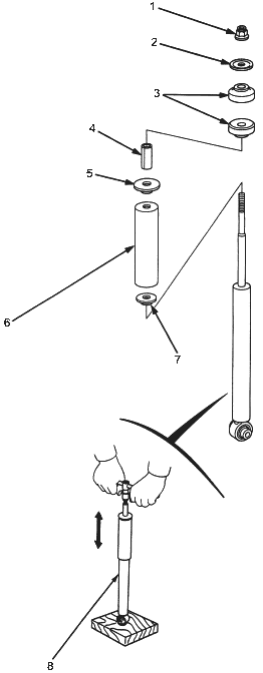
- 1. SELF-LOCKING NUT, 10 x 1.25 mm, 29 Nm (3.o kgf/m, 22 lbf/ft), Replace.
- 2. DAMPER MOUNTING WASHER. Check for weakness.
- 3. DAMPER MOUNTING RUBBER
- 4. DAMPER MOUNTING COLLAR
- 5. DUST COVER PLATE
- 6. DUST COVER. Check for bending and damage.
- 7. DUST COVER PLATE
- 8. DAMPER UNIT
- Check for smooth operation through a full stroke, both compression and extension. The damper should move smoothly. If it does not (no compression or extension), the gas is leaking, and the damper should be replaced.
- Check for oil leaks, abnormal noise or binding during these tests.