PDF p. 1941 · 14-10
Checking the Diagnostic Trouble Code (DTC)
connecting with the Special Tool to the Service Check Connector
When the PCM senses an abnormality in the input or output systems, the D indicator light in the gauge assembly will blink. When the Service Check Connector (located under the dash on the passengers side) is connected with the special tool as shown, the D indicator light will blink the Diagnostic Trouble Code (DTC) when the ignition switch is turned ON (II). When the D indicator light has been reported on, connect the Service Check Connector with the special tool.
Then turn ON (II) the ignition switch and observe the D indicator light.
- 1.GAUGE ASSEMBLY
- 2.INDICATOR LIGHT
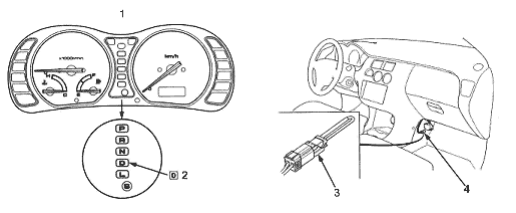
- 3. SCS SHORT CONNECTOR, 07PAZ - 0010100
- 4. SERVICE CHECK CONNECTOR (2P)
Codes 1 through 9 are indicated by individual short blinks. Codes 10 and above are indicated by a series of long and short blinks. One long blink equals 10 short blinks. Add the long and short blinks together to determine the code. After determining the code, refer to the electrical system Symptom-to-Component Chart, for this (See Page 14-13) and (See Page 14-14).
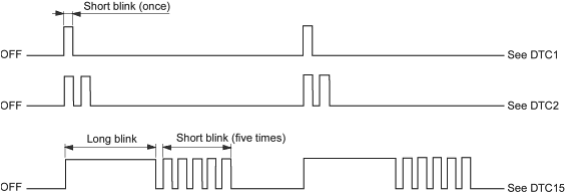
NOTE:
- If the D indicator light and the MIL (Malfunction Indicator Lamp) come on at the same time, follow this procedure:
- 1.Record the DTCs for the fuel/emissions and A/T systems.
- 2.Check the fuel and emission system indicated by the DTC.
- 3.Write down the numbers of the customer’s radio station presets.
- 4.Reset the PCM memory by removing the BACK UP fuse in the passenger’s under-dash fuse/relay box for more than 10 seconds.
- 5.Drive the vehicle for several minutes at a speed over 30 mph (50km/h), and then recheck the DTCs.
- 1.
- Disconnecting the BACK UP fuse also cancels the radio preset stations, clock setting and the feed back signal for the start clutch control. Make a note of the radio presets before removing the fuse so you can reset them, and to memorise the feedback signal for the start clutch control again follow the Memorising Feedback Signal procedures (See Page 14-71 in the ’99 HR-V shop manual code No. 62S2H00).
PDF p. 1942 · 14-11
Checking the Diagnostic Trouble Code (DTC)
with an OBD Scan Tool or the Honda PGM Tester
When the PCM senses an abnormality in the input or output systems, the D indicator light in the gauge assembly will blink. When the 16P Data Link Connector (DLC) (located under the dash on the passenger side) is connected to the OBD Scan Tool or Honda PGM Tester as shown, the scan tool or tester will indicate the Diagnostic Trouble Code (DTC) when the ignition switch is turned ON (II).
When the D indicator light has been reported on, connect the OBD Scan Tool or Honda PGM Tester to the DLC (16P). Turn the ignition switch ON (II), and observe the DTC on the screen of the Scan Tool or Honda PGM Tester. After determining the DTC, refer to the Symptom-to-Component Chart Electrical System, for this (See Page 14-13) and (Page 14-14).
NOTE: See the OBD Scan Tool or Honda PGM Tester user’s manual for specific instructions.
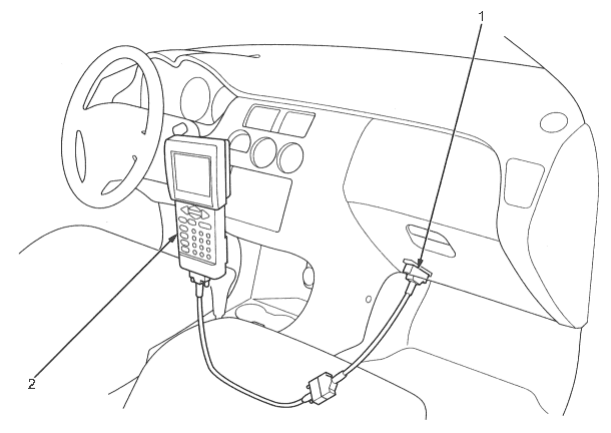
- 1. DATA LINK CONNECTOR (16P)
- 2. HONDA PGM TESTER or OBD SCAN TOOL
NOTE:
- If the D indicator light and the MIL (Malfunction Indicator Lamp) come on at the same time, follow this procedure:
- 1.Record the DTCs for the fuel/emissions and A/T systems.
- 2.Check the fuel and emission system indicated by the DTC.
- 3.Write down the numbers of the customer’s radio station presets.
- 4.Reset the PCM memory by removing the BACK UP fuse in the passenger’s under-dash fuse/relay box for more than 10 seconds.
- 5.Drive the vehicle for several minutes at a speed over 30 mph (50 km/h), and then recheck the DTCs.
- 1.
- Disconnecting the BACK UP fuse also cancels the radio preset stations, clock setting and the feed back signal for the start clutch control. Make a note of the radio presets before removing the fuse so you can reset them, and to memorise the feedback signal for the start clutch control again follow the Memorising Feedback Signal procedures (See Page 14-71 in the ’99 HR-V shop manual code No. 62S2H00).
PDF p. 1943 · 14-12
- 1.Remove the glove box (see section 20).
- 2.
Remove the PCM.
NOTE: RHD is shown; LHD is symmetrical.
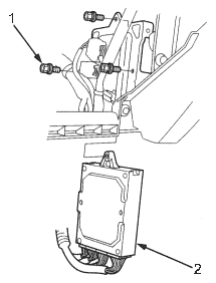
- 1. 6 x 1.0 mm 9.8 Nm (1.0 kgf/m, 7.2 lbf/ft)
- 2. PCM
- 3.Inspect the circuit on the PCM according to the troubleshooting flowchart with a digital multitester and a tapered tip probe as shown.
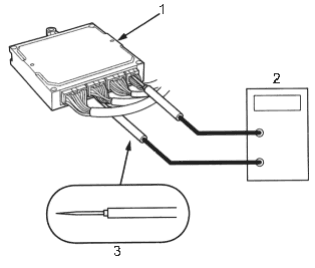
- 1. PCM
- 2. DIGITAL MULTITESTER Commercially available or 07411-0020000
- 3. TAPERED TIP PROBE
- PCM Reset Procedure
- 1.Turn the ignition switch off.
- 2.
Remove the BACK UP fuse (7.5 A) from the under-dash fuse/relay box for 10 seconds to reset the PCM.
NOTE: Disconnecting the BACK UP fuse also cancels the radio preset stations, clock setting and the feed back signal for the start clutch control. Make note of the radio presets before removing the fuse so you can reset them, and to memorise the feedback signal for the start clutch control again follow the Start Clutch Calibration Procedure (See Page 14-71 in the ’99 HR-V shop manual code No. 62S2H00)
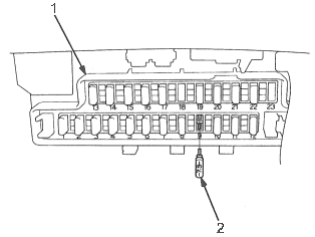
- 1. UNDER-DASH FUSE/RELAY BOX
- 2. BACK UP FUSE (7.5 A)
Final Procedure
NOTE: This procedure must be done after any troubleshooting.
- 1.Remove the special tool from the Service Check Connector.
- 2.Reset the PCM.
- 3.Set the radio preset stations and clock setting.
- 4.Follow the Start Clutch Calibration Procedure to store in the PCM (See Page 14-71 in the ’99 HR-V shop manual code No. 62S2H00)