PDF p. 628 · 14-73
- 1.Shift to the P position and loosen the nuts.
- 2.Slide the switch in the direction of the arrow within 2.0 mm (0.79 in.) so that there is continuity between the No. 1 and No. 12 terminals in the range of free play of the shift lever.
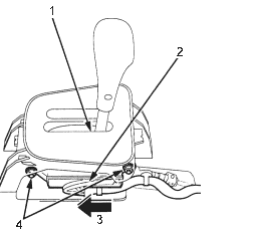
- 1. Position
- 2. A/T GEAR POSITION SWITCH
- 3. Slide within 2.0 mm, (0.079 in).
- 4. NUTS
- 3.
Recheck for continuity between each of the terminals.
NOTE:
- If adjustment is not possible, check for damage to the shift lever detent and/or the bracket. If there is no damage, replace the switch.
- The engine should start when the shift lever is in N position in the range of free play.
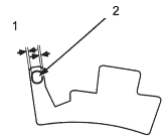
- 1. Free play
- 2. LOCK PIN
Replacement
- 1.Remove the front console, then disconnect the A/T gear position switch connector (14P).
- 2.Remove the two mounting nuts.
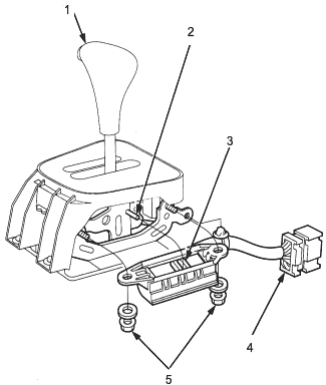
- 1. SHIFT LEVER
- 2. PIN
- 3. SWITCH SLIDER
- 4. 14P CONNECTOR
- 5. MOUNTING NUTS
- 3.Position the switch slider to “Neutral” as shown above.
- 4.Move the shift lever to “Neutral”, then slip the switch into position.
- 5.Attach the switch with the two mounting nuts.
- 6.Test the switch in the P and N position of the shift lever. The engine should start when the shift lever is in position P anywhere in the range of free play.
- 7.Connect the 14P connector, clamp the harness and install the front console.