PDF p. 725 · 14-167
- 1.Remove the front console (see section 20).
- 2.Shift to position, then remove the lock pin from the adjuster.
NOTE: LHD model is shown; RHD is similar.
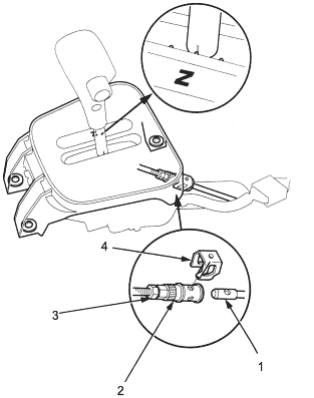
- 1. SHIFT CABLE
- 2. ADJUSTER
- 3. LOCKNUT, 7 Nm (0.7 lbf/m, 5 lbf/ft)
- 4. LOCK PIN
- 3.Check that the hole in the adjuster is perfectly aligned with the hole in the shift cable. There are two holes in the adjuster. They are positioned 90° apart to allow cable adjustment in 1/4 turn increments.
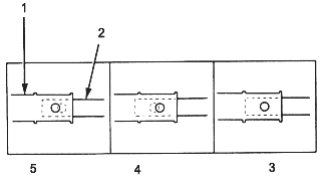
- 1. ADJUSTER
- 2. SHIFT CABLE
- 3. Exact Alignment
- 4. Cable Too Long
- 5. Cable Too Short
- 4.If the hole is not perfectly aligned, loosed the lock nut on the adjuster and adjust as required.
- 5.Tighten the locknut to 7 Nm (0.7 kgf/m, 5 lbf/ft).
- 6.Install the lock pin on the adjuster. If you feel the lock pin binding as you reinstall it, the cable is still out of adjustment and must be readjusted.
- 7.Make sure the lock pin is seated in the adjuster securely.
- 8.Move the shift lever to each position and verify that the shift position indicator follows the automatic transaxle gear position switch.
- 9.Start the engine and check the shift lever in all positions.
- 10.Insert the ignition key into the key cylinder on the A/T gear position indicator panel and verify that the shift lock lever is released for KQ and KU models.