PDF p. 249 · 6-10
Install the timing belt in the reverse order of removal;
Only key points are described here.
- 1.Set the timing belt drive pulley so that the No. 1 piston is at top dead centre (TDC). Align the TDC mark on the timing belt drive pulley to the pointer on the oil pump.
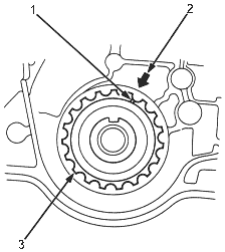
- 1. TDC MARK
- 2. POINTER
- 3. TIMING BELT DRIVE PULLEY, Clean
- 2.Set the camshaft pulley so that the No. 1 piston is at TDC. Align the TDC marks on the camshaft pulley with the cylinder head upper surface.
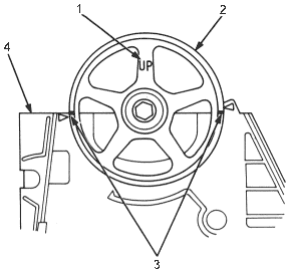
- 1. “UP” MARK
- 2. CAMSHAFT PULLEY, Clean
- 3. TDC MARKS
- 4. UPPER SURFACE
- 3.
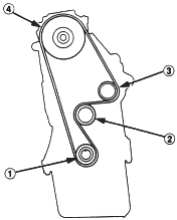
Install the timing belt tightly in the sequence shown. 1 - Timing belt pulley (crankshaft). 2 - Adjusting pulley. 3 - Water pump pulley. 4 - Camshaft pulley.
NOTE: Make sure the timng belt drive pully and camshaft pulley are at TDC
- 4.Loosen and retighten the adjusting bolt to tension the timing belt.
- 5.
Install the lower and upper covers.
NOTE: Clean the upper and lower covers before installation.
- 6.Install the crankshaft pulley, then tighten the pulley bolt (see page 6-5).
- 7.Rotate the crankshaft pulley about five or six turns counterclockwise so that the timing belt positions on the pulleys.
- 8.Adjust the timing belt tension (see page 6-7).
PDF p. 250 · 6-11
- 9.Check that the crankshaft pulley and camshaft pulley are both at TDC.
CRANKSHAFT PULLEY:
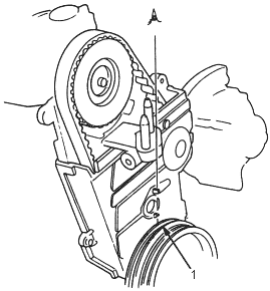
- 1. TDC MARK (WHITE)
CAMSHAFT PULLEY:
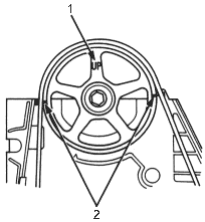
- 1. UP MARK
- 2. TDC MARK
- 10.If the camshaft and crankshaft pulleys are not positioned at TDC remove the timing belt, and adjust the position following the procedure (see page 6-9), then reinstall the timing belt.
- 11.After installation, adjust the tension of each belt.
- See section 4 for alternator belt tension adjustment.
- See section 22 for A/C compressor belt tension adjustment.
- See section 17 for P/S pump belt tension adjustment.