PDF p. 1268 · 24-3
SRS components are located in this area. Review the SRS component locations, precautions and procedures in the SRS section (24) before performing repairs or service.
Check the front seat belts for damage and replace them if necessary. Be careful not to damage them during removal and installation.
Front seat belt:
- 1.Slide the front seat forward fully.
- 2.Remove (see section 20):
- Rear seat-backs
- Rear seat cushion
- Side trim
- Rear side trim panel
- 3.Remove the upper anchor cap. Pull back the lower anchor cap.
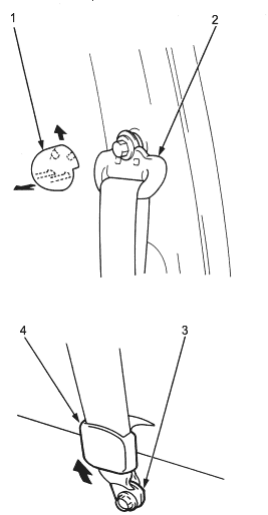
- 1. UPPER ANCHOR CAP
- 2. FRONT SEAT BELT
- 3. LOWER ANCHOR BOLT
- 4. LOWER ANCHOR CAP
- 4.Disconnect the seat belt tensioner connector.
- 5.Remove the upper anchor bolt and lower anchor bolt, the retractor mounting screw and the retractor bolt. Remove the front seat belt and retractor.
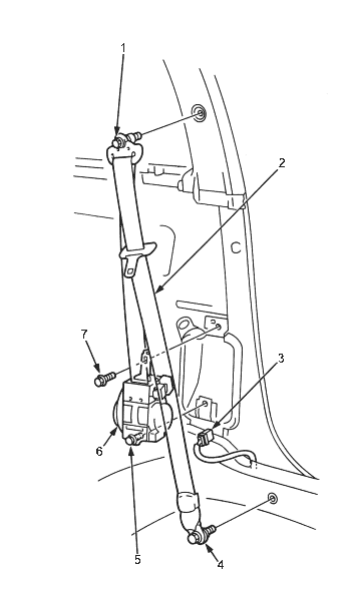
- 1. UPPER ANCHOR BOLT, 7/16-20 UNF, 32 Nm (3.3 kgf/m, 24 lbf/ft)
- 2. FRONT SEAT BELT
- 3. SEAT BELT TENSIONER CONNECTOR
- 4. LOWER ANCHOR BOLT, 7/16-20 UNF, 32 Nm (3.3 kgf/m, 24 lbf/ft)
- 5. RETRACTOR BOLT, 7/16-20 UNF, 32 Nm (3.3 kgf/m, 24 lbf/ft)
- 6. RETRACTOR
- 7. RETRACTOR MOUNTING SCREW, 6 x 1.0 mm, 4 Nm (0.4 kgf/m, 3 lbf/ft)
PDF p. 1269 · 24-4
- 6.Install in the reverse order of removal and note the following items:
- If the threads on the retractor mounting screw are worn out, use an oversized screw made specifically for this application.
- Check that the retractor locking mechanism functions (See Page 24-8).
- Assemble the washers, collar and bushing on the upper and lower anchor bolts as shown.
- Before installing the anchor bolts, make sure there are no twists or kinks in the front seat belt.
- Make sure the seat belt tensioner connector is connected securely.
Upper anchor bolt construction:
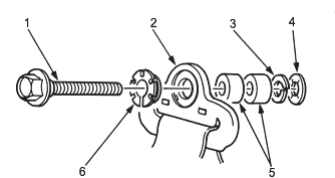
- 1. UPPER ANCHOR BOLT
- 2. UPPER ANCHOR
- 3. SPRING WASHER
- 4. TOOTHED LOCK WASHER
- 5. COLLARS
- 6. BUSHING
Lower anchor bolt construction:
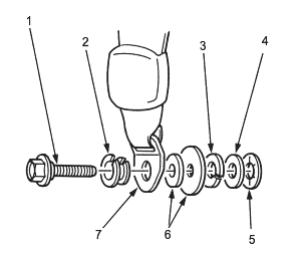
- 1. LOWER ANCHOR BOLT
- 2. BUSHING
- 3. SPRING WASHER
- 4. WASHER
- 5. TOOTHED LOCK WASHER
- 6. WASHERS
- 7. LOWER ANCHOR
Retractor bolt construction:
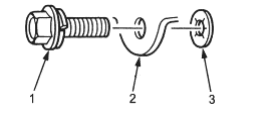
- 1. RETRACTOR BOLT
- 2. RETRACTOR
- 3. TOOTHED LOCK WASHER
PDF p. 1270 · 24-5
Seat Belt Buckle:
- 1.Remove the front seat (see section 20).
- 2.Remove the centre cover (see section 20).
- 3.Driver’s for some models: Detach the seat belt switch connector and harness clip.
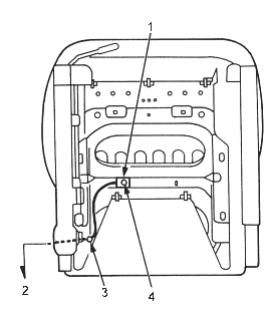
- 1. SEAT BELT SWITCH CONNECTOR
- 2. To seat belt buckle
- 3. CLIP
- 4. CLIP
- 4.Remove the centre anchor bolt and remove the seat belt buckle.
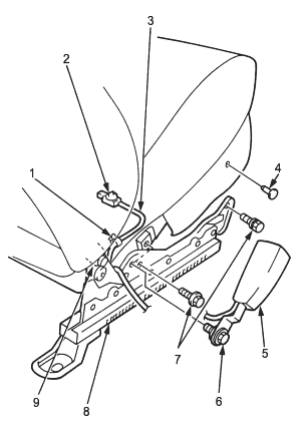
- 1. HARNESS CLIP
- 2. SEAT BELT SWITCH CONNECTOR
- 3. SEAT BELT SWITCH HARNESS
- 4. CLIP
- 5. SEAT BELT BUCKLE
- 6. CENTRE ANCHOR BOLT
- 7. 1.0 x 1.25 mm (47 Nm (4.8 kgf/m, 35 lbf/ft)
- 8. INNER SEAT TRACK
- 9. HINGE BRACKET
Centre anchor bolt construction:
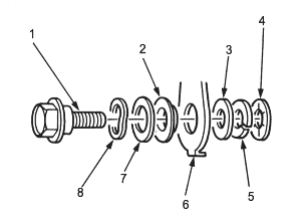
- 1. CENTRE ANCHOR BOLT
- 2. BEARING
- 3. WASHER
- 4. TOOTHED LOCK WASHER
- 5. SPRING WASHER
- 6. CENTRE ANCHOR
- 7. WASHER
- 8. WAVE WASHER
- 5.Install in the reverse order of removal; assemble
the washers on the centre anchor bolt as shown.