PDF p. 1249 · 23-F-30
- 1.
Open the hood and remove the cap nuts and the wiper arms.
NOTE: Remove the wiper arms carefully without damaging the hood.
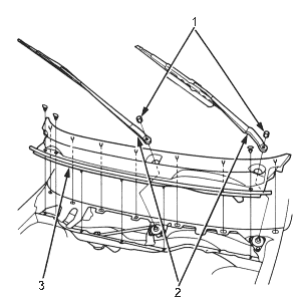
- 1. 10 x 1.25 mm, 18 Nm (1.8 kgf/m, 13 lbf/ft)
- 2. WIPER ARMS
- 3. COWL COVER
- 2.Remove the hood seal and cowl cover.
- 3.Remove the bolts and windshield wiper linkage assembly.
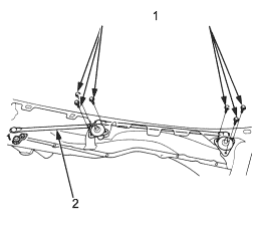
- 1. 6 x 1.0 mm, 9.8 Nm (1.0 kgf/m, 7.2 lbf/ft)
- 2. WINDSHIELD WIPER LINKAGE ASSEMBLY
- 4.Remove the four mounting nuts, then disconnect the 5P connector from the windshield wiper motor.
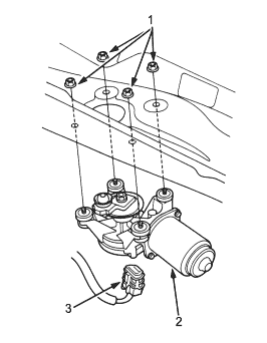
- 1. 6 x 1.0 mm, 9.8 Nm (1.0 kgf/m, 7.2 lbf/ft)
- 2. WINDSHIELD WIPER MOTOR
- 3. 5P CONNECTOR
- 5.
Remove the link from the windshield wiper motor.
NOTE: Scribe a line across the link and windshield wiper linkage to show the original adjustment.
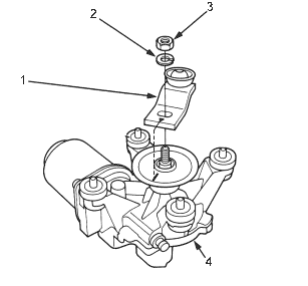
- 1. LINK
- 2. SPRING WASHER
- 3. 8 x 1.25 mm, 15 Nm (1.5 kgf/m, 11 lbf/ft)
- 4. WINDSHIELD WIPER MOTOR
- 6.Install in the reverse order of removal. Grease the moving parts. If necessary, replace any damaged clips. Check the wiper motor operation.