PDF p. 987 · 20-51
SRS components are located in this area. Review the SRS component locations, precautions and procedures in the SRS section (24) before performing repairs or service.
NOTE:
- When prying with a flat-tip screwdriver, wrap it with protective tape and apply protective tape around the related parts, to prevent damage.
- An assistant is helpful when removing and installing the dashboard.
- Take care not to scratch the dashboard, body and other related parts.
- Wear gloves to protect your hands.
- LHD is shown, RHD is symmetrical.
- 1.Remove:
- Front/rear console (See Page 20-47).
- Centre panel (See Page 20-48).
- Glove box (See Page 20-49).
- Driver pocket (See Page 20-50).
- Front pillar trim (See Page 20-41).
- Steering column (see section 17)
- Front passenger’s airbag (see section 24)
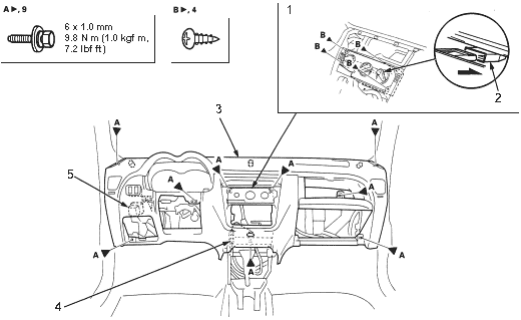
- 2.Remove the screw, then set the heater control unit to the heater unit hole.
- 3.Disconnect the gauge sub harness connector and beverage holder light connector.
- 4.Remove the bolts, then carefully remove the dashboard through the door opening.
 : Bolt, screw location
- 5.Install in the reverse order of removal and notes the following items:
- Make sure the dashboard fits onto the guide pins correctly.
- 1.HEATER CONTROL UNIT
- 2.HEATER UNIT
- 3.DASHBOARD
- 4.BEVERAGE HOLDER LIGHT CONNECTOR
- 5.GAUGE SUB HARNESS
- Before tightening the bolts, make sure the dashboard wire harnesses are not pinched.
- Make sure the connectors are plugged in properly and the antenna lead is connected properly.