PDF p. 1022 · 20-86
Component Location Index
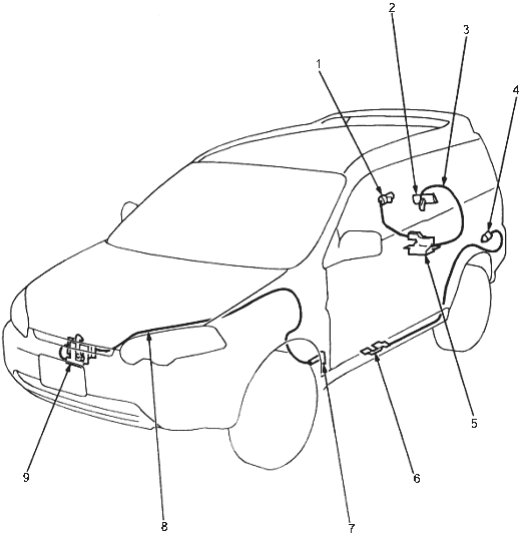
- 1. TAILGATE LOCK CYLINDER, Replacement, (See Page 20-93).
- 2. TAILGATE HANDLE, Replacement, (See Page 20-92).
- 3. TAILGATE OPENER CABLE,
- 4. FUEL LID LATCH, Replacement, (See Page 20-91).
- 5. TAILGATE LATCH, Replacement, (See Page 20-92).
- 6. FUEL LID OPENER, Replacement, (See Page 20-90).
- 7. HOOD OPENER, Replacement, (See Page 20-89).
- 8. HOOD OPENER CABLE
- 9. HOOD LATCH, Replacement, (See Page 20-89).
PDF p. 1023 · 20-87
Hood Opener Cable Replacement
NOTE: Take care not to scratch the body and related parts.
- 1.Remove:
- Front Grille (See Page 20-76).
- Inner fender (See Page 20-83).
- Kick panel (See Page 20-41).
- 2.Disconnect the hood opener cable from the hood latch (See Page 20-89).
- 3.Using a clip remover, detach the clips from the body, then remove the hood opener cable from the vehicle.
 : Clip locations
LHD: 4, RHD: 5
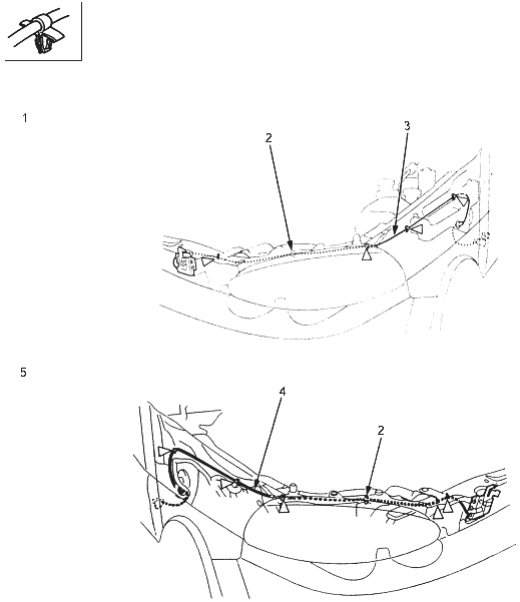
- 1. LHD:
- 2. Route the opener cable through the hole in the body.
- 3. HOOD OPENER CABLE
- 4. HOOD OPENER CABLE
- 5. RHD:
- 4.Install in the reverse order of removal and replace any damaged clips.
PDF p. 1024 · 20-88
Fuel Lid Opener Cable Replacement
NOTE: Take care not to scratch the body and related parts.
- 1.Remove:
- Side trim (See Page 20-41).
- Rear seat-back (See Page 20-59).
- Rear seat cushion (See Page 20-59).
- Rear side (See Page 20-41).
- Carpet as necessary, (See Page 20-46).
- 2.Disconnect the fuel lid opener cable form the fuel lid opener (See Page 20-90).
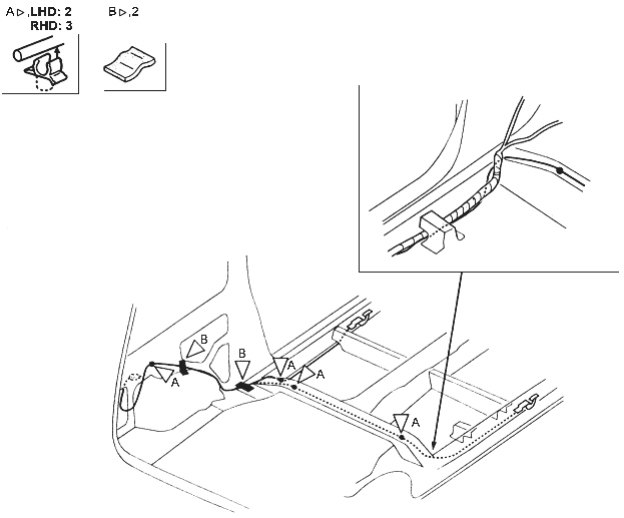
- 3.Release the fuel lid opener cable from the clips and remove the cable cushion, then remove the fuel lid opener cable.
 : Clip, cable cushion locations
- 4.Install in the reverse order of removal and replace any damaged clips and cable cushions.
PDF p. 1025 · 20-89
Hood Release Handle Replacement
NOTE: Take care not to scratch the body and related parts.
- 1.Remove the kick panel (See Page 20-41).
- 2.Remove the bolts, then remove the hood release handle.
 : Bolt locations, 2
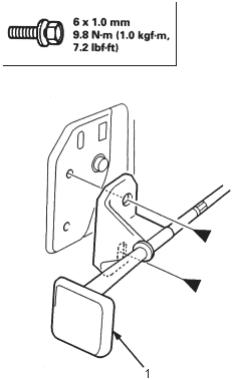
- 1. HOOD RELEASE HANDLE
- 3.Install in the reverse order of removal and make sure the hood opens properly.
Hood Latch Replacement
NOTE: Take care not to scratch the body and related parts.
- 1.Remove the front bumper (See Page 20-64).
- 2.Remove the bolts, then remove the hood latch. Disconnect the hood opener cable form the hood latch.
 : Bolt locations, 3
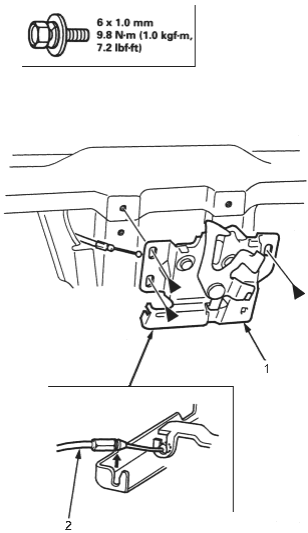
- 1. HOOD LATCH
- 2. HOOD OPENER CABLE
PDF p. 1026 · 20-90
- 3.Install in the reverse order of removal and note these items:
- Grease each location of the hood latch indicated by the arrows.
- Make sure the hood opener cable is connected properly.
- Adjust the hood latch alignment (See Page 20-68).
- Make sure the hood locks securely.
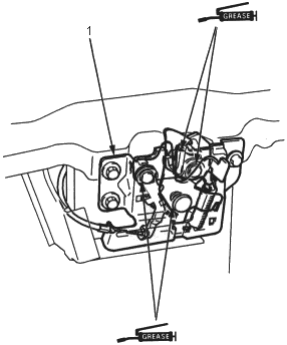
- 1. HOOD LATCH
Fuel Lid Opener Replacement
NOTE: Take care not to scratch the related parts.
- 1.Remove:
- Side trim (See Page 20-41).
- Carpet (as necessary, (See Page 20-46).
- 2.Remove the bolts, then remove the fuel lid opener. Disconnect the fuel lid opener cable from the fuel lid opener.
 : Bolt locations, 2
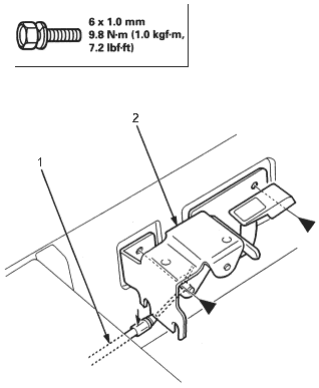
- 1. FUEL LID OPENER CABLE
- 2. FUEL LID OPENER
- 3.Install in the reverse order of removal and make sure the fuel lid opener cable is connected properly.
PDF p. 1027 · 20-91
NOTE: Take care not to scratch the related parts.
- 1.Remove the left side trim (See Page 20-41).
- 2.Turn the fuel lid latch 90° and remove it.
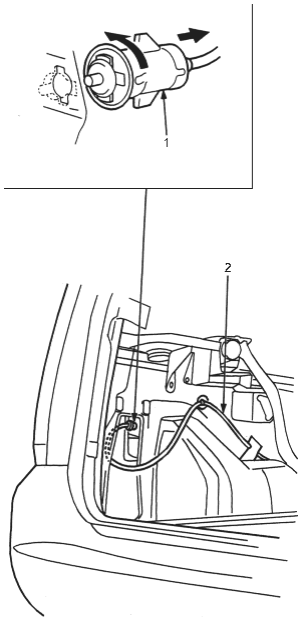
- 1. FUEL LID LATCH
- 2. FUEL LID OPENER CABLE
- 3.Install in the reverse order of removal and note these items:
- Grease each location indicted by the arrows.
- Make sure the fuel lid opens properly and locks securely.
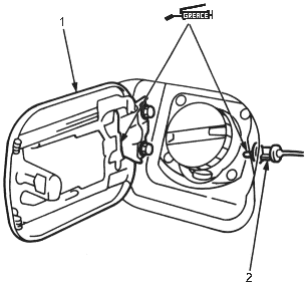
- 1. FUEL LID
- 2. FUEL LID LATCH
- 4.Check that the fuel lid fits flush against the body. If necessary, adjust it.
 : Bolt locations, 2
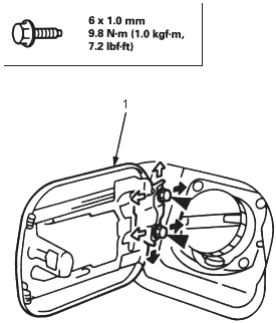
- 1. FUEL LID
PDF p. 1028 · 20-92
Tailgate Handle Replacement
NOTE: Take care not to scratch the related parts.
- 1.Remove the rear license trim (See Page 20-76).
- 2.Remove the tailgate opener cable from the tailgate handle.
- 3.Remove the nuts, then remove the tailgate handle.
 : Nut locations, 2
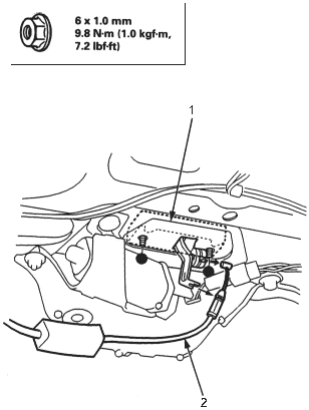
- 1. TAILGATE HANDLE
- 2. TAILGATE OPENER CABLE
- 4.Install in the reverse order of removal, make sure the tailgate opener cable is connected properly.
Tailgate Latch Replacement
NOTE: Take care not to scratch the related parts.
- 1.Remove the tailgate trim See Page 20-77).
- 2.Remove the tailgate latch switch connector and tailgate latch actuator connector, then detach the cylinder rod.
- 3.Remove the bolts, then pull the tailgate latch.
- 4.Disconnect the tailgate opener cable, then remove the tailgate latch.
 : Bolt locations, 3
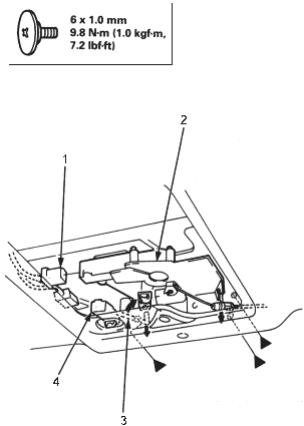
- 1. TAILGATE LATCH ACTUATOR CONNECTOR
- 2. TAILGATE LATCH
- 3. CYLINDER ROD
- 4. TAILGATE LATCH SWITCH CONNECTOR
PDF p. 1029 · 20-93
Tailgate Lock Cylinder Replacement
NOTE: Take care not to scratch the related parts.
- 1.Remove the tailgate trim (See Page 20-77).
- 2.Disconnect the cylinder rod, then remove the bolt.
 : Bolt location, 1
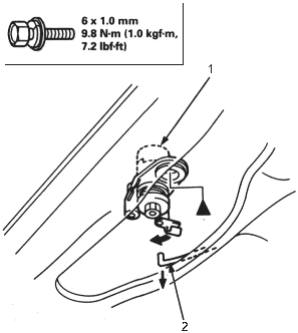
- 1. TAILGATE LOCK CYLINDER
- 2. CYLINDER ROD
- 3.Turn the tailgate lock cylinder and remove it.
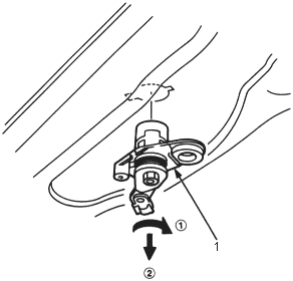
1 TAILGATE LOCK CYLINDER
- 4.Install in the reverse order of removal, make sure the cylinder cord is connected properly.