PDF p. 950 · 20-14
Component Location Index
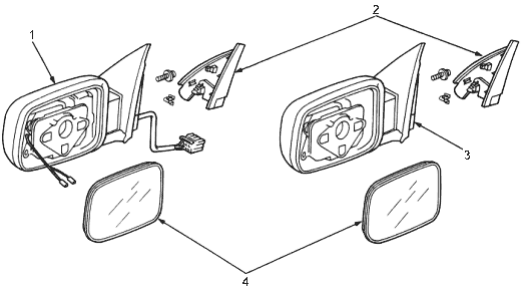
- 1. POWER MIRROR, Replacement (See Page 20-15).
- 2. MIRROR MOUNT COVER
- 3. MIRROR
- 4. MIRROR HOLDER, Replacement, (See Page 20-16).
Without roof spoiler With roof spoiler
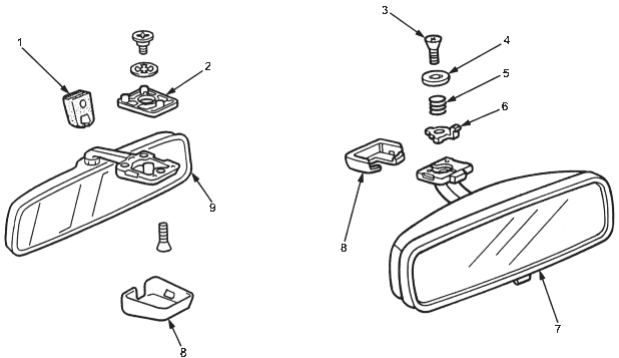
- 1. MIRROR HOLDER
- 2. STAY BASE
- 3. LOCK BOLT
- 4. LOCK WASHER
- 5. SPRING
- 6. HOOK PLATE
- 7. REARVIEW MIRROR, Replacement (See Page 20-16).
- 8. STAY COVER
- 9. REARVIEW MIRROR, Replacement (See Page 20-16).
PDF p. 951 · 20-15
Mirror Replacement
- 1.Lower the glass fully.
- 2.Remove
- Door Panel (See Page 20-4).
- Plastic cover (See Page 20-2).
- 3.Carefully pry out the mirror mount cover by hand.
 : Clip locations, 2
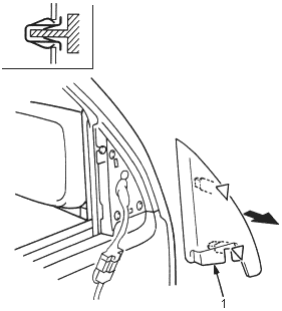
- 1. MIRROR MOUNT COVER
Manual mirror: Remove the cap, screw and knob, then remove the mirror mount cover.
- 4.Disconnect the connector and detach the harness clip, then remove the bolts securing the power mirror.
 Screw locations, 3
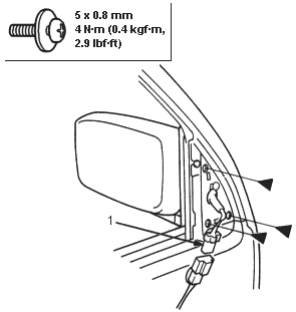
- 1. CONNECTOR
- 5.Loosen the screw, then remove the mirror.
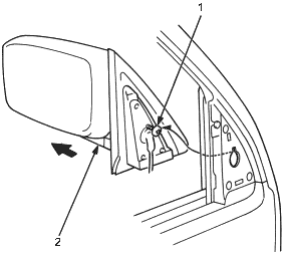
- 1. SCREW
- 2. MIRROR
- 6.Install in the reverse order of removal and note the following items:
- Make sure the connector is plugged in properly.
- Attach the harness clip.
PDF p. 952 · 20-16
Mirror Holder Replacement
NOTE:
- Take care not to scratch the mirror.
- Wear gloves to remove and install the mirror holder.
- 1.Carefully pull out the bottom edge of the mirror holder by hand. If necessary, disconnect the heater connector.
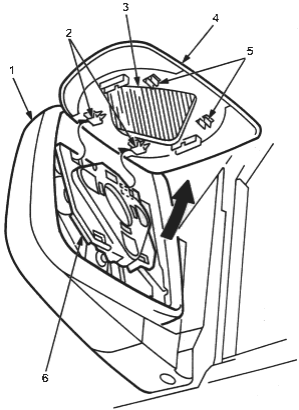
- 1. MIRROR
- 2. HOOKS
- 3. ADHESIVE
- 4. MIRROR HOLDER
- 5. CLIPS
- 6. ACTUATOR
- 2.Separate the mirror holder from the actuator by slowly pulling them apart.
- 3.Reattach the hooks of the mirror holder to the actuator, then position the mirror holder on the actuator. Carefully push the clip portions of the mirror holder until the mirror holder locks into place.
- 4.Check the actuator operation.
Rearview Mirror Replacement
Without roof spoiler
- 1.Remove the stay cover
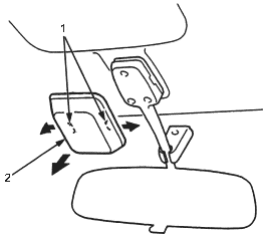
- 1. HOOKS
- 2. STAY COVER
- 2.Remove the mirror holder.
- 3.Remove the screws, then remove the rearview mirror.
 Screw locations, 3
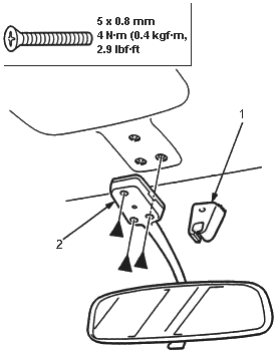
- 3. MIRROR HOLDER
- 4. REARVIEW MIRROR
- 4.Install in the reverse order of removal.
PDF p. 953 · 20-17
With roof spoiler
- 1.Remove the stay cover.
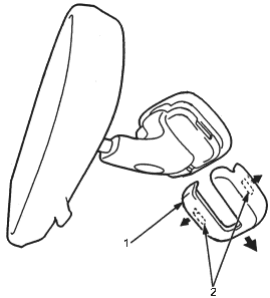
- 1. STAY COVER
- 2. HOOKS
- 2.Loosen the screw, then slide the rearview mirror down toward the bottom of the windshield.
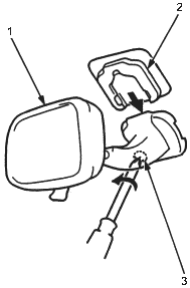
- 1. REARVIEW MIRROR
- 2. LUG
- 3. SCREW
- 3.If necessary, remove the lock bolt (left-handed bolt). Remove the lock washer and spring from the mirror stay.
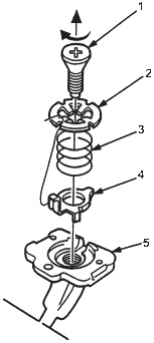
- 1. LOCK BOLT (LEFT-HANDED BOLT)
- 2. LOCK WASHER
- 3. SPRING
- 4. HOOK PLATE
- 5. MIRROR STAY