PDF p. 938 · 20-2
Component Location Index
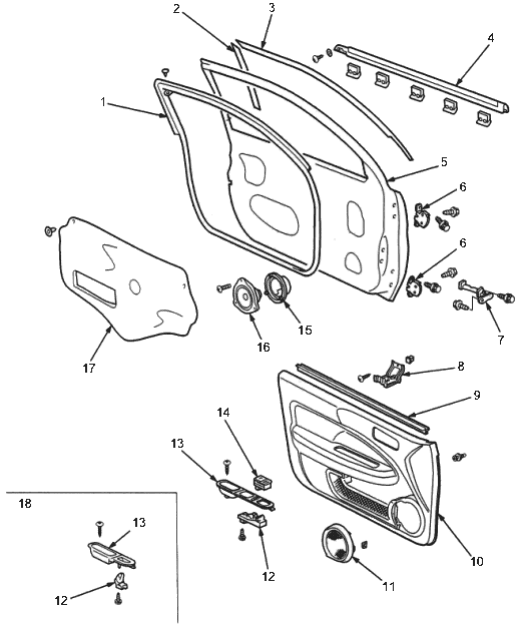
- 1. DOOR WEATHERSTRIP
- 2. CENTRE CHANNEL TAPE, Replacement, (See Page 20-11)
- 3. UPPER CHANNEL TAPE, Replacement, (See Page 20-11)
- 4. DOOR MOLDING
- 5. DOOR, Replacement,. (See Page 20-13)
- 6. HINGE
- 7. DETENT ROD
- 8. PULL POCKET BRACKET
- 9. INNER WEATHERSTRIP
- 10. DOOR PANEL, Removal and Installation, (See Page 20-4)
- 11. SPEAKER COVER
- 12. POWER WINDOW SWITCH
- 13. PULL POCKET PANEL
- 14. POWER MIRROR SWITCH
- 15. ADAPTER
- 16. SPEAKER
- 17. PLASTIC COVER
- 18. Passenger’s:
PDF p. 939 · 20-3
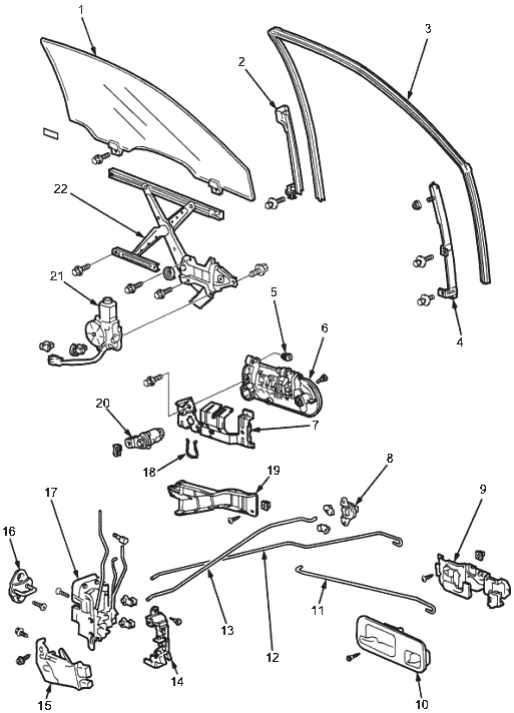
- 1. GLASS, Replacement, (See Page 20-9)
- 2. CENTRE LOWER CHANNEL
- 3. GLASS RUN CHANNEL
- 4. FRONT LOWER CHANNEL
- 5. BUSH
- 6. OUTER HANDLE, Replacement, (See Page 20-5)
- 7. OUTER HANDLE PROTECTOR
- 8. ROD CRANK
- 9. INNER HANDLE
10 INNER HANDLE CASE - 11. FRONT LOCK ROD
- 12. INNER HANDLE ROD
- 13. REAR LOCK ROD
- 14. LATCH PROTECTOR
- 15. POWER DOOR LOCK ACTUATOR
- 16. STRIKER
- 17. LATCH, Replacement, (See Page 20-7)
- 18. RETAINER CLIP
- 19. ROD PROTECTOR
- 20. LOCK CYLINDER
- 21. POWER WINDOW MOTOR
- 22. REGULATOR, Replacement, (See Page 20-9)
PDF p. 940 · 20-4
Door Panel Removal and Installation
- 1.Remove the inner handle case. Take care not to scratch the door panel.
 : Screw location, 1
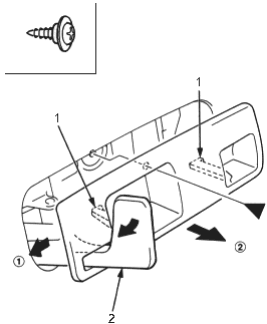
- 1. HOOK
- 2. INNER HANDLE
- 2.Remove the pull pocket panel, then disconnect the power window switch connector and power mirror switch connector.
 : Screw location, 1
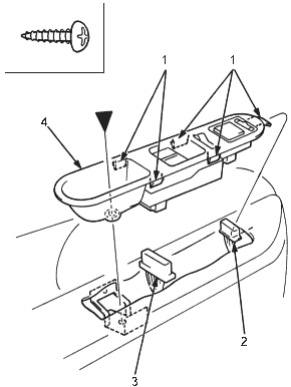
- 1. HOOKS
- 2. POWER MIRROR SWITCH CONNECTOR (For some models)
- 3. POWER WINDOW SWITCH CONNECTOR
- 4. PULL POCKET PANEL
- 3.Release the clips that hold the door panel with a trim pad remover (commercially available), then remove the door panel by pulling it upward.
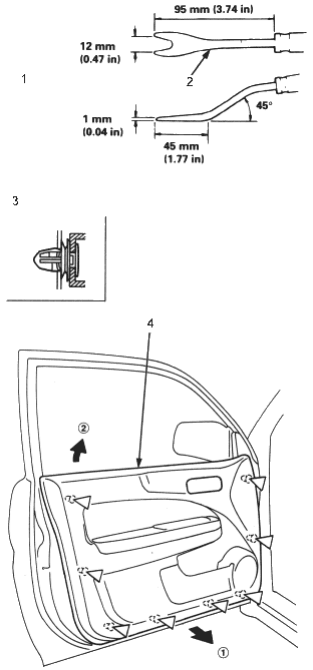
- 1. Snap on #A177, or equivalent
- 2. TRIM PAD REMOVER
- 3.
 : Clip locations, 8
- 4. DOOR PANEL
- 4.Install in the reverse order of removal; make sure the connectors and the courtesy light bulb socket are plugged in properly and the rod is connected properly.
PDF p. 941 · 20-5
Door Outer Handle Replacement
NOTE: Wear gloves to protect your hands when removing and installing the outer handle.
- 1.Raise the glass fully.
- 2.Remove
- Door panel (See Page 20-4).
- Plastic cover (as necessary (See Page 20-2).
- 3.Remove the screws from the latch.
 : Screw locations, 3
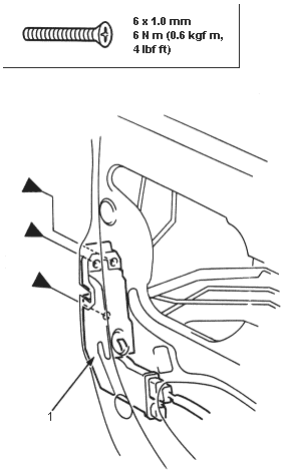
- 1. LATCH
- 4.Disconnect the cylinder rod. Release the retainer clip, then remove the lock cylinder.
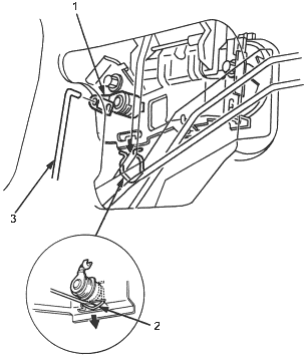
- 1. LOCK CYLINDER
- 2. RETAINER CLIP
- 3. CYLINDER ROD
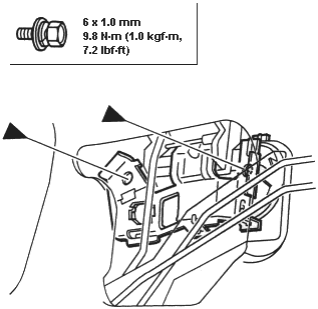
- 5.Remove the bolts.
 : Bolt locations, 2
PDF p. 942 · 20-6
- 6.Remove the outer handle protector from the outer handles
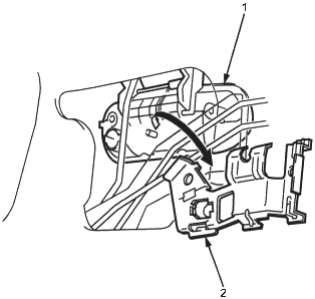
- 1. OUTER HANDLE
- 2. OUTER HANDLE PROTECTOR
- 7.
Pull out the outer handle. Pry the outer handle rod out of its joint using diagonal cutter.
NOTE:
- To ease reassembly, note distance ( A) of the outer handle rod on the joint, before disconnect it.
- Take care not to bend the outer handle rod.
- Use a shop towel to protect the opening in the door.
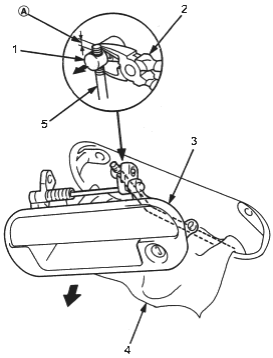
- 1. JOINT
- 2. DIAGONAL CUTTERS
- 3. OUTER HANDLE
- 4. SHOP TOWEL
- 5. OUTER HANDLE ROD
- 8.Replace the bushing on the outer handle.
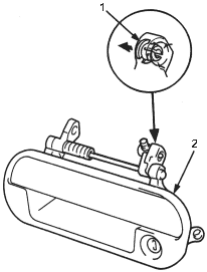
- 1. BUSHING
- 2. OUTER HANDLE
PDF p. 943 · 20-7
- 9.Install in the reverse order of removal, and note the following items:
- Make sure the connector is plugged in properly and each rod is connected securely.
- Make sure the door locks and opens properly.
- When installing the lock cylinder, leave the outer handle bolts loose so the inner protector does not interfere with the lock cylinder.
- Install the lock cylinder retaining clip on the handle, then install the lock cylinder. Make sure the clip is fully seated in the slot on the lock cylinder.
Door Latch Replacement
NOTE: Wear gloves to protect your hands when replacing the door latch.
- 1.Raise the glass fully.
- 2.Remove the outer handle (See Page 20-5).
- 3.Remove the glass run channel as needed from the centre lower channel. Remove the bolt, then remove the centre lower channel by pulling it downward.
 : Bolt location, 1
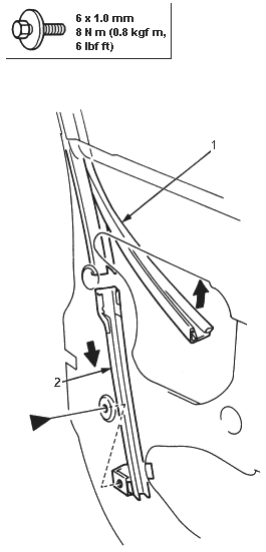
- 1. GLASS RUN CHANNEL
- 2. CENTRE LOWER CHANNEL
PDF p. 944 · 20-8
- 4.Remove the bolt, then remove the rod protector.
 : Bolt location, 1
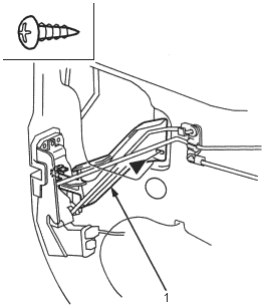
- 1. ROD PROTECTOR
- 5.Detach the rear lock rod from the rod crank. Remove the inner handle rod, then disconnect the power door lock actuator connector.
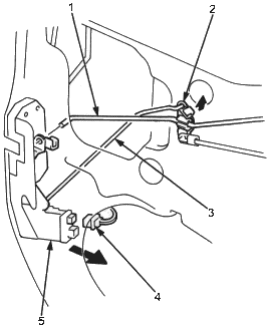
- 1. INNER HANDLE ROD
- 2. ROD CRANK
- 3. REAR LOCK ROD
- 4. CONNECTOR
- 5. LATCH
- 6.Remove the screws, then remove the inner handle and rod crank.
 : Screw locations, 3
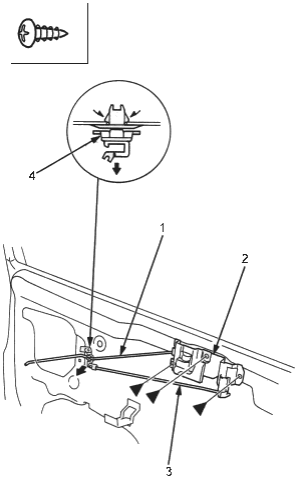
- 1. INNER HANDLE ROD
- 2. INNER HANDLE
- 3. FRONT LOCK ROD
- 4. ROD CRANK
- 7.Install in the reverse order of removal and note the following items.
- Make sure the actuator connectors are plugged in properly and each rod is connected securely.
- make sure the door locks and opens properly.
PDF p. 945 · 20-9
Door Glass and Regulator Replacement
NOTE: Wear gloves to protect your hands when removing and installing the glass and regulator.
- 1.Remove:
- Door panel (See Page 20-4).
- Plastic cover (See Page 20-2).
- 2.Carefully move the glass until you can see the bolts, then loosen them. Slide the guide to the rear, then remove the glass from the guide and carefully lower the glass. Take care not to drop the glass inside the door.
 : Bolt locations, 2
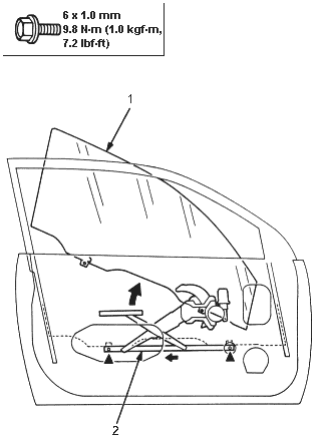
- 1. GLASS
- 2. GUIDE
- 3.
Disconnect and detach the connector and harness clip from the door. Scribe a line around the roller guide bolt to show the original adjustment. Remove the bolts and loosen the bolts, then remove the regulator through the hole in the door.
 : Bolt locations
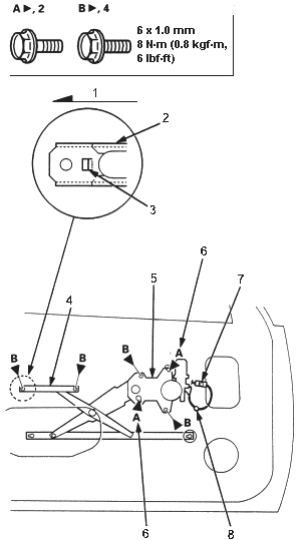
- 1. Rear side
- 2. ROLLER GUIDE
- 3. HOLE
- 4. ROLLER GUIDE
- 5. REGULATOR
- 6. Loosen.
- 7. CONNECTOR
- 8. HARNESS CLIP
PDF p. 946 · 20-10
- 4.Scribe a line across the regulator and sector gear.
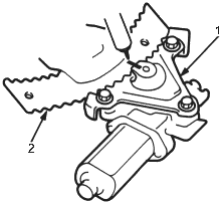
- 1. REGULATOR
- 2. SECTOR GEAR
- 5.Remove the bolts, then separate the power window motor and regulator. Grease the moving portions of the regulator indicated by the arrows.
 : Bolt locations, 3
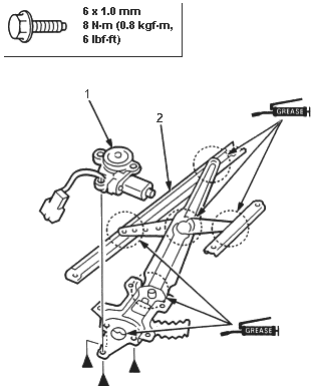
- 1. POWER WINDOW MOTOR
- 2. REGULATOR
- 6.Install in the reverse order of removal and note the following items:
- Roll the glass up and down to see if it moves freely without binding.
- Make sure that there is no clearance between the glass and glass run channel when the glass is closed.
PDF p. 947 · 20-11
Door Channel Tape Replacement
NOTE
- Keep dust away from the working area.
When working at lower temperatures, heat the door channel and door channel tape with a hair dryer.
Door channel: about 15°C (59°F).
Door channel tape: about 30°C (86°F).
- When heating the door channel tape, heat it evenly and gradually to prevent deformation.
- When pressing the door channel tape, slowly press it from the corner to prevent air bubbles and wrinkles.
- If there are air bubbles in the door channel tape, prick them with a pin, then release the air with your finger or a plastic squeegee.
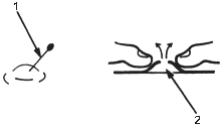
- 1. PIN
- 2. TRAPPED AIR
- If the air bubble is more than 10 mm (0.4 in) in diameter, peel up the door channel tape, then reapply it.
- 1.The following tools are required to replace the door channel type.
- Plastic squeegee
- Alcohol
- Sponge or shop towel
- Hair dryer
- Pin
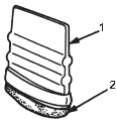
- 1. PLASTIC SQUEEGEE
- 2. FELT
- 2.
Remove the following parts.
Upper channel tape replacement
- Power mirror (See Page 20-15).
- Door weatherstrip (See Page 20-2).
- Glass run channel (See Page 20-3).
Centre channel tape replacement
- Power mirror (See Page 20-15).
- Door weatherstrip (See Page 20-2).
- Glass run channel(See Page 20-3).
- Door Molding(See Page 20-2).
- 3.Slowly peel up the old door channel tape while heating it with a hair dryer.
- 4.
Clean the door channel bonding surface with a sponge dampened in alcohol.
NOTE: After cleaning, keep oil, grease and water from getting on the surface.
- 5.Attach the door channel tape:
- -1.Peel the edge of the adhesive backing from the channel tape.
- -2.Fit the door channel tape to the door channel.
- -3.Apply the door channel tape to the door channel while peeling the adhesive backing from it a little at a time. Check that the channel tape is parallel with the door channel.
- -4.Push firmly on the door channel tape with a plastic squeegee (felt side).
- -1.
NOTE: To prevent air bubbles, slowly press the door channel tape around the door frame corner
- 6.As necessary, repeat the preceding steps.
- 7.Reinstall all remaining removed parts.
- 8.Check that the body colour on the door channel is covered by the door channel tape.
- 9.Check for water leaks. Do not squeeze the tip of the hose.
PDF p. 948 · 20-12
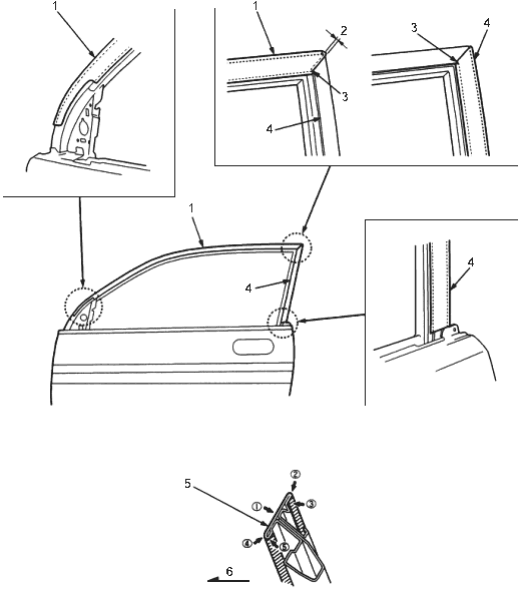
- 1. UPPER CHANNEL TAPE
- 2. 2 mm (0.08 in)
- 3. Align
- 4. CENTRE CHANNEL TAPE
- 5. CENTRE/UPPER CHANNEL TAPE
- 6. Outside
PDF p. 949 · 20-13
Door Position Adjustment
NOTE: After installing the door, check for a flush fit with the body, then check for equal gaps between the front, rear and bottom door edges and the body. Check that the door and body edges are parallel. Before adjusting, replace the mounting bolts.
- 1.Place the vehicle on a firm, level surface when adjusting the door.
- 2.Adjust at the hinges.
- Loosen the door mounting bolts slightly and move the door IN or OUT until it is flush with the body.
- Remove the inner fender (See Page 20-83). loosen the hinge mounting bolts slightly and move the door BACKWARD or FORWARD, UP or DOWN as necessary to equalise the gaps.
- Place a shop towel on the jack to prevent damage to the door when adjusting the door.
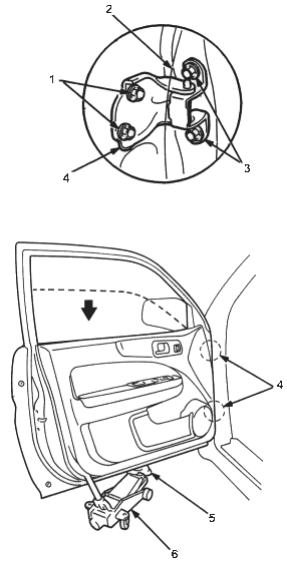
- 1. HINGE MOUNTING BOLTS 8 x 1.25 mm, 29 Nm (3.0 kgf/m, 22 lbf/ft)
- 2. DOOR
- 3. DOOR MOUNTING BOLTS 8 x 1.25, 29 Nm (3.0 kgf/m, 22 lbf/ft)
- 4. HINGE
- 5. SHOP TOWEL
- 6. JACK
- 3.Check that the door and body edges are parallel, if necessary, adjust the door cushions.
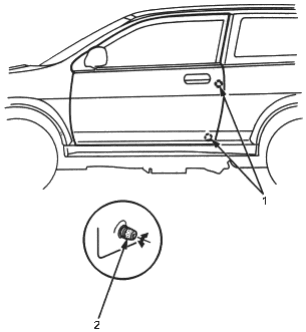
- 1. DOOR CUSHIONS
- 2. DOOR CUSHION
- 4.Grease the pivot portions of the hinges indicated by the arrows.
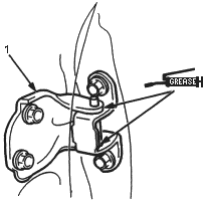
- 1. HINGE
- 5.Check for water leaks. Do not squeeze the tip of the hose.