PDF p. 1706 · 9-12
General Information/Repair Materials
The door mirror housing, license plate trim, and front grille are made from ABS resin.
They can be repaired if the damage or deformation is minor in nature. This section covers ABS repair. Repairing ABS is different from other resins such as PP.
NOTE:
- The ABS resin is the copolymer resin consisting of the three monomers of acrylonitrile, butadiene and styrene.
- Polycarbonate is a generic name for high polymers which have the carbonic ester structure in the structural unit. The most prominent feature of polycarbonate is its tensile strength which shows the same level of yielding point as metals in the normal temperature. It also has outstanding impact strength compared to other plastics.
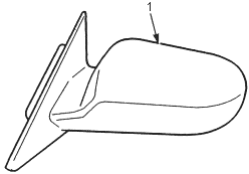
- 1. DOOR MIRROR HOUSING
NOTE: The following repair procedures also apply to the door out handle (PC) and front air spoiler, rear lower skirt and trunk lid spoiler (PUR).
Repair Materials
Examples:
Adhesive and filler: Epoxy
- Kemit TE2301 bond quick mender
Filler
- R-M Stop zinc (R-M)
- 3M 5900 Repair Material (Akzo)
NOTE: Follow the manufacturer's specification
Top Coat:
- Super ponacle II, Solo de Diamont, Diamont (R-M)
- Autocryl Auto base (Akzo)
- Super Centari (Dupont)
Primer/Primer surfacer:
Use when the resin material is exposed.
- R-M fast filler + R-M flex primer (R-M)
- Plasto flex primer 2 coat (Akzo)
- 1220RH-S filler primer (Dupont)
PDF p. 1707 · 9-13
Repair Procedures
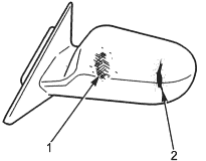
- 1. B. SHALLOW SCRATCH: 1mm APPROX. (0.04 in)
- 2. A. DEEP SCRATCH: 2mm APPROX. (0.08 in)
- A.Deep scratches, when filling:
- (1)Sand the damage section. (#120~#240)
- (2)Apply the filler and dry.
- (3)Sand the filler (#240~#400)
- (4)Coat with the primer/primer surfacer and dry.
- (5)Sand the primer surfacer. (#600~#800)
- (6)Top coating.
- (1)
- B.Shallow scratches:
- (1)Coat with the primer/primer surfacer.
- (2)Sand the primer surfacer. (#600~#800)
- (3)Top coating
- (1)
- C.Repaint:
- (1)Sand the primer surfacer. (#600~#800)
- (2)Top coating
- (1)
Refinishing Procedures
- 1.Base material reconditioning (sanding)
- -1.
Repaint the replacement part
Lightly sand the part with #400, #600 or #800.
- -2.
Slight scores or scratches
Use a flexible sanding block, wet sand the damaged section with #400, #600 sandpaper.
NOTE: Sand level to remove damage.
- -3.
Deep scratches when filling.
Use a flexible sanding block and wets and the damaged section with #240, #400 sandpaper.
- -1.
- 2.
Degreasing and cleaning
Clean the repaired area with wax and grease remover, then blow with compressed air.
NOTE: Wipe dust off surface with a tack cloth.
- 3.Filling, drying and sanding
Apply the filler in several thin coats.
NOTE: Mix and apply the filler according to the manufacturer's instructions.
- -1.
Dry the filler with an infrared dryer for 5 or 6 minutes.
Be sure to keep the dryer 40 - 50 cm (16 - 20 in.) away from the surface.
- -2.Scratch the filled surface with your nail. If the surface is white when scratched, dry sand and wet sand with the #240~#400 sandpaper. Be sure to sand level.
- 4.Cleaning with compressed air, and degreasing
Blow the entire area to be coated with compressed air, then clean with wax and grease remover.
NOTE: Clean the whole surface to the help the masking tape adhere securely.
PDF p. 1708 · 9-14
- 5.
Masking
Use the masking tape and paper to mask the area that should not be sprayed.
- 6.Coat with primer/primer surfacer, followed by drying and sanding.
- Spray the primer surfacer over the filled area.
- The coating thickness should be 20 - 25 microns.
NOTE: Follow the primer/primer surfacer manufacturer's instruction.
- -1.Drying
- Let the primer surfacer dry naturally for 5 to 10 minutes, then dry with an infrared dryer.
- Be sure to keep the dryer 40 - 50 cm (16 - 20 in.) away from the paint film.
- -2.
Sanding
Lightly dry sand the whole area to be painted with #600, #800 sandpaper.
- 7.Blow off with compressed air, then clean with wax and grease remover.
NOTE: Clean the whole surface to help the masking tape adhere securely.
- 8.Top coating
- Remove dust with a tack cloth before spraying.
- Spray the top coating. Spray until the primer surfacer is covered.
- The coating thickness should be 30 - 35 microns.
NOTE: For the recommended top coat paint, refer to "Example of repair materials".
| Solid color: | Colour enamel + clear coat |
| Metallic: | Metallic enamel + clear coat |
| Pearl: | Pearl enamel + clear coat |
- 9.
Drying
After top coating for about 10 minutes, then dry with an infrared dryer.
NOTE: Follow the paint manufacturer's specification to dry properly.