PDF p. 1685 · 8-5
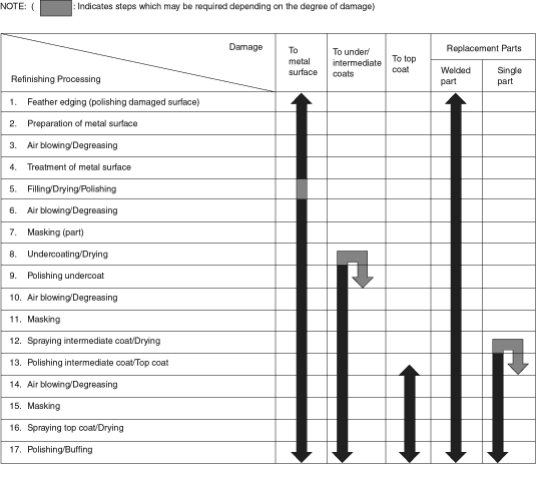
PDF p. 1686 · 8-6
- 1.
Featheredging (polishing damaged areas)
Damage to metal surface
- Sand the damaged area flat and smooth with a double action sander and #60 or #80 disc paper.
- Sand the boundary between the metal surface and undercoat with a double action sander and #180 or #280 disc paper. Try to sand a larger area than the damage.
NOTE:
- Make sure there is no height difference between the metal surface and undercoat.
- If double action sander is not available, use a rubber block and wrap sandpaper around it to sand the surface.
Damage to
Undercoat
Intermediate coat
Top coat
Paint coat on replacement parts
Sand the damaged surface flat and smooth with a double action sander and #280 or #320 paper.
NOTE:
- If double action sander is not available, use a rubber pad and wet or dry sand the surface with #280, #320, #400 or #600 sandpaper.
- After sanding, check that the surface is flat and smooth.
- Perform the operations detailed in “damage to metal surface” above for areas where parts are welded to the body.
- 2.
Preparation of metal surface
Remove all corrosion from the damaged area using #180 or #280 paper.
- 3.Air Blowing/Degreasing
- Air blow the sanded area, then degrease with a wax and grease remover.
- Use the following materials:
- 38125 Enamel Reducer (Dupont)
- Spies Hecker Silicon Remover (Hoechst)
- Standox Silicon Remover (Herberts)
- 4.Treatment of metal surface
- Brush or spray a solution of chrome phosphate or washer primer on the exposed metal surface.
- Use the following materials to treat the metal surface:
- 2145 Kwik-Prep TM (Dupont)
- 6155/6165 Vari Prim Self Etching Primer TM (Dupont)
- Spies Hecker Priomat 1:1 Wash Primer 3688 (Hoechst)
- Standox Etching Adhesion Primer (Herberts)
NOTE:
- Follow the manufacturer’s instructions.
- Treat the metal surface, as much as possible, to provide a better bonding surface for the subsequent paint.
- 5.Application of Filler, Drying and Sanding
- Small cracks or pinholes in the sheet metal should be repaired with a filler and sanded flat and smooth.
NOTE:
- Mix the putty with the hardener in the correct ratio.
- Follow the filler manufacturer’s instructions.
PDF p. 1687 · 8-7
- Allow the filler to air dry for about 5-6 minutes, then force dry with an infra-red lamp.
NOTE: Keep the lamp 40-50 cm (16-20 in) from the filler when drying.
- Stop drying the filler if a white mark appears when the surface is scratched with your nail. Wet or dry sand the surface flat and smooth with a #280 or #320 sandpaper.
- 6.Air Blowing/Degreasing
- Blow the surface to be repaired with compressed air, then degrease with a wax and grease remover.
Use the following materials:
- 38125 Enamel Reducer (Dupont).
- Spies Hecker Silicon Remover (Hoechst).
- Standox Silicon Remover (Herberts).
NOTE: Also clean and degrease surfaces where masking tape will be attached.
- 7.
Masking
Mask the areas surrounding the damage to prevent overspray from the primer.
- 8.Application and Drying of Primer/Drying
Spray the primer over the filler and surface (use epoxy or urethane 2-part primer).
Spray: 2-3 coats.
Use the following materials:
- 615S Primer Surfacer (Dupont).
- Primer Surfacer EP (Akzo).
- NPS735 Urethane Primer Surfacer (R-M).
- Spies Hecker Permacron HS Surfacer (Hoechst).
- Standox 2K HS Filler (Herberts).
- Let the primer air dry for 5-10 minutes, then force dry with a infra-red lamp.
NOTE: Keep the lamp 40-50 cm (16-20 in) from the surfaces.
- 9.Application of Polishing Undercoat
- Remove the masking paper and tape.
- Check that the undercoat has dried thoroughly, then dry or wet sand the surface with #280 or #320 sandpaper.
NOTE:
- Use a rubber block and sand flat and smooth.
- Sand the entire surface to be refinished.
- 10.Air Blowing/Degreasing
- Blow all the surfaces with compressed air then degrease with a wax and grease remover.
Use the following materials:
- 38125 Enamel Reducer (Dupont).
- Spies Hecker Silicon Remover (Hoechst).
- Standox Silicon Remover (Herberts).
NOTE: Also clean and degrease surfaces where masking tape will be attached.
- 11.
Masking
Mask the undamaged areas surrounding the damage to prevent overspray from primer surfacer (undercoat).
NOTE: Use masking tape and paper to mask the body. A vinyl cover may also be used to effectively mask the body.
PDF p. 1688 · 8-8
- 12.Application of Intermediate Coat (same colour as enamel) top coat spraying/drying
- Use the same colour paint as the top coat. Spray it over the surface until the undercoat (primer surfacer) is fully covered.
- Spray the paint slightly thicker than normal to allow for loss during subsequent polishing
- Super ponacle II (R-M).
- Super Centri (Dupont).
- Auto cryl (Akzo).
- Spies Hecker Permacron 2K Acrylic Top Coat (Hoechst).
- Standox Standocryl 2K (Herberts).
- 13.Polishing of Intermediate Coat
- Check that the paint coat has dried thoroughly, then dry or wet sand the surface with #600 and #800 sandpaper.
NOTE: Use a rubber block to sand flat and smooth, being careful not to expose the undercoat.
Polishing the Top Coat (if damaged)
Use the same technique described above.
- 14.Air Blowing/Degreasing
- Blow the entire surface with compressed air then degrease with a wax and grease remover.
Use the following materials:
- 38125 Enamel Reducer (Dupont).
- Spies Hecker Silicon Remover (Hoechst).
- Standox Silicon Remover (Herberts).
- For shading or spot painting, polish the area with a polishing compound. Sand with a #2000 paper to give a better bonding surface for the subsequent paint.
- 15.Masking
- Remove all existing masking paper, then mask with new paper.
- Use a heat resistant type masking tape (SCOTCH TAPE) where tape is attached directly to the body.
- Use brown paper or masking roll paper to cover.
NOTE:
- Mask the area surrounding the damage sufficiently to prevent overspray. It is also good practice to use a vinyl cover to protect other areas.
- Protect resin parts with aluminium foil under the brown paper or masking paper to prevent damage due to heat during baking.
- 16.Application of Top Coat Spraying/Drying
- Prior to putting the vehicle in the painting booth, thoroughly clean the interior and spray water over the floor. Be careful about blowing dust and dirt.
- Blow with compressed air and degrease the surface before spraying the paint. Also clean the surface with a tack cloth.
- Spray colour matched top coat over the prepared surface. Apply 2-3 coats in two directions until the intermediate coat is fully covered.
NOTE: For application of the top coat, refer to step 12 "Application of Intermediate Coat".
Solid colour: Colour enamel + Colour clear coat Metallic colour: Metallic enamel + Clear coat Pearl colour: Pearl enamel + Clear coat
PDF p. 1689 · 8-9
- After spraying, allow the paint to settle for about 10 minutes, then force dry with an infra-red lamp.
NOTE: Follow the paint manufacturer's instructions.
- 17.Polishing/Buffing
- Let the paint dry gradually, then polish the surface carefully using a polishing compound and sponge buff.
- To remove lint or dirt, wet sand the surface with #2000 sand paper or finer first, then polish with compound.
NOTE: Polish all roughness caused by sanding thoroughly. To do this, first polish with very fine compound, then with ultra fine compound.
- After polishing, remove the masking paper and tape, then wash the entire vehicle thoroughly.