PDF p. 1651 · 4-41
- 1.Remove the related parts.
- Rear bumper.
- Rear bumper extension.
- Tailgate striker.
- Other related parts.
- Trim, panels and luggage compartment fitting..
- Taillights.
- 2.Pull out and straighten the damaged area.
- Pull out the related rear side inner panel, rear pillar gutter, rear floor, rear side frame, and other damaged parts with the frame straightener.
- Attach the vehicle to the frame straightener by tightening the underbody clamps located at the jack-up points on the bottom of the side sill and the side sill side flanges.
- 3.Cut and pry off the rear panel.
- Centre punch around the spot weld imprints with the rear side outer panel and rear floor.
- Drill holes using the spot cutter.
NOTE: Be careful not to let holes penetrate through to the rear floor.
- Remove weld flange with a chisel.
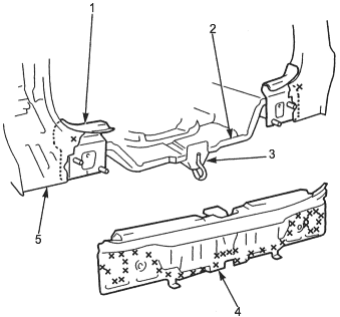
- 1. REAR PANEL SIDE STIFFENER
- 2. REAR FLOOR
- 3. TIE DOWN STIFFENER
- 4. REAR PANEL
- 5. REAR PILLAR GUTTER
- 4.Check the rear panel side stiffener for damage. Replace the rear panel side stiffener if necessary.
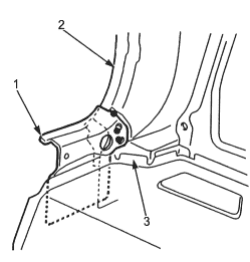
- 1. REAR PANEL SIDE STIFFENER
- 2. REAR PILLAR STIFFENER
- 3. REAR FLOOR
- 5.
Straighten the related parts.
Repair all cracks, holes or other defects by MIG o gas welding.
- 6.Set the new rear panel side stiffener and the new rear panel.
- Paint the inside of the rear panel with the body colour.
- Remove the undercoat from the welding section of the panels and expose the steel plate using a disc sander.
NOTE: Apply the spot sealer to the welding surface when spot welding.
- Check the rear panel position using the body dimensional drawings (see section 6).
PDF p. 1652 · 4-42
- 7.Tack weld the rear panel and rear panel side stiffener.
- Weld the clamped sections for temporary installation.
- 8.
Open and close the tailgate to check for proper installation.
NOTE: Make sure the tailgate locks securely.
Position the rear pillar gutter and rear panel in its correct position with the rear bumper and taillight installed.
- 9.Perform the main welding.
- Make 20% to 30% more spot welds than there were holes drilled.
NOTE: If there is no room for spot welds, compensate by using MIG welds.
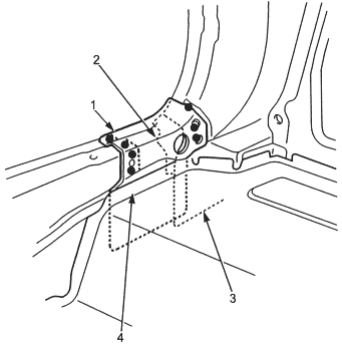
- 1. REAR PANEL SIDE STIFFENER
- 2. REAR PILLAR GUTTER
- 3. REAR PILLAR STIFFENER
- 4. REAR FLOOR
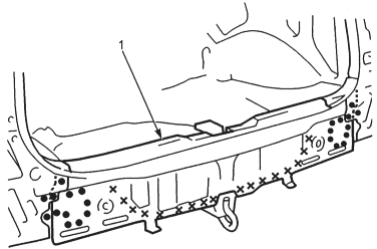
- 1. REAL PANEL
- 10.Finish the welding area.
- Level the welded areas with a disc sander, then even out high areas with a hammer. Be careful not to deform them.
- Even out the spot welded flange area with a hammer and dolly.
- 11.Apply the sealer (see section 5).
- Apply sealer to the rear side outer joint and around the taillight areas of the rear panel.
- Apply sealer to the rear panel and rear floor joint.
- 12.Apply the paint. See Paint Repair section.
PDF p. 1653 · 4-43
- 13.Apply anti-rust agent (see section 7).
- Apply agent to the outer panel, rear panel and rear floor joint.
- Apply agent to the inside of the jack position stiffener.
- 14.Install the related parts in the reverse order in which they were remove.
- 15.Inspect, check and clean.
- Adjust the clearance with the tailgate, then adjust the level differences and fit. Check operation.
- Test for leaks in the trunk compartment.
- Clean the trunk floor.