PDF p. 1631 · 4-22
- 5.Check the front pillar lower stiffener for position and damage, if necessary replace it.
- 6.
Straighten the related parts.
Fill any holes by MIG or gas welding and even out with a hammer and dolly.
- 7.Set the new front pillar lower stiffener and repair part.
- Remove the undercoat from both sides of the areas to be spot welded with a sander to expose the steel plate.
NOTE: Apply the spot sealer to the welding surface of the new front pillar lower stiffener
- Clamp the new front pillar stiffener and check the position.
- Tack weld the new front pillar stiffener.
- Align the repair part with the top cut section, then cut it with a handsaw.
NOTE: Cut the side sill joint with a handsaw leaving an overlap of 30 mm (1.2 in.)
- Attach the patch to the cut section of the front pillar (body side) and plug weld it.
- Check the body dimensions (see section 6)
- Clamp the repair part and temporarily install the door, and check the door hinge mounting position.
- Remove the repair part.
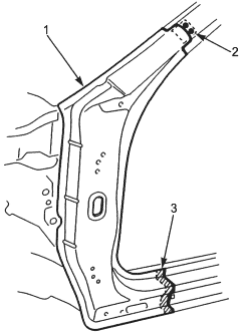
- 1. OUTER PANEL (Repair part)
- 2. PATCH
- 3. Overlap 30 mm (1.2 in)
- 8.Weld new front pillar stiffener.
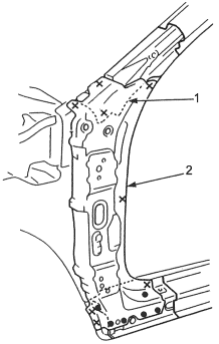
- 1. FRONT PILLAR UPPER STIFFENER
- 2. FRONT PILLAR STIFFENER
PDF p. 1632 · 4-23
- 9.Set the repair part.
- Sand off the undercoat from both sides of the welded flange on the repair part.
- Clamp the repair part in place with vice-grips.
NOTE: Apply the spot sealer to the welding surface when spot welding.
- Check the body dimensions (see section 6).
- 10.Tack weld the repair part.
- Remove the vice-grips and install the front fender, door and windshield. Check for differences in level and clearance.
- 11.Perform the main welding.
- Weld the front pillar and side sill outer joints with a MIG welder.
- Make 20 to 30% more spot welds than there were holes drilled.
NOTE: If there is no room for spot welds, compensate by using MIG welds.
- Make 5 mm (0.2 in.) holes in the MIG weld holes with the repair part, and weld the lower stiffener and dashboard upper side member with a MIG welder.
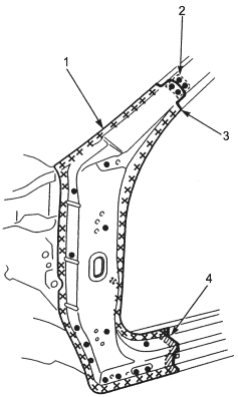
- 1. OUTER PANEL (Repair part)
- 2. PATCH
- 3. Butt welding
- 4. Fillet welding
- 12.Weld the wheelhouse upper member
- 13.Finish the welding areas.
- Grind the finishing allowance with a disc sander until it is smooth.
- Smooth the flanged section of the door opening with a hammer and dolly.
PDF p. 1633 · 4-24
- 14.Apply the sealer (see section 5).
- 15.
Apply the paint.
See Paint Repair section.
- 16.Apply anti-rust agent to the inside of the front pillar, wheelhouse upper member and side sill (see section 7).
- 17.Install the related parts.
- Install in the reverse order of removal.
- Check the door for proper installation and alignment with the fenders.
- 18.Clean and check.
- After installing the dashboard, check the lights and gauges for proper operation.
- Clean the passenger compartment and check for water leaks.