PDF p. 1630 · 4-21
- 1.Remove the related parts:
- Hood.
- Front fender.
- Door.
- Windshield.
- Side trim.
- Door opening trim.
- Kick panel.
- Dashboard.
- Front pillar trim.
- Wire harness, etc.
- Steering column.
- Steering hanger brace.
NOTE: Make sure that the right and left pillars are parallel with the windshield surface. Check the door for proper opening and closing.
- 2.Pull out and straighten the damaged area.
- Pull out the damaged area with the frame straightener before cutting off the wheelhouse upper member and front pillar.
NOTE: Pull out until the pillar is lined up with the surface of the windshield.
- With the pillar pulled out, pull out and straighten the related lower dashboard and floor section
- After pulling, check the inner pillar position using the body dimensional drawings (see section 6).
- 3.Remove the wheelhouse upper member carefully so it can be reused.
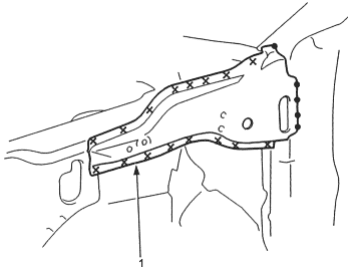
- 1. WHEELHOUSE UPPER MEMBER
- 4.Cut off the front pillar.
- Use a die grinder to cut the windshield and side sill areas.
NOTE: Be careful not to cut the inner section.
- Centre punch around the spot weld imprints.
- Drill holes using a spot cutter.
- Chisel off the weld flanges.
- Finish the burs at the drilled areas with a disc sander.
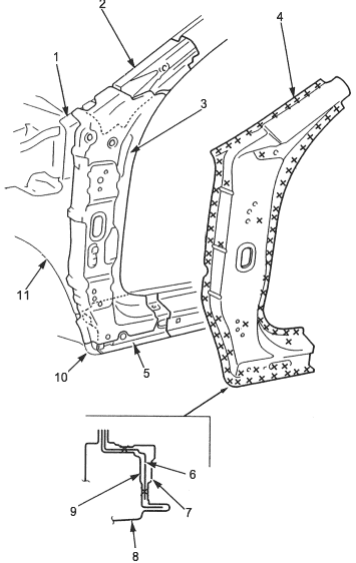
- 1. INNER UPPER
- 2. FRONT PILLAR UPPER STIFFENER
- 3. FRONT PILLAR STIFFENER
- 4. OUTER PANEL
- 5. SIDE SILL STIFFENER
- 6. FRONT PILLAR
- 7. OUTER PANEL
- 8. INSIDE SILL
- 9. SIDE SILL STIFFENER
- 10. FRONT SIDE OUTRIGGER
- 11. INNER LOWER