PDF p. 761 · 16-3
Inspection
- 1.Check the inboard boot and outboard boot on the driveshaft for cracks, damage, leaking grease and loose boot bands. If any damage is found, replace the boot and boot bands.
- 2.Turn the driveshaft by hand and make sure the splines and joint are not excessively loose.
- 3.Make sure the driveshaft is not twisted or cracked; if it is replace it.
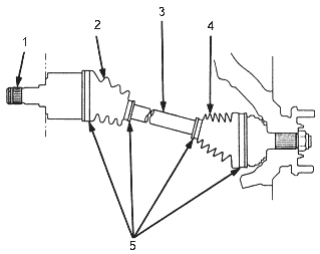
- 1. SPLINES
- 2. INBOARD BOOT
- 3. DRIVESHAFT
- 4. OUTBOARD BOOT
- 5. BOOT BANDS
Removal
- 1.Loosen the wheel nuts slightly.
- 2.Raise the front of the vehicle and support it with safety stands in the proper location (see section 1).
- 3.Remove the wheel nuts and front wheels.
- 4.Lift up the locking tab on the spindle nut, then remove the nut.
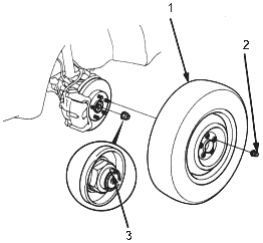
- 1. FRONT WHEEL
- 2. WHEEL NUT
- 3. SPINDLE NUT, 22 x 1.5 mm, Replace
- 5.If the right driveshaft is removed, drain the MTF (see section 13) or ATF (see section 14). It is not necessary to drain the transmission fluid when the left driveshaft is removed.
- 6.Hold the stabiliser link ball joint pin with a hexagonal wrench and remove the flange nut, then separate the front stabiliser link and front stabiliser.
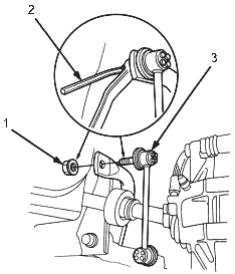
- 1. FLANGE NUT
- 2. HEXAGONAL WRENCH
- 3. FRONT STABILISER LINK
PDF p. 762 · 16-4
- 7.Remove the cotter pin from the lower arm ball joint castle nut and remove the nut.
- 8.Separate the ball joint from the lower arm with the special tool (see section 18).
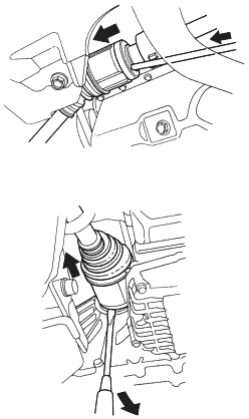
- 9.Pry the driveshaft assembly with a screwdriver, as shown, to force the set ring at the driveshaft end past the groove.
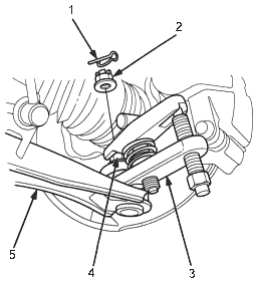
- 1. LOCK NUT, Replace
- 2. CASTLE NUT
- 3. BALL JOINT REMOVER, 28 mm, 07MAC-SL00200
- 4. HEX NUT
- 5. LOWER ARM
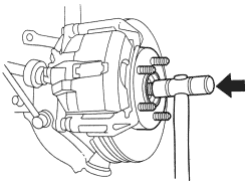
- 10.Pull the knuckle outward and remove the driveshaft outboard pin from the front wheel hub using a plastic hammer.
- 11.Prey the driveshaft assembly with a screwdriver as shown, to force the set ring at the driveshaft end past the groove. Be careful not to damage the oil seals when prying.
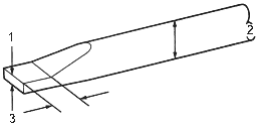
- 1. 3.5 mm (0.14 in)
- 2. 1.3 mm (0.5 in) I.D.
- 3. 7 mm (0.3 in)
- 12.Pull the inboard joint and remove the driveshaft from the differential case or bearing support as an assembly. Do not pull on the driveshaft, the inboard joint may come apart. Pull the driveshaft straight out to avoid damaging the differential oil seal or the intermediate shaft outer seal.
PDF p. 763 · 16-5
Disassembly
Inboard Joint Side:
- 1.Remove the set ring from the inboard joint.
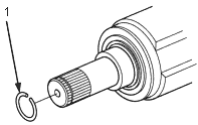
- 1. SET RING, Replace
- 2.Remove the boot bands. Take care not to damage the boot and dynamic damper.
- If the boot band is a welded type, cut the boot band.
- If the boot band is a double loop type, lift up the band boot.
Welded Type:
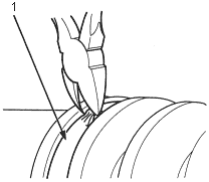
- 1. WELDED BAND, Replace
Double Loop Type:
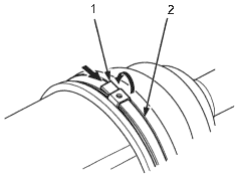
- 1. Band bend
- 2. DOUBLE LOOP BAND, Replace
- 3.Make a mark on each roller and inboard joint to identify the locations of rollers and grooves in the inboard joint. The remove the inboard joint and place on the shop towel. Be careful not to drop the rollers when separating them from the inboard joint.
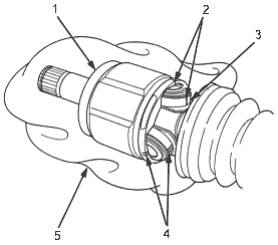
- 1. INBOARD JOINT
Check splines for wear or damage. Check inside bore for wear. Inspect for cracks - 2. Marks
- 3. ROLLER
- 4. Marks
- 5. SHOP TOWEL
- 4.Make a mark on the rollers and spider to identify the locations of rollers on the spider, then remove the rollers.
- 5.Remove the circlip.
- 6.Mark the spider and driveshaft to identify the position of the spider on the shaft.
- 7.Remove the spider using a commercially available bearing remover.
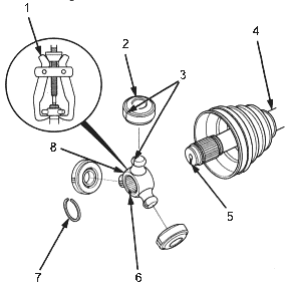
- 1. BEARING REMOVER
- 2. ROLLER
- 3. Marks
- 4. DRIVESHAFT
- 5. Mark
- 6. Mark
- 7. CIRCLIP
- 8. SPIDER
PDF p. 764 · 16-6
- 8.Wrap the splines on the driveshaft with vinyl tape to prevent damage to the inboard boot and dynamic damper.
- 9.Remove the inboard boot and dynamic damper. Take care not to damage the boot and dynamic damper.
- 10.Remove the vinyl tape.
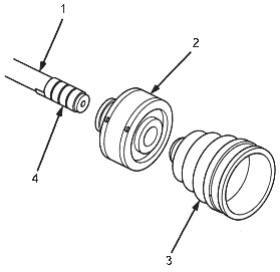
- 1. DRIVESHAFT
- 2. DYNAMIC DAMPER, Check for damage
- 3. INBOARD BOOT
Inspect for cracking, splitting and wear - 4. VINYL TAPE
Outboard Joint Side:
- 1.Lift up the three tabs with a screwdriver, then remove the boot bands. Take care not to damage the boot and dynamic damper.
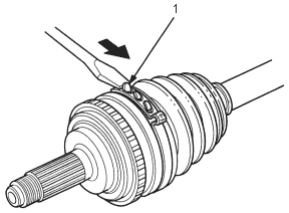
- 1. TAB
- 2.Slide the outboard boot to the inboard joint side. Take care not to damage the boot.
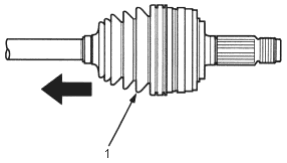
- 1. OUTBOARD BOOT
PDF p. 765 · 16-7
- 3.Wipe off the grease to expose the driveshaft and the outboard joint inner race.
- 4.Make a mark on the driveshaft at the same position of the outboard joint end with paint.
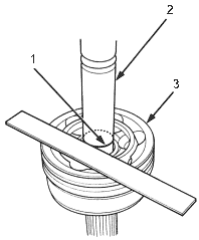
- 1. PAINT MARK
- 2. DRIVESHAFT
- 3. OUTBOARD JOINT END
- 5.Carefully clamp the driveshaft in a vice.
- 6.Remove the outboard joint using the special tools.
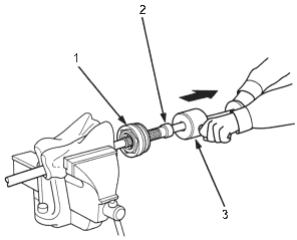
- 1. OUTBOARD JOINT
- 2. THREADED ADAPTER, 22 x 1.5 mm, 07XAC-0010100
- 3. SLIDING HAMMER SET, 07936-5790001
- 7.Remove the driveshaft from the vice.
- 8.Remove the stop ring from the driveshaft.
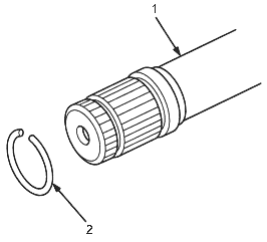
- 1. DRIVESHAFT
- 2. STOP RING, Replace
- 9.Wrap the splines on the driveshaft with vinyl tape to prevent damage to the outboard boot.
- 10.Remove the outboard boot. Take care not to damage the boot.
- 11.Remove the vinyl tape.
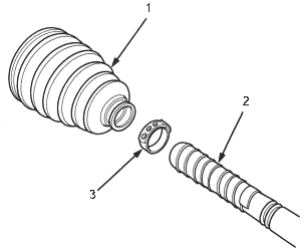
- 1. OUTBOARD BOOT
- 2. VINYL TAPE
- 3. BOOT BAND, Replace
PDF p. 766 · 16-8
Reassembly
NOTE:
- Clean the disassembled parts with solvent and dry them thoroughly with compressed air. Do not wash the rubber parts with solvent.
- Thoroughly pack both joints and both joint boots with the joint grease included in the new driveshaft set.
- The driveshaft uses a TPE (Thermoplastic Polyester Elastomer) outboard joint boot. Use the ear clamp type boot band in the outboard joint boot set. Grease quantity
Inboard joint: 130 -140 g (4.6 - 4.9 oz)
Outboard joint: 105 - 115 g (3.7 - 4.1 oz)
Inboard joint spline (A): 0.5 - 1.0 g (0.018 - 0.035 oz)
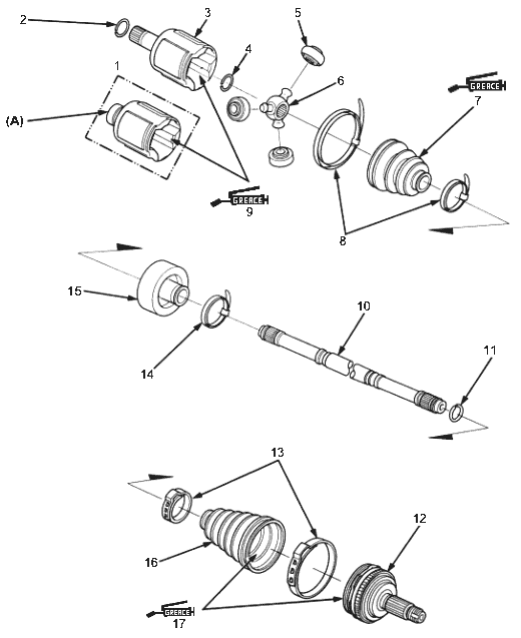
- 1. Left Driveshaft:
- 2. SET RING, Replace
- 3. INBOARD JOINT
- 4. CIRCLIP
- 5. ROLLER
- 6. SPIDER
- 7. INBOARD BOOT
Pack cavity with grease - 8. BOOT BANDS, Replace
- 9. Pack cavity with grease
- 10. DRIVESHAFT
- 11. STOP RING, Replace
- 12. OUTBOARD JOINT
- 13. BOOT BANDS, Replace
- 14. DYNAMIC DAMPER BAND, Replace
- 15. DYNAMIC DAMPER
- 16. OUTBOARD BOOT (TPE)
- 17. Pack cavity with grease
PDF p. 767 · 16-9
Inboard Joint Side:
- 1.Wrap the splines with vinyl tape to prevent damage to the inboard boot and dynamic damper.
- 2.Install the dynamic damper and inboard boot to the driveshaft, then remove the vinyl tape. Take care not to damage the inboard boot and dynamic damper.
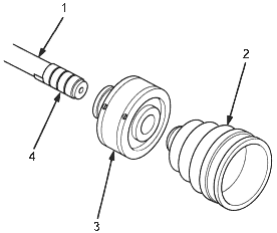
- 1. DRIVESHAFT
- 2. INBOARD BOOT
- 3. DYNAMIC DAMPER
- 4. VINYL TAPE
- 3.Install the spider onto the driveshaft by aligning the marks on the spider and end of the driveshaft.
- 4.Fit the circlip into the driveshaft groove. Always rotate the circlip in its groove to be sure it is fully seated.
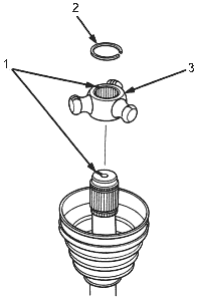
- 1. Marks
- 2. CIRCLIP
- 3. SPIDER
- 5.Fit the rollers to the spider with their high shoulders facing outward and note the following items:
- Reinstall the rollers in their original positions on the spider by aligning the marks.
- Hold the driveshaft pointed up to prevent the rollers from falling off.
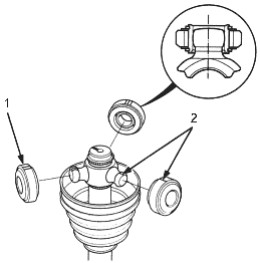
- 1. ROLLER
- 2. Marks
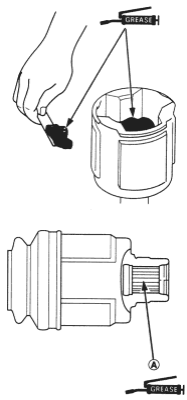
- 6.
Pack the inboard joint with the joint grease included in the new driveshaft set.
Grease quantity
Inboard joint: 130 - 140 g (4.6 - 4.9 oz) Inboard joint spline: 0.5 - 1.0 g (0.02 - 0.04 oz)
PDF p. 768 · 16-10
- 7.Fit the inboard joint onto the driveshaft and note the following items:
- Reinstall the inboard joint onto the driveshaft by aligning the marks on the inboard joint and the rollers.
- Hold the driveshaft so the inboard joint points up to prevent it from falling off.
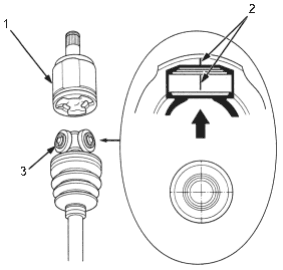
- 1. INBOARD JOINT
- 2. Marks
- 3. ROLLER
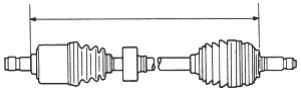
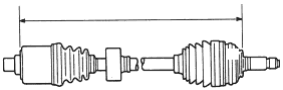
- 8.
Adjust the length of the driveshafts to the figure below, then adjust the boots to halfway between full compression and full extension. Make sure the ends of the boots seat in the grooves of the driveshaft and joint.
Standard:
Left driveshaft: 487 - 492 mm (19.2 - 19.4 in)
Right driveshaft: 506 - 511 mm (19.9 - 20.1 in)
Right driveshaft:
Left driveshaft:
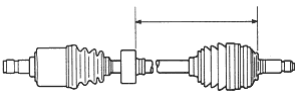
- 9.
Position the dynamic damper as shown below.
Standard:
Left driveshaft: 251 - 255 mm (9.9 - 10.0 in) Right driveshaft: 242 - 246 mm (9.5 - 9.7 in)
- 10.Fit the boot ends onto the driveshaft and the inboard joint, then install the boot bands with the band end towards the front of the vehicle.
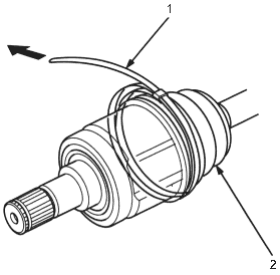
- 1. DOUBLE LOOP BAND, Replace
- 2. BOOT
PDF p. 769 · 16-11
- 11.Pull up the slack in the band by hand.
- 12.Mark a position on the band 10 -14 mm (0.4 - 0.6 in) from the clip.
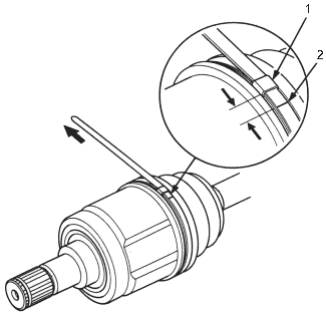
- 1. CLIP
- 2. Mark
- 13.Thread the free end of the band through the nose section of the commercially available boot band tool KD-3191 or equivalent and into the slot on the winding mandrel.
- 14.Place a wrench on the winding mandrel of the band tightening tool and tighten the band until the marked spot on the band meets the edge of the clip.
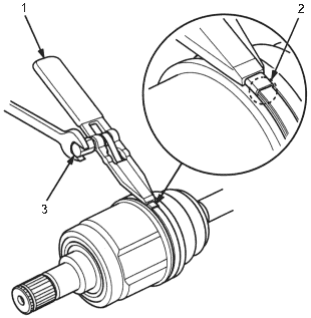
- 1. BAND TIGHTENING TOOL (Commercially available)
- 2. Mark spot
- 3. WINDING MANDREL
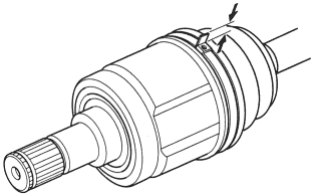
- 15.Lift up the band tightening tool to bend the free end of the band 90° to the clip. Centre punch the clip, then fold over the remaining tail onto the clip.
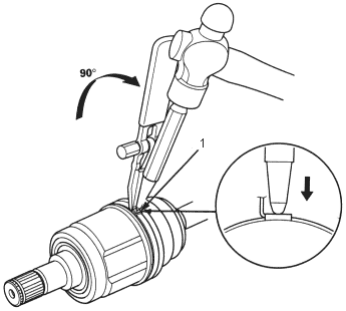
- 1. CLIP
- 16.Unwind the band tightening tool and cut off the excess free end of the band to leave a 5 - 10 mm (0.2 - 0.5 in) tail protruding from the clip.
PDF p. 770 · 16-12
- 17.
Bend the band end by tapping it down with a hammer.
NOTE:
- Make sure the band and clip do not interfere with anything and the band does not move.
- Remove any grease remaining on the surrounding surfaces.
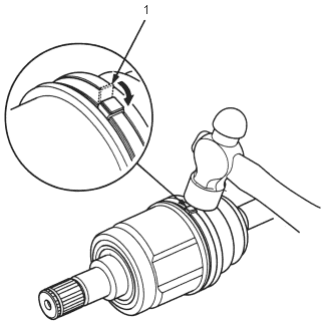
- 1. Band end
- 18.Install the new set ring.
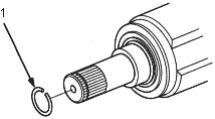
- 1. SET RING, Replace
Outboard Joint Side:
- 1.Wrap the splines with vinyl tape to prevent damage to the outboard boot.
- 2.Install the outboard boot. Take care not to damage the outboard boot.
- 3.Remove the vinyl tape.
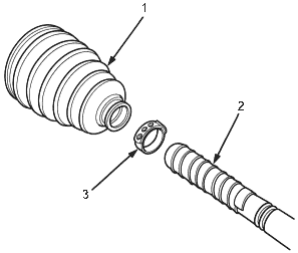
- 1. OUTBOARD BOOT
- 2. VINYL TAPE
- 3. BOOT BAND, Replace
- 4.Install the new stop ring into the driveshaft groove.
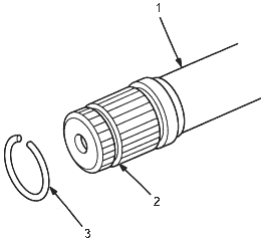
- 1. DRIVESHAFT
- 2. GROOVE
- 3. STOP RING, Replace
PDF p. 771 · 16-13
- 5.Insert the driveshaft into the outboard joint until the stop ring is close to the joint.
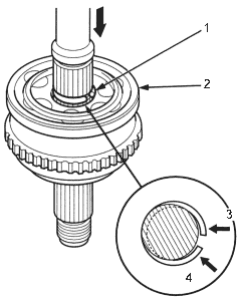
- 1. STOP RING, Replace
- 2. OUTBOARD JOINT
- 3. Push.
- 4. Push.
- 6.To completely seat the outboard joint, pick up the driveshaft and joint and drop them from about 10 cm (4 in) onto a hard surface. Do not use a hammer as excessive force may damage the driveshaft.
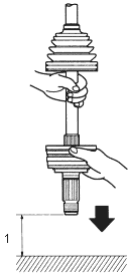
- 1. 10 cm ( 4 to 5 inches)
- 7.Check the alignment of the paint mark with the outboard joint end.
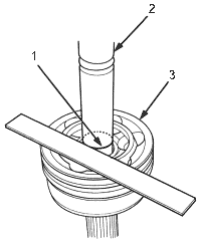
- 1. PAINT MARK
- 2. DRIVESHAFT
- 3. OUTBOARD JOINT END
- 8.
Pack the outboard joint with the joint grease included in the new joint boot set.
Grease quantity
Outboard joint: 105 - 115 g (3.7 - 4.1 oz)
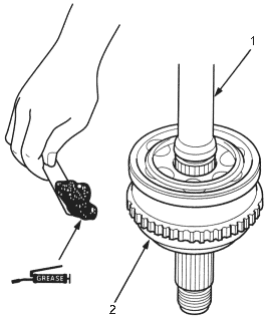
- 1. DRIVESHAFT
- 2. OUTBOARD JOINT
PDF p. 773 · 16-14
- 9.Fit the boot ends onto the driveshaft and outboard joint.
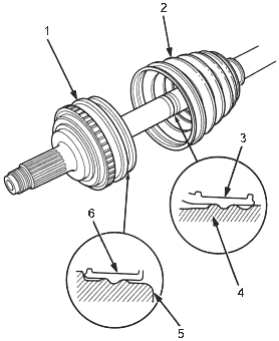
- 1. OUTBOARD JOINT
- 2. OUTBOARD BOOT
- 3. OUTBOARD BOOT
- 4. DRIVESHAFT
- 5. OUTBOARD JOINT
- 6. OUTBOARD BOOT
- 10.Set the new ear clamp by putting the tab into the holes of the band.
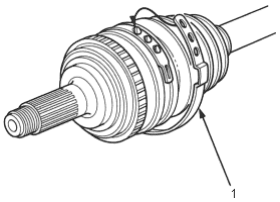
- 1. EAR CLAMP BAND, Replace
- 11.Close the ear portion of the band with (commercially available) boot band pincers.
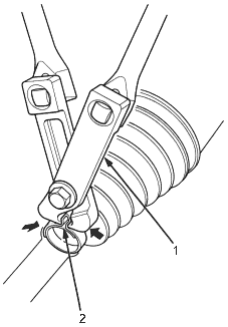
- 1. BOOT BAND PINCERS
(Commercially available) KENT-MOORE J-35910 or equivalent - 2. EAR PORTION
- 12.Check the clearance between the closed ear portion of the band. If the clearance is not within the standard, close the ear portion of the band further.
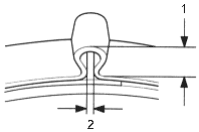
- 1. 6.00 mm (0.24 in) MAX
- 2. 3.0 mm (0.12 in) MAX
PDF p. 774 · 16-15
Installation
- 1.Install a new set ring onto the set ring groove of the driveshaft.
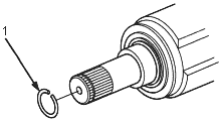
- 1. SET RING, Replace
- 2.Clean the areas where the driveshaft contacts the differential thoroughly with solvent or carburettor cleaner and dry with compressed air. Insert the inboard end of the driveshaft into the differential or intermediate shaft until the set ring locks in the groove.
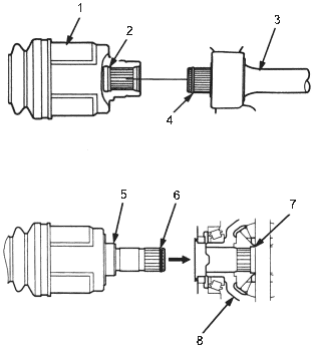
- 1. INBOARD JOINT
- 2. GROOVE
- 3. INTERMEDIATE SHAFT
- 4. SET RING
- 5. INBOARD END
- 6. SET RING
- 7. Groove
- 8. DIFFERENTIAL
- 3.Install the outboard joint into the front hub.
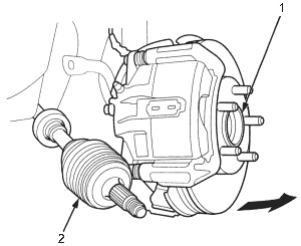
- 1. FRONT HUB
- 2. OUTBOARD JOINT
- 4.Install the knuckle onto the lower arm. Be careful not to damage the ball joint boot. Wipe off the grease before tightening the nut on the ball joint. Torque the castle nut to the lower torque specification, then tighten it only far enough to align the slot with the pin hole. Do not align the nut by loosening.
- 5.Install the new cotter pin into the pin hole and bend the cotter pin as shown.
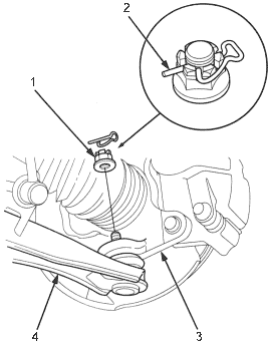
- 1. CASTLE NUT, 12 x 1.25 mm, 49 - 59 Nm (5.0 - 6.0 kgf/m, 36 - 43 lbf/ft)
- 2. LOCK PIN, Replace
- 3. KNUCKLE
- 4. LOWER ARM
PDF p. 775 · 16-16
- 6.Connect the front stabiliser link and front stabiliser, then hold the stabiliser link ball joint pin with a hexagonal wrench and tighten the flange nut.
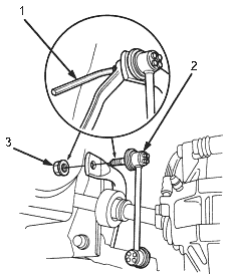
- 1. HEXAGONAL WRENCH
- 2. FRONT STABILISER LINK
- 3. FLANGE NUT, Replace
10 x 1.25 mm, 29 Nm (3.0 kgf/m, 22 lbf/ft)
- 7.Install a new spindle nut, then tighten the nut. After tightening, use a drift to stake the spindle nut shoulder against the driveshaft.
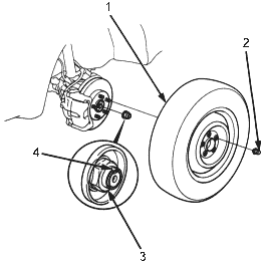
- 1. FRONT WHEEL
- 2. WHEEL NUT, 12 x 1.5 mm, 108 Nm (11.0 kgf/m, 79.6 lbf/ft)
- 3. SPINDLE NUT, 22 x 1.5 mm, Replace
181 Nm (18.5 kgf/m, 134 lbf/ft) - 4. Staked
- 8.Clean the mating surfaces of the brake disc and the front wheel, then install the front wheel with the wheel nuts.
- 9.Tighten the flange bolts and self-locking nut with the vehicle’s weight on the damper.
- 10.Refill the transmission with recommended MD (see section 13) or ATF (see section 14).
- 11.Check the front wheel alignment and adjust if necessary (see section 18).