PDF p. 639 · 14-85
- 1.Be sure the transmission fluid is filled to the proper level.
- 2.Raise the vehicle (see section 1):
2WD:
Raise the front of the vehicle and make sure it is securely supported. Set the parking brake and block rear wheels securely.
4WD:
Raise the vehicle.
- 3.Allow the raised wheels to rotate freely.
- 4.Warm up the engine (radiator fan comes on), then stop and connect a tachometer.
- 5.
Connect the special tool to each inspection hole.
TORQUE: 18 Nm (1.8 kgf/m, 13 lbf/ft)
NOTE:
- Drive pulley pressure may be above 3,430 kPa (3.43 Mpa, 35.0 kgf/cm2, 498 psi) when there is a transmission problem that causes the PCM to go into the fail-safe mode.
- Use a commercially available oil pressure gauge that measures 4,900 kPa (4.90 Mpa, 50.0 kgf/cm2, 711 psi) or more and use the A/T Oil Pressure Gauge Set and the A/T Low Pressure Gauge.
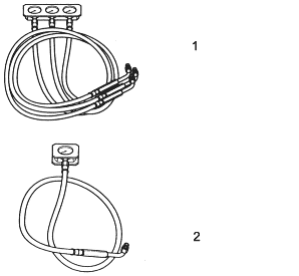
- 1. A/T OIL PRESSURE GAUGE SET 07406-0020004
- 2. A/T LOW PRESSURE GAUGE 07406-0070001
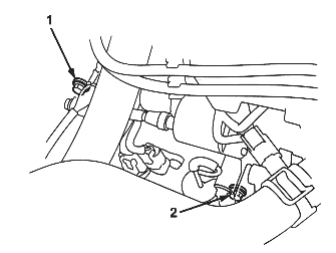
- 1. REVERSE BRAKE PRESSURE INSPECTION HOLE
- 2. START CLUTCH PRESSURE INSPECTION HOLE (Marked with “SC”)
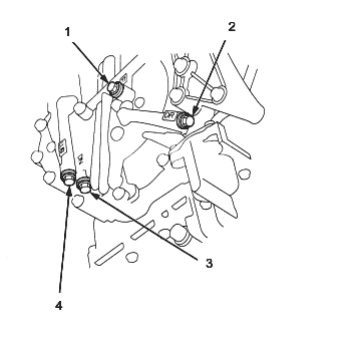
- 1. FORWARD CLUTCH PRESSURE INSPECTION HOLE (Marked with “F”)
- 2.DRIVE PULLEY PRESSURE INSPECTION HOLE (Marked with “DR”)
- 3.DRIVEN PULLEY PRESSURE INSPECTION HOLE (Marked with “DN”)
- 4.LUBRICATION PRESSURE INSPECTION HOLE (Marked with “LUB”)
PDF p. 640 · 14-86
- 6.Start the engine.
- 7.Shift the respective shift lever position as in the table and measure the following pressures at 1,500 rpm.
- Forward Clutch Pressure
- Reverse Brake Pressure
- Drive Pulley Pressure
- Driven Pulley Pressure
- 8.Shift to N position and measure the lubrication pressure at 3,000 rpm.
| Pressure | Shift lever | Symptom | Probable cause | Fluid Pressure | ||
|---|---|---|---|---|---|---|
| Position | Standard | Service Limit | ||||
| Forward | D | No or low forward | Forward Clutch | 1.4 - 1.75 Mpa | ||
| Clutch | clutch pressure | (14.3 - 17.8 kgf/cm2, 203 - 253 psi) | ||||
| Reverse | R | No or low reverse | Reverse Brake | 1.4 - 1.75 Mpa | ||
| Brake | brake pressure | (14.3 - 17.8 kgf/cm2, 203 - 253 psi) | ||||
| Drive Pulley | N | No or low drive | ATF pump, PH | 0.2 - 0.7 Mpa | ||
| pulley | pressure | regulator valve, PL | (2 - 7.1 kgf/cm2, 28 - 101 psi) | |||
| regulator valve, Shift | ||||||
| valve | ||||||
| Drive Pulley | N | Drive pulley pressure | PH regulator valve, | 0.2 - 0.7 Mpa | ||
| too high | PL regulator valve, | (2 - 7.1 kgf/cm2, 28 - 101 psi) | ||||
| Shift valve, Shift | ||||||
| control linear solenoid | ||||||
| Driven Pulley | N | No or low driven | ATF pump, PH | 1.5 - 2.3 Mpa | ||
| pulley pressure | regulator valve, Shift | (15.3 - 23.5 kgf/cm2, 218 - 334 psi) | ||||
| valve, Shift control | ||||||
| linear solenoid | ||||||
| Driven Pulley | N | Driven pulley | PH regulator valve | 1.5 - 2.3 Mpa | ||
| pressure too high | (15.3 - 23.5 kgf/cm2, 218 - 334 psi) | |||||
| Lubrication | N | No or low lubrication | ATF pump, | Above 0.2 Mpa | ||
| pressure | Lubrication valve | (Above 2 kgf/cm2, 30 psi) | ||||
- 9.Disconnect the special tool after pressure testing.
- 10.
Install the sealing bolt with a new sealing washer in the inspection hole and tighten to the specified torque.
TORQUE: 18 Nm (1.8 kgf/m, 13 lbf/ft)