PDF p. 631 · 14-76
- 1.Remove the front console (see section 20).
- 2.Disconnect the shift lock solenoid connector.
- 3.Connect the No. 1 terminal to the battery positive terminal and connect the No. 2 terminal to the battery negative terminal
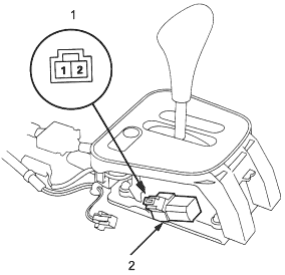
- 1. SHIFT LOCK SOLENOID CONNECTOR
- 2. SHIFT LOCK SOLENOID
- 4.
Check that the shift lever can be moved from P position. Release the battery terminals from the shift lock solenoid connector. Move the shift lever back to the P position and make sure it locks.
NOTE: Do not connect the power to the No. 2 terminal (reverse polarity) or you will damage the diode inside the solenoid.
- 5.Check the shift lock release when the release lever is pushed and check that it locks when the release lever is released.
- 6.If the solenoid does not work, replace it.
Shift Lock Solenoid Replacement
- 1.Remove the front console (see section 20).
- 2.Disconnect the shift lock solenoid connector.
- 3.Remove the two screws from the A/T gear position switch side, then remove the shift lock solenoid.
- 4.Install the shift lock solenoid plunger and plunger spring in the new shift lock solenoid.
- 5.Apply silicone grease to the tip of the shift lock stop on the detent plate and the plunger.
- 6.Install the shift lock solenoid by aligning the joint of the shift lock solenoid plunger with the shift lock stop tip.
- 7.Secure the shift lock solenoid with the two screws, then connect the connector.
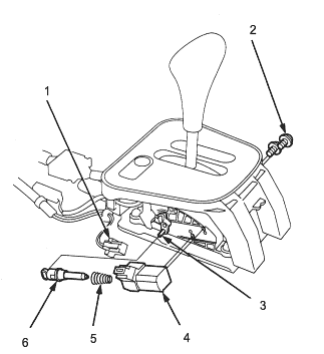
- 1. SHIFT LOCK SOLENOID CONNECTOR
- 2. SCREW 3 Nm (0.3 kgf/m, 2 lbf/ft).
- 3. SHIFT LOCK STOP TIP
- 4. SHIFT LOCK SOLENOID
- 5. PLUNGER SPRING
- 6. PLUNGER