PDF p. 697 · 14-140
NOTE:
- While reassembly the transfer assembly:
- Check and adjust the transfer gear tooth contact.
- Measure and adjust the transfer gear backlash
- Check and adjust the tapered roller bearing starting torque.
- Coat all parts with transmission fluid during reassembly.
- Replace the tapered roller bearing and the bearing outer race a set if either part is replaced.
- Replace the transfer drive gear and the transfer driven gear shaft as a set if either part is replaced.
Outline of Assembly
- 1.
Select the 35 mm thrust shim.
Perform this procedure if the transfer driven gear shaft or the tapered roller bearing on the transfer driven gear shaft is replaced.
- 2.Preassemble the parts to check and adjust transfer gear backlash and transfer gear tooth contact.
- 3.Disassemble the parts, then assemble the transfer driven gear shaft and its related parts.
- 4.Measure and adjust the starting torque of the transfer driven gear shaft tapered roller bearing.
- 5.Assemble the transfer shaft and its related parts.
- 6.Measure and adjust the total starting torque.
35 mm Thrust Shim Selection.
- 1.
Select the 35 mm thrust shim if the transfer driven gear shaft or the tapered roller bearing on the transfer driven gear shaft is replaced.
Calculate the thickness of the 35 mm thrust shim using the formula below:
FORMULA: A - B + C = X 100 100 A: Number on the existing transfer driven gear shaft
B: Number on the replacement transfer driven gear shaft C: Thickness of the existing 35 mm thrust shim
X: Thickness needed for the replacement 35 mm thrust shim
NOTE: The number on the transfer driven gear shaft is shown in 1/100 mm.
EXAMPLE:
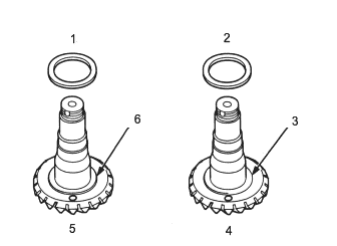
- 1. C: EXISTING 35 mm, THRUST SHIM Thickness: C=1.05 mm
- 2. X: REPLACEMENT 35 mm, THRUST SHIM Thickness: X=??
- 3. Number: B= - 1
- 4. B: REPLACEMENT TRANSFER DRIVEN GEAR SHAFT
- 5. A: EXISTING TRANSFER DRIVEN GEAR SHAFT
| X = | A - B + C | |
| 100 100 | ||
| = | 2 - -1 + 1.05 | |
100 100
= 0.02 + 0.01 + 1.05
= 1.08 (mm)
Select 35 mm thrust shim thickness of 1.08 mm (0.043 in). If the tapered roller bearing on the transfer driven gear shaft is replaced.
Measure the thickness of the replacement bearing and the existing bearing and calculate the difference of the bearing thickness. Adjust the thickness of the existing 35 mm thrust shim by the amount of difference in bearing thickness and select the replacement 35 mm thrust shim.
THRUST SHIM, 35 mm
| Shim No. Part Number | Thickness | ||
| A | 41361-PS3-000 | 0.72 mm (0.028 in) | |
| B | 41362-PS3-000 | 0.75 mm (0.030 in) | |
| C | 41363-PS3-000 | 0.78 mm (0.031 in) | |
| D | 41364-PS3-000 | 0.81 mm (0.032 in) | |
| E | 41365-PS3-000 | 0.84 mm (0.033 in) | |
| F | 41366-PS3-000 | 0.87 mm (0.034 in) | |
| G | 41367-PS3-000 | 0.90 mm (0.035 in) | |
| H | 41368-PS3-000 | 0.93 mm (0.037 in) | |
| I | 41369-PS3-000 | 0.96 mm (0.038 in) | |
| J | 41370-PS3-000 | 0.99 mm (0.039 in) | |
| K | 41371-PS3-000 | 1.02 mm (0.040 in) | |
| L | 41372-PS3-000 | 1.05 mm (0.041 in) | |
| M | 41373-PS3-000 | 1.08 mm (0.043 in) | |
| N | 41374-PS3-000 | 1.11 mm (0.044 in) | |
PDF p. 698 · 14-141
Transfer Gear Backlash Inspection and Transfer Gear Tooth Contact Inspection
- 2.Install the 35 mm thrust shim on the transfer driven gear shaft, then install the tapered roller bearing using the special tools and a press.
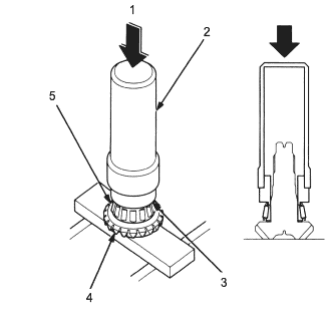
- 1. PRESS
- 2. DRIVER 40 mm, I.D. 07746-0030100
- 3. DRIVER ATTACHMENT, 35 mm, I.D. 07746-0030400
- 4. TRANSFER DRIVEN GEAR SHAFT
- 5. TAPERED ROLLER BEARING
- 3.Place the tapered roller bearing on the bearing outer race of the companion flange side of the transfer housing.
- 4.Install the new oil seal on the transfer housing using the special tools.
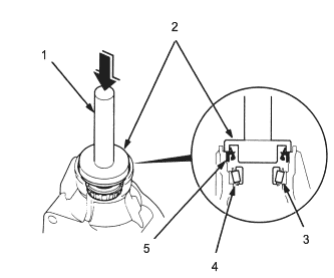
1 HANDLE DRIVER, 07749-0010000
- 2.DRIVER ATTACHMENT, 58 mm, 07JAD-PH80101
- 3.BEARING OUTER RACE
- 4.TAPERED ROLLER BEARING
- 5.OIL SEAL, Replace
- 5.Install the transfer driven gear shaft in the transfer housing. Do not install the transfer spacer on the transfer driven gear shaft in this step.
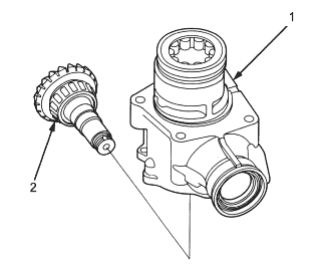
- 1. TRANSFER HOUSING
- 2. TRANSFER DRIVEN GEAR SHAFT
- 6.Install the companion flange, conical spring washer and locknut on the transfer driven gear shaft. Do not install the O-ring and the back-up ring on the transfer gear shaft in this step.
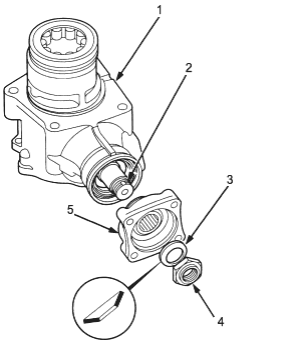
- 1. TRANSFER HOUSING
- 2. TRANSFER DRIVEN GEAR SHAFT
- 3. CONICAL SPRING WASHER, Install in this direction
- 4. LOCKNUT
- 5. COMPANION FLANGE
PDF p. 699 · 14-142
- 7.Secure the transfer housing in a bench vice with soft jaws, then install the special tool on the companion flange. To prevent damage to the transfer housing, always use soft jaws or equivalent materials between the transfer housing and the vice.
- 8.
Tighten the locknut while measuring the starting torque so the start torque is within 0.98 - 1.39 Nm (10.0 - 14.2 kgf/cm, 8.68 - 12.3 lbf/in).
NOTE:
- Coat the threads of the locknut and the shaft with transmission fluid before installing the locknut.
- Do not state the locknut in this step.
STARTING TORQUE:
0.98 - 1.39 Nm
(10.0 - 14.2 kgf/cm, 8.68 - 12.3 lbf/in)
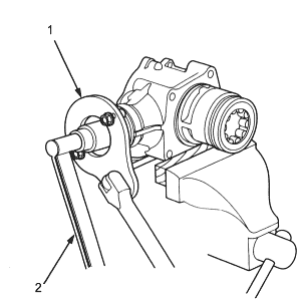
- 1. COMPANION FLANGE HOLDER, 07PAB-0010000
- 2. TORQUE WRENCH
- 9.
Install the transfer shaft in the transfer housing, then install the tapered roller bearing, transfer shaft collar, 25 mm thrust shim, transfer drive gear, conical spring washer and locknut on the transfer shaft.
NOTE:
- Coat the threads of the locknut and the shaft with transmission fluid before installing the locknut.
- Do not stake the locknut in this step.
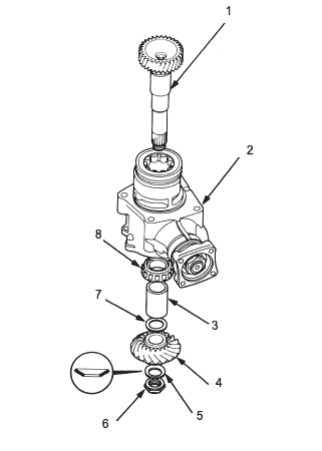
- 1. TRANSFER SHAFT
- 2. TRANSFER HOUSING
- 3. TRANSFER SHAFT COLLAR
- 4. TRANSFER DRIVE GEAR
- 5. CONICAL SPRING WASHER, Replace
- 6. LOCKNUT Replace.
- 7. THRUST SHIM, 25 mm, Selective part.
- 8. TAPERED ROLLER BEARING
PDF p. 700 · 14-143
- 10.Put a 14 mm Allen wrench in the gear side of the transfer shaft, then secure the Allen wrench in a bench vice.
- 11.
Tighten the transfer shaft locknut.
NOTE:
- The transfer shaft locknut has left-hand threads.
- Do not state the locknut in this step.
TORQUE: 118 Nm (12.0 kgf/m, 87 lbf/ft)
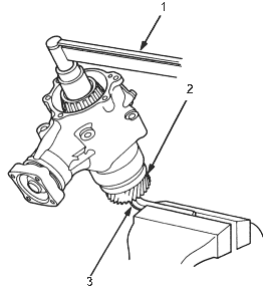
- 1. TORQUE WRENCH
- 2. TRANSFER SHAFT
- 3. 14 mm, ALLEN WRENCH
- 12.Temporarily install the transfer cover A without the O-ring.
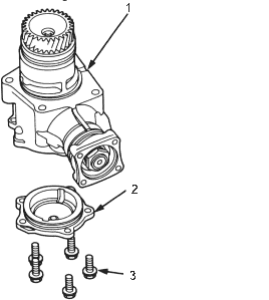
- 1. TRANSFER HOUSING
- 2. TRANSFER COVER A
- 3. 8 x 1.25 mm, 24 Nm, (2.4 kgf/m, 17 lbf/ft)
- 13.Rotate the companion flange several times to seat the tapered roller bearing.
- 14.
Set a dial indicator on the companion flange, then measure the transfer gear backlash.
STANDARD: 0.06 - 0.16 mm (0.02 - 0.06 in)
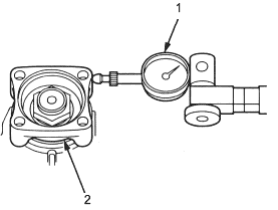
- 1. DIAL INDICATOR
- 2. COMPANION FLANGE
- 15.If the measurement is not within the standard, remove the transfer shaft locknut and replace the 25 mm thrust shim, then recheck the measurement. Do not use more than two 25 mm thrust shims to adjust the transfer gear backlash. THRUST SHIM, 25 mm
| Shim No. | Part Number | Thickness | |
| 1 | 29411-P1C 000 | 1.70 mm (0.067 in) | |
| 2 | 29412-P1C-000 | 1.73 mm (0.068 in) | |
| 3 | 29413-P1C-000 | 1.76 mm (0.069 in) | |
| 4 | 29414-P1C-000 | 1.79 mm (0.070 in) | |
| 5 | 29415-P1C-000 | 1.82 mm (0.072 in) | |
| 6 | 29416-P1C-000 | 1.85 mm (0.073 in) | |
| 7 | 29417-P1C-000 | 1.88 mm (0.074 in) | |
| 8 | 29418-P1C-000 | 1.91 mm (0.075 in) | |
| 9 | 29419-P1C-000 | 1.94 mm (0.076 in) | |
| 10 | 29420-P1C-000 | 1.97 mm (0.078 in) | |
| 11 | 29421-P1C-000 | 2.00 mm (0.079 in) | |
| 12 | 29422-P1C-000 | 2.03 mm (0.080 in) | |
| 13 | 29423-P1C-000 | 2.06 mm (0.081 in) | |
| 14 | 29424-P1C-000 | 2.09 mm (0.082 in) | |
| 15 | 29425-P1C-000 | 2.12 mm (0.083 in) | |
| 16 | 29426-P1C-000 | 2.15 mm (0.085 in) | |
| 17 | 29427-P1C-000 | 2.18 mm (0.086 in) | |
| 18 | 29428-P1C-000 | 2.21 mm (0.087 in) | |
| 19 | 29429-P1C-000 | 2.24 mm (0.088 in) | |
PDF p. 701 · 14-144
16 Apply Prussian Blue to both sides of the transfer gear
teeth lightly and evenly.
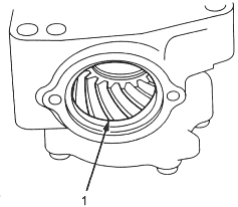
- 1. TRANSFER DRIVE GEAR
- 17.Rotate the companion flange in both directions until the transfer gear rotates one full tun in both directions.
- 18.Check the transfer gear tooth contact pattern.
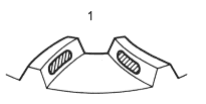
- 1. CORRECT TOOTH CONTACT PATTERN
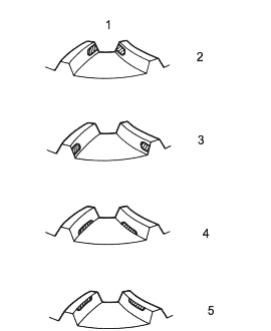
- 1. INCORRECT TOOTH CONTACT PATTERN
- 2. TOE CONTACT
- 3. HEEL CONTACT
- 4. FLANK CONTACT
- 5. FACE CONTACT
- 19.
If the transfer gear tooth contact is incorrect, adjust the transfer gear tooth contact with a 35 mm or 25 mm thrust shim.
NOTE:
- To select a 35 mm thrust shim, (See Page 14-140).
- Do not use more than two 35 mm shims to adjust the transfer gear tooth contact.
- To select the 25 mm thrust shim, (See Page 14-143).
- Do not use more than two 25 mm shims to adjust the transfer gear tooth contact.
Toe Contact
Use a thicker 35 mm thrust shim to move the transfer driven gear shaft toward the transfer drive gear. Because this movement causes the transfer gear backlash to change, move the transfer drive gear away from the transfer driven gear shaft to adjust the transfer gear backlash as follows:
- Increase the thickness of the 25 mm thrust shim.
- Reduce the thickness of increased thickness of the 25 mm thrust shim.
Heel Contact
Use a thinner 35 mm thrust shim to move the transfer driven gear shaft away from the transfer drive gear. Because this movement causes the transfer gear backlash to change, move the transfer drive gear toward the transfer driven gear shaft to adjust the transfer gear backlash as follows:
- Reduce the thickness of the 25 mm thrust shim.
- Increase the thickness of the 68 mm thrust shim by the amount of reduced thickness of the 25 mm thrust shim.
Flank Contact
Use a thinner thrust shim to move the transfer drive gear toward the transfer driven gear shaft. Flank contact must be adjusted within the limits of the transfer gear backlash. If the backlash exceeds the limits, adjust as described under Heel Contact.
Face Contact
Use a thicker thrust shim to move the transfer drive gear away from the transfer driven gear shaft. Face contact must be adjusted within the limits of the transfer gear backlash. If the backlash exceeds the limits, adjust as described under Toe Contact.
PDF p. 702 · 14-145
- 20.Remove the parts on the transfer shaft and remove the transfer shaft from the transfer housing.
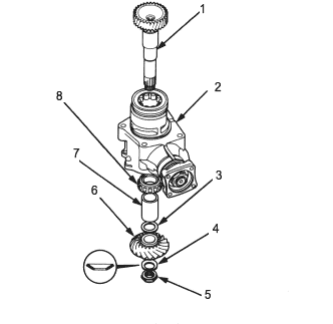
- 1. TRANSFER SHAFT
- 2. TRANSFER HOUSING
- 3. THRUST SHIM, 25 mm, Selective part.
- 4. CONICAL SPRING WASHER, Replace
- 5. LOCKNUT, Replace
- 6. TRANSFER DRIVE GEAR
- 7. TRANSFER SHAFT COLLAR
- 8. TAPERED ROLLER BEARING
Transfer Driven Gear Shaft Starting Torque Inspection and Adjustment.
- 21.Secure the transfer housing in a bench vice with soft jaws. To prevent damage, always use soft jaws or equivalent materials between the transfer housing and the vice.
- 22.Install the special tool on the companion flange, then remove the transfer driven gear shaft locknut and the conical spring washer.
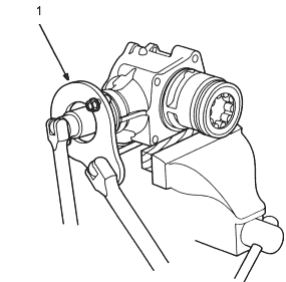
- 1. COMPANION FLANGE HOLDER, 07PAB-0020000
- 23.Remove the transfer driven gear shaft and the companion flange.
- 24.Install the new transfer spacer on the transfer driven gear shaft, then install them in the transfer housing.
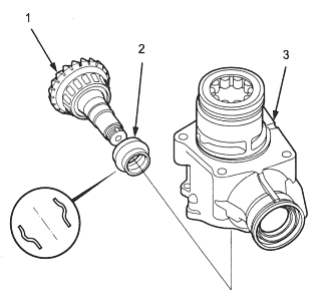
- 1. TRANSFER DRIVEN GEAR SHAFT
- 2. TRANSFER SPACER, Install in this direction.
- 3. TRANSFER HOUSING
- 25.
Install the companion flange, O-ring, back-up ring, conical spring washer and locknut on the transfer driven gear shaft.
NOTE:
- Coat the threads of the locknut and transfer shaft with transmission fluid before installing the locknut.
- Install the conical spring washer in the direction shown.
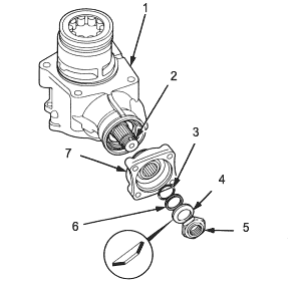
- 1. TRANSFER HOUSING
- 2. TRANSFER DRIVEN GEAR SHAFT
- 3. O-RING Replace.
- 4. CONICAL SPRING WASHER, Replace
- 5. LOCKNUT Replace.
- 6. BACK-UP RING
- 7. COMPANION FLANGE
PDF p. 703 · 14-146
- 26.Secure the transfer housing in a bench vice with soft jaws. To prevent damage, always use soft jaws or equivalent materials between the transfer housing and the vice.
- 27.
Install the special tool on the companion flange, then tighten the transfer driven gear shaft locknut while measuring the starting torque of the transfer driven gear shaft.
STARTING TORQUE:
0.98 - 1.39 Nm
(10.0 - 14.2 kgf/cm, 8.68 - 12.3 lbf/in)
TIGHTENING TORQUE:
132 - 216 Nm
(13.5 - 22.0 kgf/m, 98 - 159 lbf/ft)
NOTE:
- Rotate the companion flange several times to seat the tapered roller bearing, then measure the starting torque.
- If the starting torque exceeds 1.39 Nm (14.2 kgf/cm, 12.3 lbf/in), replace the transfer spacer and reassemble the parts. Do not adjust the torque with the locknut loose.
- If the tightening torque exceeds 216 Nm (22.0 kgf/m, 159 lbf/ft), replace the transfer spacer and reassemble the parts.
Write down the measurement of the starting torque:
it is used to measure the total starting torque.
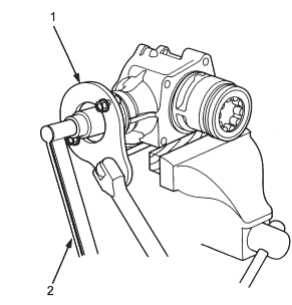
- 1. COMPANION FLANGE HOLDER, 07PAB-0020000
- 2. TORQUE WRENCH
- 28.Stake the locknut into the transfer driven gear shaft using a 3.5 mm punch as shown.
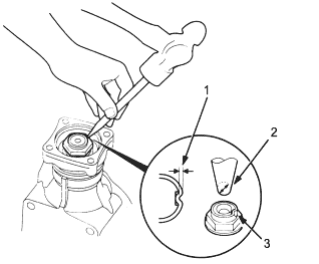
- 1. 0.7 - 1.2 mm, (0.03 - 0.05 in)
- 2. PUNCH, 3.0 - 3.5 mm, (0.12 - 0.14 in)
- 3. Point to be staked
- 29.
Install the transfer shaft in the transfer housing, then install the tapered roller bearing, transfer shaft collar, 25 mm thrust shim, transfer drive gear, conical spring washer and transfer shaft locknut on the transfer.
NOTE:
- Coat the threads of the locknut and transfer shaft with transmission fluid before installing the locknut.
- Install the conical spring washer in the direction shown.
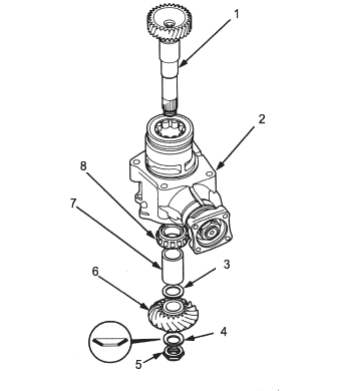
- 1. TRANSFER SHAFT
- 2. TRANSFER HOUSING
- 3. THRUST SHIM, 25 mm, Selective part
- 4. CONICAL SPRING WASHER, Replace
- 5. LOCKNUT, Replace
- 6. TRANSFER DRIVE GEAR
- 7.TRANSFER SHAFT COLLAR
- 8.TAPERED ROLLER BEARING
PDF p. 704 · 14-147
- 30.
Put a 14 mm Allen wrench in the gear side of the transfer shaft, then secure the Allen wrench in a bench vice. Tighten the transfer shaft locknut. (The locknut has left-hand threads.
TORQUE: 118 Nm (12.0 kgf/m, 87 lbf/ft)
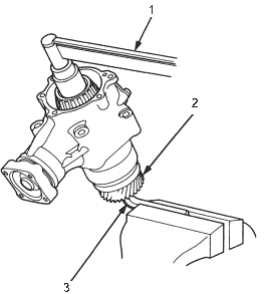
- 1. TORQUE WRENCH
- 2. TRANSFER SHAFT
- 3. 14 mm, ALLEN WRENCH
- 31.Stake the locknut on the transfer shaft using a 3.5 mm punch.
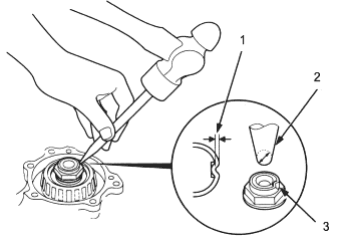
- 1. 0.7 - 1.2 mm, (0.03 - 0.05 in)
- 2. PUNCH, 3.0 - 3.5 mm, (0.12 - 0.14 in)
- 3. Point to be staked
Total Starting Torque Inspection and Adjustment
- 32.Temporarily install transfer cover A without the O-ring.
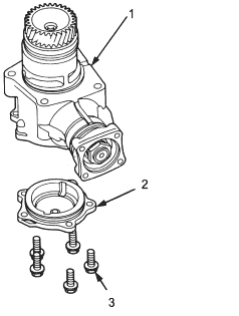
- 1. TRANSFER HOUSING
- 2. TRANSFER COVER A
- 3. 8 x 1.25 mm, 24 Nm (2.4 kgf/m, 17 lbf/ft)
- 33.Secure the transfer housing in a bench vice with soft jaws, then rotate the companion flange several times to fit the tapered roller bearing. To prevent damage, always use soft jaws or equivalent materials between the transfer housing and the vice.
- 34.
Measure the total starting torque.
TOTAL STARTING TORQUE:
1.70 - 2.8 Nm (17.3 - 21.2 kgf/cm, 15.0 - 18.4 lbf/in) + Transfer Driven Gear Shaft Starting Torque Value (written down in step 27).
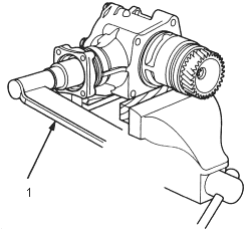
- 1. TORQUE WRENCH
PDF p. 705 · 14-148
- 35.Remove transfer cover A.
- 36.
If the measurement is out of specification, remove the 68 mm thrust shim from transfer cover A by heating the cover to almost 100°C (212°F) using a heat gun, Do not heat the cover high than 100°C (212°F). Let the cover cool to room temperature before adjusting the starting torque.
If the measurement is within the specification, go to step 40.
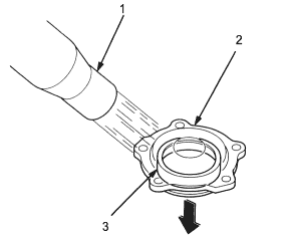
- 1. HEAT GUN
- 2. TRANSFER COVER A
- 3. BEARING OUTER RACE
- 37.Select the 68 mm thrust shim.
| Shim No. | Part Number | Thickness | |
| ZV | 23974-P1C 020 | 1.41 mm (0.056 in) | |
| ZW | 23975-P1C-020 | 1.44 mm (0.057 in) | |
| ZX | 23976-P1C-020 | 1.47 mm (0.058 in) | |
| ZY | 23977-P1C-020 | 1.50 mm (0.059 in) | |
| ZZ | 23978-P1C-000 | 1.53 mm (0.060 in) | |
| A | 23941-PW5-000 | 1.56 mm (0.061 in) | |
| B | 23942-PW5-000 | 1.59 mm (0.063 in) | |
| C | 23943-PW5-000 | 1.62 mm (0.064 in) | |
| D | 23944-PW5-000 | 1.65 mm (0.065 in) | |
| E | 23945-PW5-000 | 1.68 mm (0.066 in) | |
| F | 23946-PW5-000 | 1.71 mm (0.067 in) | |
| G | 23947 PW5-000 | 1.74 mm (0.069 in) | |
| H | 23948-PW5-000 | 1.77 mm (0.070 in) | |
| I | 23949-PW5-000 | 1.80 mm (0.071 in) | |
| J | 23950-PW5-000 | 1.83 mm (0.072 in) | |
| K | 23951-PW5-000 | 1.86 mm (0.073 in) | |
| L | 23952-PW5-000 | 1.89 mm (0.074 in) | |
| M | 23953-PW5-000 | 1.92 mm (0.076 in) | |
| N | 23954-PW5-000 | 1.95 mm (0.077 in) | |
| O | 23955-PW5-000 | 1.98 mm (0.078 in) | |
| P | 23956-PW5-000 | 2.01 mm (0.079 in) | |
| Q | 23957-PW5-000 | 2.04 mm (0.080 in) | |
| R | 23958-PW5-000 | 2.07 mm (0.081 in) | |
| S | 23959-PW5-000 | 2.10 mm (0.082 in) | |
| T | 23960-PW5-000 | 2.13 mm (0.084 in) | |
| U | 23961-PW5-000 | 2.16 mm (0.085 in) | |
| V | 23962-PW5-000 | 2.19 mm (0.086 in) | |
| W | 23963-PW5-000 | 2.22 mm (0.087 in) | |
| X | 23964-PW5-000 | 2.25 mm (0.089 in) | |
| Y | 23965-PW5-000 | 2.28 mm (0.090 in) | |
| Z | 23966-PW5-000 | 2.31 mm (0.091 in) | |
| AA | 23967-PW5-000 | 2.34 mm (0.092 in) | |
| AB | 23968-PW5-000 | 2.37 mm (0.093 in) | |
| AC | 23969-PW5-000 | 2.40 mm (0.094 in) | |
| AD | 23970-PW5-000 | 2.43 mm (0.096 in) | |
| AZ | 23941-PW5-000 | 2.46 mm (0.097 in) | |
| BZ | 23942-PW5-000 | 2.49 mm (0.098 in) | |
| CZ | 23943-PW5-000 | 2.52 mm (0.099 in) | |
| DZ | 23944-PW5-000 | 2.55 mm (0.100 in) | |
| EZ | 23945-PW5-000 | 2.58 mm (0.102 in) | |
PDF p. 706 · 14-149
- 38.Install the 68 mm thrust shim using the special tools.
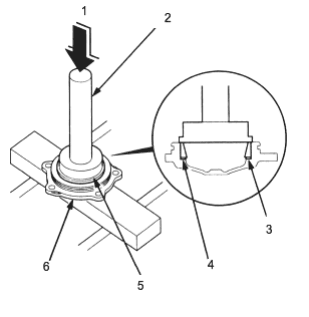
- 1. PRESS
- 2. HANDLE DRIVER, 07749-0010000
- 3. THRUST SHIM, 68 mm, Selective part
- 4. BEARING OUTER RACE
- 5. DRIVER ATTACHMENT, 62 x 68 mm, 07746-0010500
- 6. TRANSFER COVER A
- 39.After replacing the 68 mm thrust shim, recheck and make sure the total starting torque is within the specification.
- 40.Install the new O-rings on transfer covers A and B, then install the covers on the transfer housing.
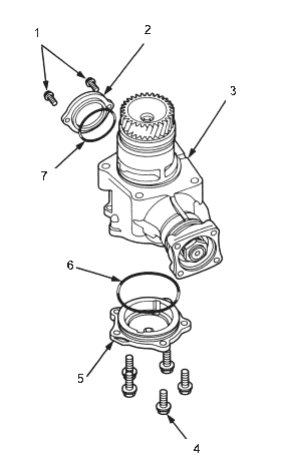
- 1. 6 x 1.0 mm, 12 Nm (1.2 kgf/m, 8.7 lbf/ft)
- 2. TRANSFER COVER B
- 3. TRANSFER HOUSING
- 4. 8 x 1.25 mm, 24 Nm (2.4 kgf/m, 17 lbf/ft)
- 5. TRANSFER COVER A
- 6. O-RING, Replace
- 7. O-RING, Replace