PDF p. 672 · 14-118
NOTE:
- Clean all parts thoroughly in solvent or carburetor cleaner and dry them with compressed air.
- Blow out all passages.
- Lubricate all parts with transmission fluid before reassembly.
- 1.Inspect the check valve; if it is loose, replace the piston.
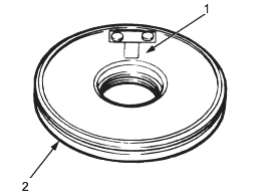
- 1. CHECK VALVE
- 2. PISTON
- 2.Install new O-rings on the clutch piston
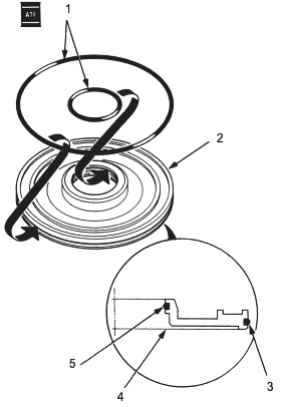
- 1. O-RINGS
- 2. PISTON
- 3. O-RING
- 4. PISTON
- 5. O-RING
- 3.
Install the piston in the clutch drum. Apply pressure and rotate to ensure proper seating.
NOTE: Do not pinch the O-ring by installing the piston with too much force.
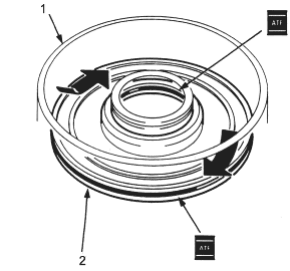
- 1. CLUTCH DRUM
- 2. PISTON
- 4.Install the return spring and spring retainer and position the snap ring on the retainer.
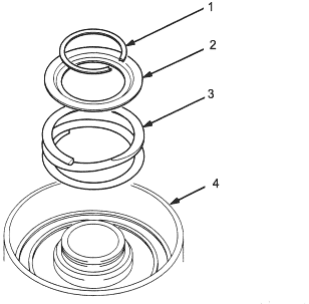
- 1. SNAP RING
- 2. SPRING RETAINER
- 3. RETURN SPRING
- 4. CLUTCH DRUM
PDF p. 673 · 14-119
- 5.Install the special tools as shown.
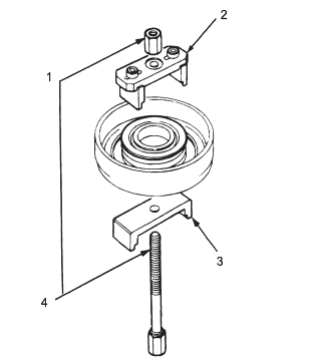
- 1. CLUTCH SPRING COMPRESSOR SET 07LAE-PX40000
- 2. CLUTCH SPRING COMPRESSOR ATTACHMENT 07LAE-PX40100
- 3. CLUTCH SPRING COMPRESSOR ATTACHMENT 07HAE-PL50100
- 4. CLUTCH SPRING COMPRESSOR BOLT ASSEMBLY 07GAE-PG40200
NOTE: If either end of the special tool is set over an area of the spring retainer which is unsupported by the return spring, the retainer may be damaged. Be sure the special tool is adjusted to have full contact with the spring retainer
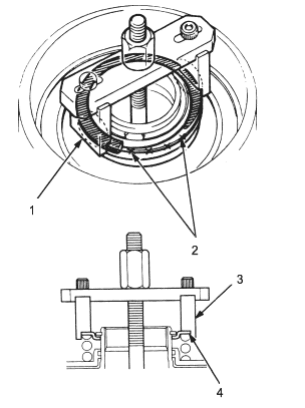
- 1. Set here
- 2. Do not set here
- 3. SPECIAL TOOL
- 4. SPRING RETAINER
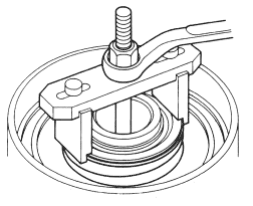
- 6.Compress the return spring
- 7.Install the snap ring
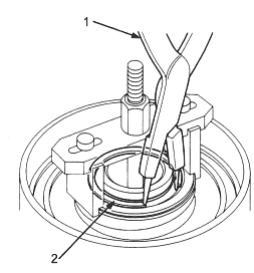
- 1. SNAP RING PLIERS 07LGC-0010100
- 2. SNAP RING
- 8.Remove the special tools.
PDF p. 674 · 14-120
- 9.Install the disc spring in the direction shown.
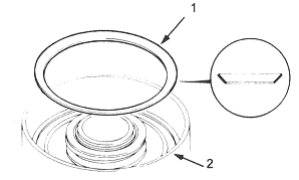
- 1. DISC SPRING
- 2. CLUTCH DRUM
- 10.Soak the clutch discs thoroughly in recommended transmission fluid for a minimum of 30 minutes.
- 11.Make sure the inside of the clutch drum is free of dirt or other foreign matter.
- 12.Starting with a clutch plate, alternately install the clutch plates an discs. Install the clutch end plate with flat side toward the disc.
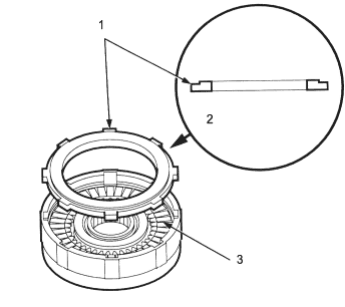
- 1. CLUTCH END PLATE
- 2. Install this side facing clutch disc.
- 3. CLUTCH DISC
- 13.Install the snap ring.
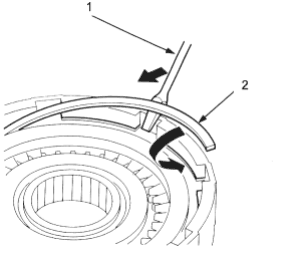
- 1. SCREWDRIVER
- 2. SNAP RING
- 14.Verify that the snap ring end gap is correct.
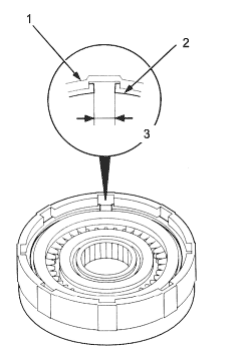
- 1. CLUTCH DRUM
- 2. SNAP RING
- 3. Minimum 7.9 mm, (0.31 in).
PDF p. 675 · 14-121
- 15.
Measure the clearance between the clutch end plate and top disc with a dial indicator. Zero the dial indicator with the clutch end plate lowered and lift it up to the snap ring. The distance that the clutch end plate moves is the clearance between the clutch end plate and top disc.
NOTE: Take measurements in at least three places and use the average as the actual clearance.
Clutch End Plate-to-Top Disc Clearance:
STANDARD: 0.6 - 0.8 mm (0.024 - 0.031 in)
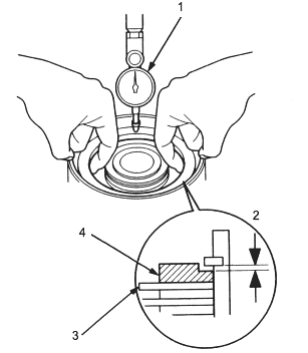
- 1. DIAL INDICATOR
- 2. Clearance
- 3. CLUTCH DISC
- 4. CLUTCH END PLATE
- 16.
If the clearance is out of tolerance, select a new clutch end plate from the following table, then recheck.
NOTE: If the thickest clutch end plate is installed but the clearance is still over the standard, replace the clutch discs and clutch plates.
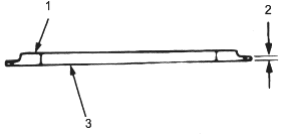
- 1. PLATE NUMBER
- 2. Thickness
- 3. CLUTCH END PLATE
FORWARD CLUTCH END PLATE
| Plate No. | Part Number | Thickness |
| 1 or 15 | 22561-P4V-003 | 3.5 mm (0.138 in) |
| 2 or 16 | 22562-P4V-003 | 3.6 mm (0.142 in) |
| 3 or 17 | 22563-P4V-003 | 3.7 mm (0.146 in) |
| 4 or 18 | 22564-P4V-003 | 3.8 mm (0.150 in) |
| 5 or 19 | 22565-P4V-003 | 3.9 mm (0.154 in) |
| 6 or 20 | 22566-P4V-003 | 4.0 mm (0.157 in) |
| 7 or 21 | 22567 P4V-003 | 4.1 mm (0.161 in) |
| 8 or 22 | 22568-P4V-003 | 4.2 mm (0.165 in) |
| 9 or 23 | 22569-P4V-003 | 4.3 mm (0.169 in) |
| 10 or 24 | 22570-P4V-003 | 4.4 mm (0.173 in) |
| 11 or 25 | 22571-P4V-003 | 4.5 mm (0.177 in) |
| 12 or 26 | 22572-P4V-003 | 4.6 mm (0.181 in) |
| 13 or 27 | 22573-P4V-003 | 4.7 mm (0.185 in) |
- 17.After replacing the clutch end plate, make sure that the clearance is within tolerance.