PDF p. 662 · 14-108
NOTE:
- Clean all parts thoroughly in solvent or carburettor cleaner and dry them with compressed air.
- Blow out all passages.
- When removing the lower valve body assembly, replace the following:
- O-rings
- ATF pan gasket
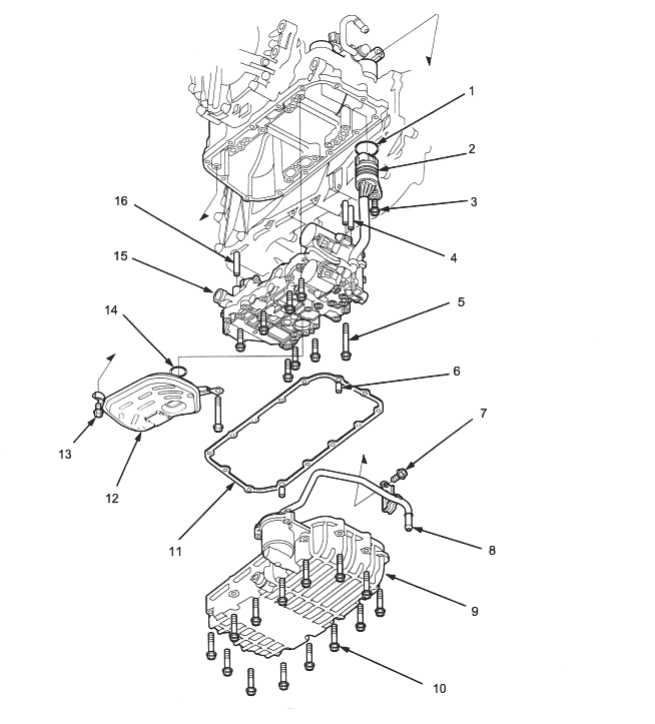
- 1. O-RINGS Replace.
- 2. SOLENOID HARNESS CONNECTOR
- 3. 6 x 1.0 mm, BOLT
- 4. DOWEL PIN
- 5. 6 x 1.0 mm, 8 BOLTS
- 6. DOWEL PIN
- 7. ATF COOLER INLET LINE BRACKET BOLT 8 x 1.25 mm
- 8. ATF COOLER INLET LINE
ASSEMBLY - 9. ATF PAN
- 10. 6 x 1.0 mm, 14 BOLTS
- 11. ATF PAN GASKET Replace.
- 12. ATF STRAINER
- 13. 6 x 1.0 mm, 2 Bolts
- 14. O-RING Replace.
- 15. LOWER VALVE BODY ASSEMBLY
- 16. DOWEL PIN
PDF p. 663 · 14-109
- 1.Remove the ATF cooler inlet line bracket bolt.
- 2.Remove the ATF pan (fourteen bolts).
- 3.Remove the ATF strainer (two bolts).
- 4.Remove the one bolt securing the solenoid harness connector, then push the connector.
- 5.Remove the lower valve body (eight bolts).
- 6.Clean the inlet opening of the ATF strainer thoroughly with compressed air, then check that it is in good condition and the inlet opening is not clogged.
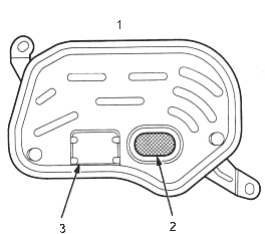
- 1. ATF STRAINER
- 2. INLET OPENING
- 3. ATF MAGNET
- 7.
Replace the ATF strainer if it is clogged or damaged.
NOTE: The ATF strainer can be reused if it is not clogged.