PDF p. 1927 · 11-148
Inspection/Adjustment
- 1.Check that the throttle cable operates smoothly with no binding or sticking. Repair as necessary.
- 2.Check cable for free play at the throttle link. Cable deflection should be 10 -12 mm (3/8 - 1/2 in.).
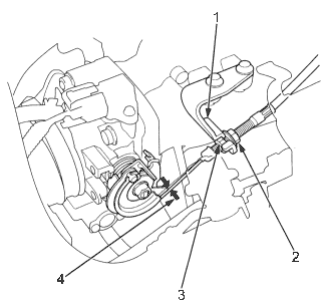
- 1. CABLE BRACKET
- 2. LOCKNUT
- 3. ADJUSTING NUT
- 4. DEFLECTION, 10 -12 mm (3/8 - 1/2 in)
- 3.If deflection is not within specification, loosen the locknut, turn the adjusting nut until the deflection is as specified, then retighten the locknut.
- 4.With the cable properly adjusted, check the throttle valve to be sure it opens fully when you push the accelerator pedal to the floor. Also check the throttle valve to make sure it returns to the idle position whenever you release the accelerator pedal.
Installation
- 1.Open the throttle valve fully, then install the throttle cable in the throttle link and install the cable housing in the cable bracket.
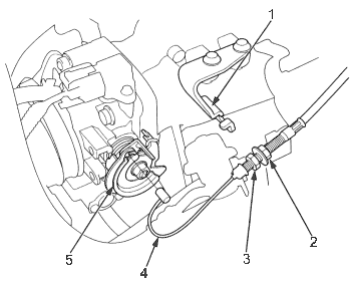
- 1. CABLE BRACKET
- 2. LOCKNUT
- 3. ADJUSTING NUT
- 4. INNER CABLE
- 5. THROTTLE LINK
- 2.Hold the cable sheath, removing all slack from the cable.
- 3.Set the locknut on the cable bracket. Adjust the adjusting nut so that its free play is 0 mm (0 in.)
- 4.Remove the cable sheath from the throttle bracket, reset the adjusting nut and tighten the locknut.
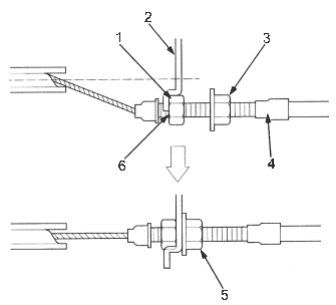
- 1. ADJUSTING NUT
- 2. CABLE BRACKET
- 3. LOCKNUT
- 4. CABLE SHEATH
- 5. 9.8 Nm (1.0 kgf/m, 7.2 lbf/ft)
- 6. There should be no clearance