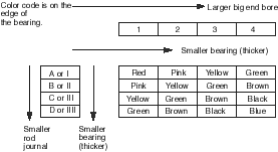
PDF p. 280 · 7-10
- 1.Remove the connecting rod cap and bearing half.
- 2.Clean the crankshaft rod journal and bearing half with a clean shop towel.
- 3.Place the plastigage across the rod journal.
- 4.
Reinstall the bearing half and cap and torque the nuts.
Torque: 31 Nm (3.2 kgf/m, 23 lbf/ft)
NOTE: Do not rotate the crankshaft during inspection.
- 5.
Remove the rod cap and bearing half and measure the widest part of the plastigage.
Connecting Rod Bearing-to-Journal Oil Clearance:
Standard (New): 0.020 - 0.038 mm
(0.0008 - 0.0015 in)
Service Limit: 0.05 mm (0.002 in)
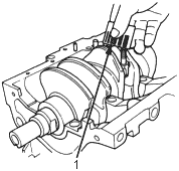
- 1. PLASTIGAGE STRIP
- 6.If the plastigage measures too wide or too narrow, remove the upper half of the bearing, install a new, complete bearing with the same colour code (select the colour as shown in the right column) and recheck the clearance.
- 7.
If the plastigage shows the clearance is still incorrect, try the next larger or smaller bearing (the colour listed above or below the one selected) and check again.
NOTE: If the proper clearance cannot be obtained by using the appropriate larger or smaller bearings, replace the crankshaft and start over
Selection
NOTE: If the codes are indecipherable because of an accumulation of dirt and dust, do not scrub them with a wire brush or scraper. Clean them only with solvent or detergent.
Connecting Rod Code Location
Numbers have been stamped on the side of each connecting rod as a code for the size of the big end. Use them and the letters stamped on the crankshaft (codes for the rod journal size), to choose the correct bearings.
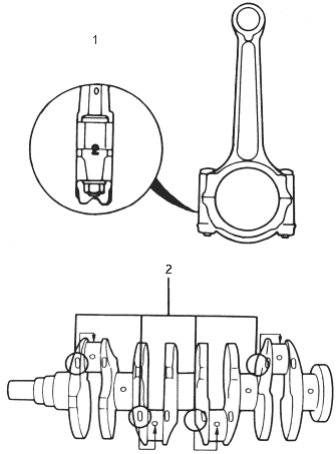
- 1. Half of the number is stamped on bearing cap and the other half is stamped on the rod.
- 2. Connecting Rod Journal Code Locations (Letters)
Bearing Identification