PDF p. 1182 · 23-D-16
NOTE: The control unit is built into the dash lights brightness controller.
- 1.Remove the switch panel from the dashboard.
- 2.Disconnect the 3P connector from the controller.
- 3.Push the controller out from behind the switch panel.
- 4.Inspect the connector terminals to make sure they are all making good contact.
- If the terminals are bent, loose or corroded, repair them as necessary and recheck the system.
- If the terminals look OK, make the following input tests at the connector.
- If any test indicates a problem, find and correct the cause, then recheck the system.
- If all the input tests prove OK, the controller must be faulty, replace it.
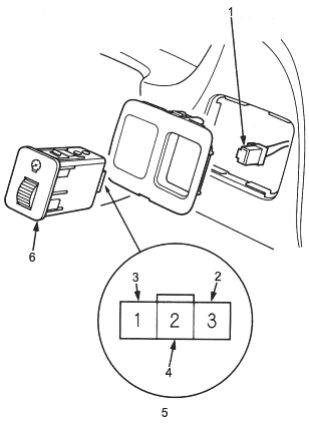
- 1. 3P CONNECTOR
- 2. RED
- 3. RED/BLK
- 4. BLK
- 5. Wire side of female terminals
- 6. DASH LIGHTS BRIGHTNESS CONTROLLER
| Cavity | Wire | Test condition | Test: Desired result | Possible cause if result is not | |
|---|---|---|---|---|---|
| obtained | |||||
| 1 | RED/BLK | Combination light | Check for voltage to ground | ♦ | Blown No. 46 (7.5A) fuse in |
| switch ON | There should be battery voltage | the under-dash fuse/relay box. | |||
| ♦ | Faulty combination light switch | ||||
| ♦ | Faulty taillight relay | ||||
| ♦ | An open in the wire | ||||
| 2 | BLK | Under all conditions | Check for continuity to ground: | ♦ | Poor ground (G401, G402) |
| There should be continuity | ♦ | An open in the wire | |||
| 3 | RED | Combination light | Connect to ground: | ♦ | An open in the wire |
| switch ON | Dash lights should come on full | ||||
| brightness | |||||