PDF p. 1977 · 20-28
5D:
NOTE:
- When prying with a flat-tip screwdriver, wrap it with protective tape to prevent damage.
- Take care not to bend or scratch the trim and panels.
- Put on gloves to protect your hands.
Centre pillar area:
 : Clip locations
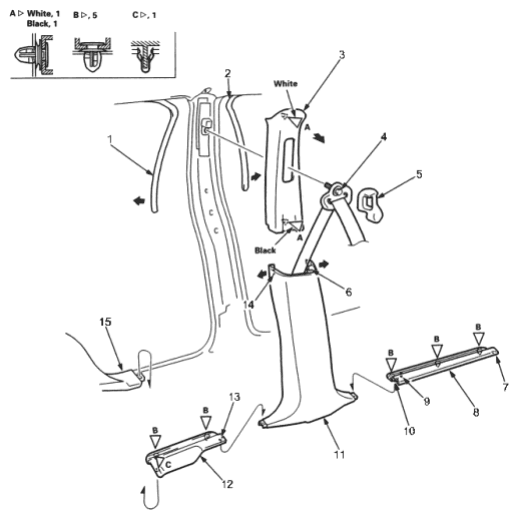
Install in the reverse order of removal, and note these items:
- Replace any damaged clips.
- 1.
REAR DOOR TRIM
Pull back as necessary.
- 2.
FRONT DOOR TRIM
Pull back as necessary.
- 3.CENTRE PILLAR TRIM
- 4.
FRONT SEAT BELT UPPER
ANCHOR BOLT 7/16-20 UNF 33 Nm (3.3 kgf/m, 24 lbf/ft)
- 5.UPPER ANCHOR COVER
- 6.HOOK
- 7.TAB
- 8.FRONT SIDE TRIM
- 9.PIN
- 10.HOOK
- 11.CENTRE PILLAR LOWER TRIM
- 12.REAR SIDE TRIM
- 13.HOOK
- 14.HOOK
- 15.TRUNK SIDE TRIM PANEL
- Before installing the anchor bolt, make sure there are no twists or kinks in the seat belt.
PDF p. 1978 · 20-29
Rear side area:
Remove the following parts:
- Rear seat cushion and seat-back (See Page 20-34)
- Rear seat pivot bracket (See Page 20-34)
- Rear side trim
- Rear centre shelf
- Spare type lid
- Rear floor bucket
- Rear trim panel
 : Bolt, screw locations
 : Clip locations
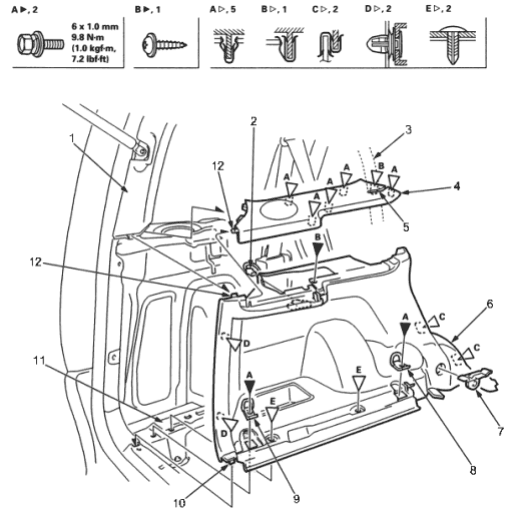
Install in the reverse order of removal, and note these items:
- Replace any damaged clips.
- Make sure the cargo area light connector is plugged in properly (left side).
- Make sure the wire harnesses are not pinched.
- 1.REAR PILLAR TRIM
- 2.CARGO AREA LIGHT (Left side only)
- 3.
REAR SEAT BELT
Slip the seat belt through the slit in the rear side shelf.
- 4.REAR SIDE SHELF
- 5.SLIT
- 6.TRUNK SIDE TRIM PANEL
- 7.REAR SEAT PIVOT BRACKET
- 8.TIE DOWN HOOK
- 9.TIE DOWN HOOK
- 10.HOOK
- 11.CARGO FRAME
- 12.HOOK
PDF p. 1979 · 20-30
Quarter pillar and rear pillar area:
Remove the trunk side trim panel (See Page 20-29).
 : Bolt locations, 3
 : Clip locations,6
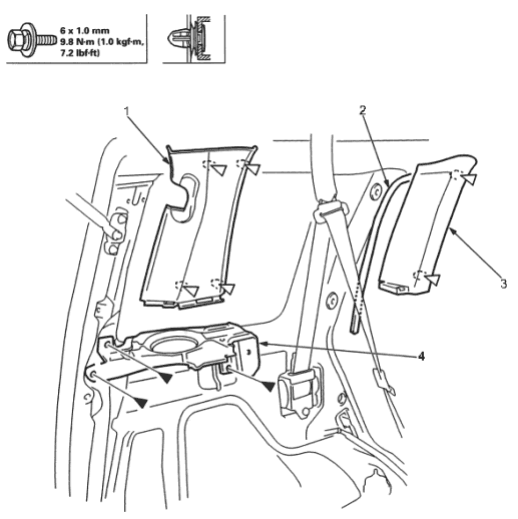
- 1. REAR PILLAR TRIM
- 2. REAR DOOR TRIM Pull back as necessary.
- 3. QUARTER PILLAR TRIM
- 4. REAR SPEAKER BRACKET
Install in the reverse order of removal, and replace any damaged clips.