PDF p. 1007 · 20-71
NOTE:
- An assistant is helpful when removing the tailgate.
- Take care not to scratch the tailgate.
- Wear gloves to protect your hands.
- 1.Remove the tailgate trim.
- 2.Disconnect the rear wiper motor connector, rear window defogger connector, rear license light connector, tailgate latch switch connector, tailgate latch actuator connector and rear washer tube. Detach the harness clips, then remove the wire harness from the tailgate.
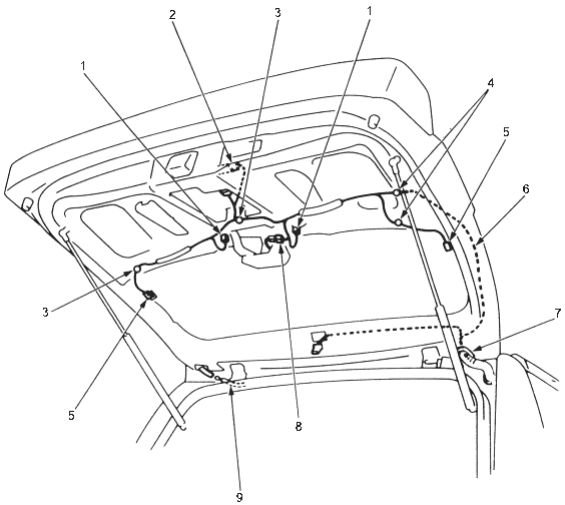
- 1. REAR LICENSE LIGHT CONNECTOR
- 2. TAILGATE LATCH ACTUATOR CONNECTOR
- 3. HARNESS CLIP
- 4. HARNESS CLIPS
- 5. REAR WINDOW DEFOGGER CONNECTOR
- 6. WIRE HARNESS
- 7. GROMMET
- 8. REAR WIPER MOTOR CONNECTOR
- 9. REAR WASHER TUBE
PDF p. 1008 · 20-72
- 3.Remove the open stay from the open stay bracket. Remove the bolts, then remove the tailgate.
 : Bolt locations, 4
 : Nut locations, 2 1. TAILGATE
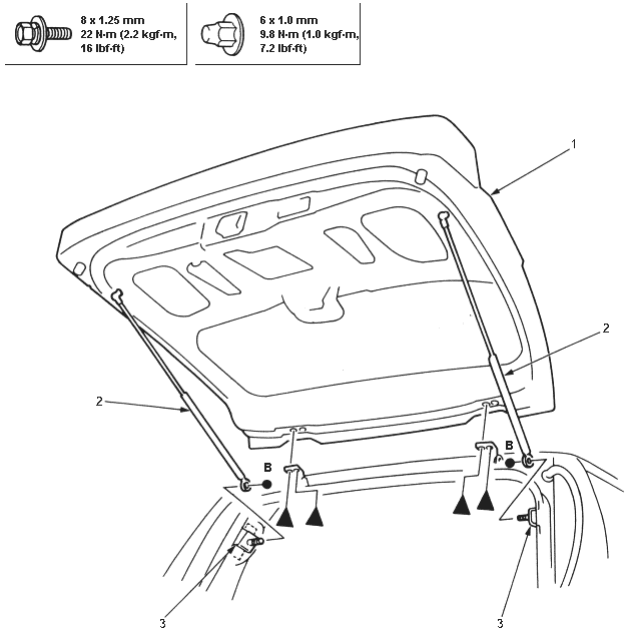
- 2. OPEN STAY
- 3. OPEN STAY BRACKET
- 4.Remove the open stay from the tailgate.
- 5.Install in the reverse order of removal and note the following items:
- Make sure the connectors and wire harness are routed properly.
- Make sure the tailgate open properly and locks securely.
- Adjust the tailgate alignment seat (See Page 20-73).
PDF p. 1009 · 20-73
NOTE:
- Before adjusting the tailgate, loosen each bolt and nut slightly.
- The support struts should be removed.
- 1.Adjust the tailgate hinges right and left, as well as fore and aft, by using the elongated holes.
- 2.Turn the tailgate edge cushions, as necessary, to make the tailgate fit flush with the body at each side.
- 3.Adjust the tailgate fit to the tailgate opening by moving the striker.
- 4.After adjustment, tighten each bolt and nut securely.
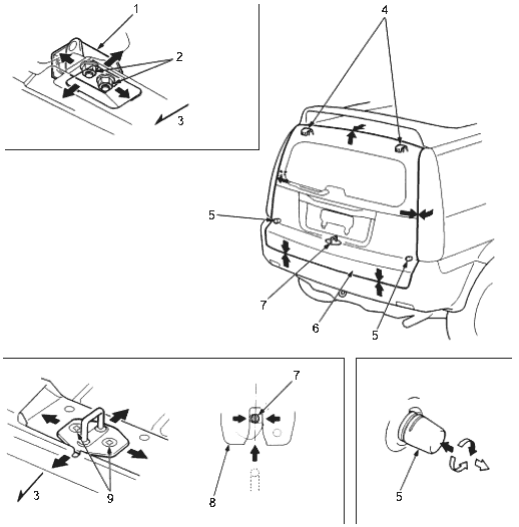
- 1. TAILGATE HINGE
- 2. NUTS, 8 x 1.25 mm, 22 Nm (2.2 kgf/m, 16 lbf/ft)
- 3. Forward
- 4. TAILGATE HINGES
- 5. TAILGATE EDGE CUSHION
- 6. TAILGATE
- 7. TAILGATE STRIKER
- 8. TAILGATE LATCH
- 9. 8 x 1.25 mm 22 Nm (2.2 kgf/m, 16 lbf/ft)