PDF p. 1004 · 20-68
- 1.Remove the front grille seat (See Page 20-76).
- 2.Slightly loosen each hood hinge bolt.
- 3.Adjust the hood alignment in this sequence.
- Adjust the hood right and left, as well as fore and aft, by using the elongated holes on the hood hinge.
- Turn the hood edge cushions, as necessary, to make the hood fit flush with the body at front and side edges.
- Adjust the hood latch to obtain the proper height at the forward edge and move the hood latch right or left until the striker is centred in the hood latch.
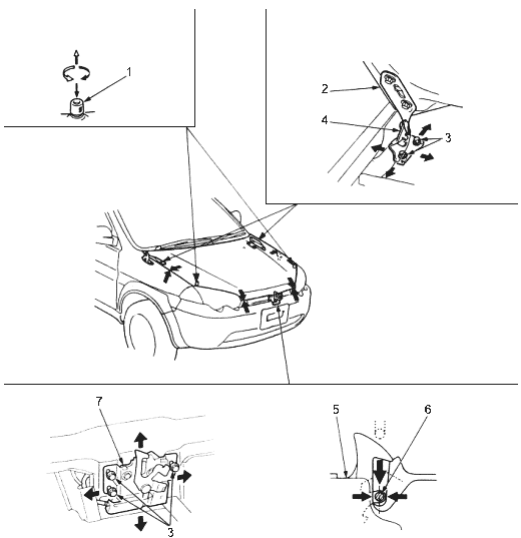
- 1. HOOD EDGE CUSHION
- 2. HOOD
- 3. 6 x 1.0 mm 9.8 Nm (1.0 kgf/m, 7.2 lbf/ft)
- 4. HOOD HINGE
- 5. HOOD LATCH
- 6. STRIKER
- 7. HOOD LATCH
PDF p. 1005 · 20-69
- 4.Tighten each bolt securely.
- 5.Check that the hood opens properly and locks securely.
- 6.Grease each location of the hood latch and hood hinge as indicated by the arrows.
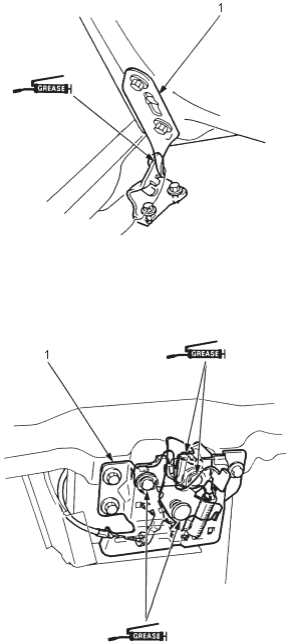
- 1. HOOD HINGE
- 2. HOOD LATCH
Hood Insulator Replacement
NOTE: Take care not to scratch the hood.
- 1.
Remove the hood insulator.
-1 Disconnect the windshield washer tubes from the windshield washer nozzles. -2 Release the windshield washer tube from the clips. -3 Using a clip remover, detach the clips, release the hooks and remove the hood insulator.
 : Clip locations
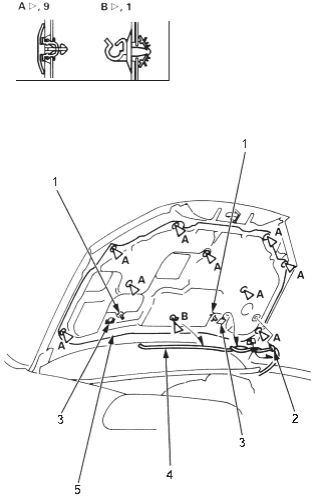
- 1. WINDSHIELD WASHER NOZZLE
- 2. CLIP
- 3. HOOK
- 4. WINDSHIELD WASHER TUBES
- 5. HOOD INSULATOR
- 2.Install in the reverse order of removal and note the following items:
- Replace any damaged clips.
- Make sure the washer tubes are connected properly.