PDF p. 1639 · 4-30
- 1.Remove the related parts.
- Windshield.
- Tailgate.
- Sunvisor.
- Ceiling lights.
- Headliner.
- Sunroof glass (for some models).
- Roof antenna (for some models).
- Roof spoiler and roof side trim (for some models).
- 2.
Pull out and straighten the damaged area to approximately the original shape.
NOTE: Check the inner front pillar and the inner centre pillar for position and damage.
Cut the roof panel and pull out the pillars if necessary.
- Pull out the damaged area with the frame straightener before removing the roof panel.
- Attach the vehicle to the frame straightener by tightening the underbody clamps located at the horizontal pinch welds.
- 3.
Keep the body level.
NOTE: Refer to the HR-V Shop Manual for safety stand location points.
Jack-up the body at the front and back. Place safety stands to support engine weight, at the four designated place of the side sills.
NOTE: Make sure that the right and left pillars are parallel with the windshield surface. Check the door for proper opening and closing.
- 4.Cut off the shaded areas of the roof panel.
- Cut the roof rail weld flange with a handsaw at the four corners.
- Using a chisel, pry off the roof panel along the bold lines as shown.
- Centre punch around the spot weld imprints of the roof gutter welded flange.
- Drill holes using the spot cutter.
- Using a chisel, pry off the welded flange.
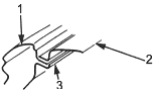
- 1. OUTER PANEL
- 2. ROOF PANEL
- 3. ROOF SIDE PANEL
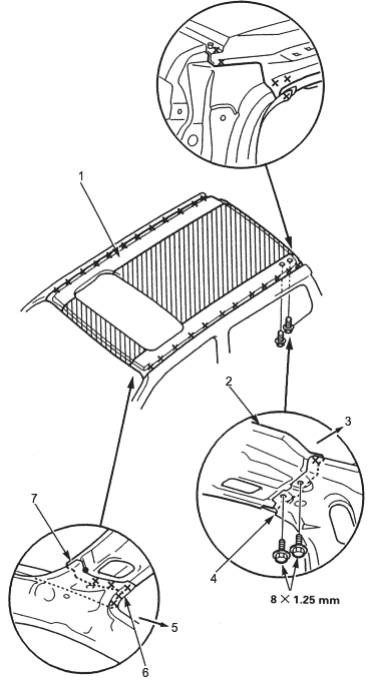
- 1. ROOF PANEL
- 2. REAR ROOF RAIL
- 3. Forward
- 4. 8 x 1.25 mm
- 5. Forward
- 6. ROOF SIDE RAIL
- 7. FRONT ROOF RAIL
NOTE: If necessary, replace the outer panel (see page 4-20).
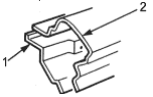
- 1. ROOF SIDE RAIL
- 2. OUTER PANEL
PDF p. 1641 · 4-31
- 5.Plug weld the holes with a MIG welder.
- Level and finish the burrs on the welded flanges with a disc sander.
- Even out the roof side rail welded flange with a hammer and dolly for a close fit with the roof panel welded flange.
- 6.
Apply paint to the underside of the new roof panel.
See Paint Repair section.
- 7.Set the new roof panel.
- Sand off the undercoat from both sides of the flange sections to be spot welded to expose the steel plate.
- Clamp the roof panel with vice-grips.
NOTE:
- Check that the flange surfaces fit closely. Be careful not to twist or deform the roof panel..
- Check the width of the groove of the roof moldings on both sides.
- Apply the spot sealer to the welding surface when spot welding.
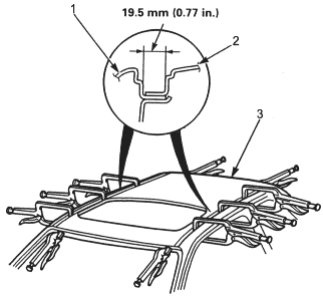
- 1. OUTER PANEL
- 2. ROOF PANEL
- 3. NEW ROOF PANEL
- Check the body dimension (see section 6).
- 8.Tack weld the new roof panel.
- Spot weld the clamped sections to temporarily install the roof panel.
- Set the windshield and tailgate and check the roof panel for proper installation.
- Install the roof molding and check the width of the groove.
- 9.Perform the main welding.
- Spot weld the roof rails at the front and rear.
- Spot weld the roof arch.
- Make 20% to 30% more spot welds than there were holes drilled.
NOTE: If there is no room for spot welds, compensate by MIG welds.
PDF p. 1642 · 4-32
- Smooth the spot weld areas under the windshield and rear window with a hammer and dolly.
NOTE: After welding the pillars, grind and finish the welded areas flat and blend them into the roof panel.
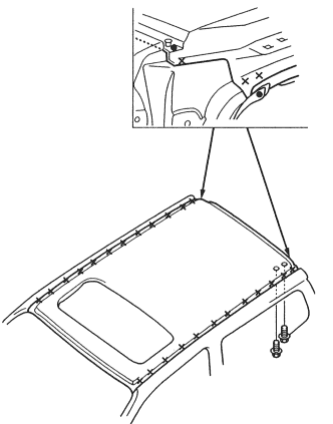
- Weld the roof rail from the inside by MIG welding as shown.
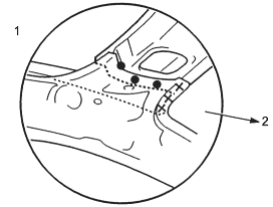
- 1. Front
- 2. Forward
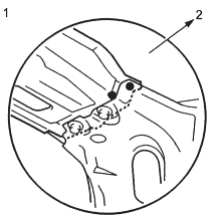
- 1. Rear
- 2. Forward
- 10.Apply and level the sealer to the welded areas.

- 11.Apply the paint. See Paint Repair section.
- 12.Apply an anti-rust agent to the inside of the roof side rail.
- 13.Install the related parts in the reverse order of removal.
- 14.Check and clean.
- Check the windshield and tailgate opening area for water leaks.
- Adjust the clearance with the tailgate, then adjust the level differences and fit. Check for operation.
- Clean the passenger compartment thoroughly.