PDF p. 1618 · 4-9
- 1.Remove the related parts.
- Parts that must be removed when removing the front bulkhead.
- Parts on passenger side of lower dashboard which are especially flammable.
- Electrical accessories in engine the compartment and the wire harnesses.
NOTE: See the HR-V Shop Manual, for removal and installation of the engine, front suspension and brakes.
- 2.Pull out and straighten the damaged area to approximately the original shape.
- Attach the vehicle to the frame straightener by tightening the underbody clamps at the horizontal pinch weld points.
NOTE: Refer to the HR-V Shop Manual for safety stand location points.
- Before cutting off the damaged sections, pull them out so that they are restored to the original shape.
- Do not pull out more than necessary.
- Pull out and straighten the damaged area of the lower dashboard, front pillar and other parts.
- After pulling, check the damper housing position using the body dimensional drawings (see section 6) and positioning jig (see page 1-7).
NOTE: Check the condition of the door and hinges.
- 3.
Peel off the undercoat.
Heat the undercoat at the weld areas of the wheelhouse and front side frame with a gas torch and peel off the undercoat with a metal spatula.
- 4.Remove the wheelhouse upper member carefully so it can be reused.
- Centre punch around the spot weld imprints.
- Use the special spot cutter to drill holes at the spot weld nuggets.
- Remove the MIG weld flange with a disc sander.
- Using a chisel, pry off the welded flange from the front pillar.
NOTE: Remove the wheelhouse upper member carefully so it can be reused.
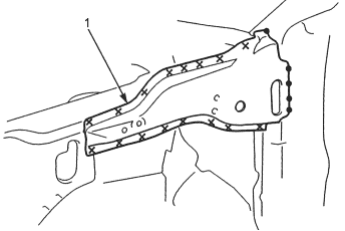
- 1. WHEELHOUSE UPPER MEMBER
- 5.Check the wheelhouse extension for position and damage. If necessary, replace it.
- Centre punch around the spot weld imprints on the front side frame and damper housing.
- Use the special spot cutter to drill holes at the spot weld nuggets.
- Using a chisel, pry off the welded flange from the dashboard upper side member, front wheelhouse and damper housing.
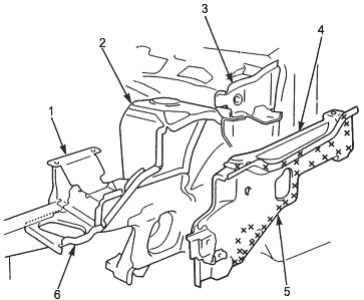
- 1. ENGINE MOUNT BRACKET SUPPORT
- 2. DAMPER HOUSING
- 3. DASHBOARD UPPER SIDE MEMBER
- 4. FRONT FENDER SUPPORT
- 5. WHEELHOUSE EXTENSION
- 6. FRONT WHEELHOUSE
PDF p. 1619 · 4-10
- 6.Replace the front wheelhouse.
- Centre punch around the spot weld imprints on the front side frame, engine mount bracket support and damper housing..
- Drill holes in the centre punched areas using a spot cutter.
- Using a chisel, pry off the weld flange.
- Level and finish the burrs left on the welding surfaces with a sander.
- 7.Check the damper housing for position and damage. If necessary, replace the damper housing.
- Centre punch around the spot weld imprints on the front side frame, dashboard lower and dashboard upper.
- Drill holes using a spot cutter.
- Using a chisel, pry off the weld flange.
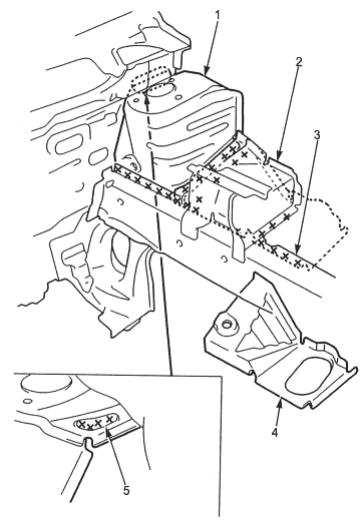
- 1. DAMPER HOUSING
- 2. ENGINE MOUNT BRACKET SUPPORT
- 3. FRONT SIDE FRAME
- 4. FRONT WHEELHOUSE
- 5. Drill holes from under the damper housing.
- From the passenger compartment side, drill holes in the spot welded area with a 5 mm (0.2 in.) spot weld cutter.
NOTE: Drill holes completely through the parts since the replacement damper housing will be welded by MIG welding
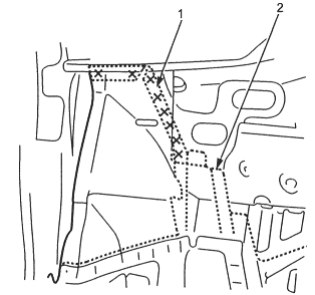
- 1. DAMPER HOUSING
- 2. FRONT SIDE FRAME
- 8.Straighten the related parts.
- Level and finish the burrs left on the welding surfaces with a sander.
- Fill all drilled holes by MIG or gas welding.
- Use a hammer and dolly to even out the welded areas of the lower dashboard, front side frame and dashboard upper side member.
PDF p. 1620 · 4-11
- 9.Set the new front wheelhouse, damper housing and wheelhouse extension.
- Apply body paint to both sides of the new front wheelhouse and damper housing.
- See Paint Repair section.
- Remove the undercoat from both sides of the welding section and expose the steel plate using a disc sander.
- Clamp the front side frame with vice-grips and squill vices.
NOTE: Apply the spot sealer to the welding surface when spot welding.
- Clamp the front bulkhead with vice-grips.
- Measure the front compartment diagonally.
NOTE: Use of a positioning jig is recommended (see page 1-7).
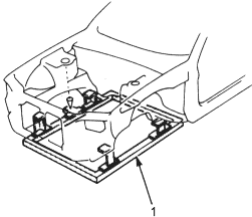
- 1. POSITIONING JIG
- Spot weld several points in the clamped sections and temporarily attach the front wheelhouse and damper housing.
- 10.Check the dimensions (see section 6)., temporarily install the hood, front fender and headlight and check for differences in level and clearance.
- 11.Perform the main welding.
- Weld as much as possible with the jig still mounted.
- Make 20% to 30% more spot welds than there were holes drilled.
NOTE: If there is no room for spot welds, compensate by using MIG welds.
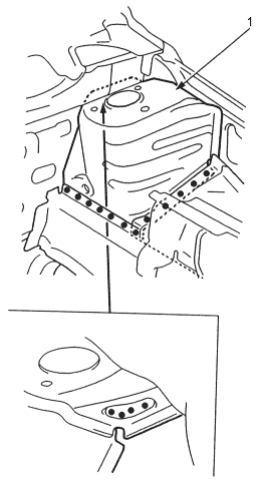
- 1. DAMPER HOUSING
PDF p. 1621 · 4-12
- Plug weld the holes in the lower dashboard and damper housing with a MIG welder.
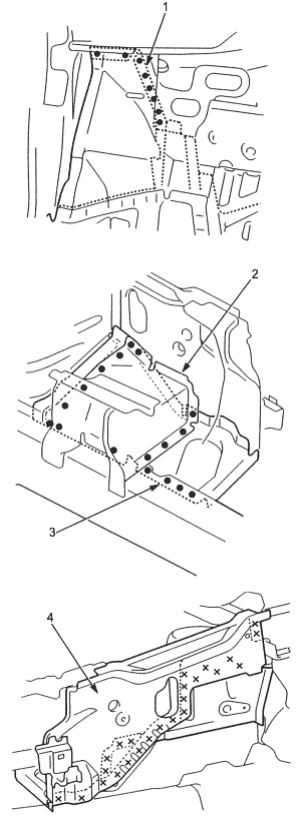
- 1. DAMPER HOUSING
- 2. ENGINE MOUNT BRACKET SUPPORT
- 3. FRONT WHEELHOUSE
- 4. WHEELHOUSE EXTENSION
- 12.
Weld the wheelhouse upper member.
If the upper member is to be reused, make MIG plug welds at the drilled holes.
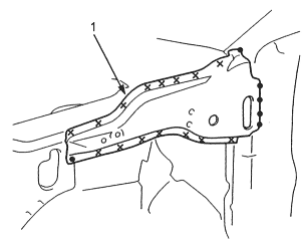
- 1. WHEELHOUSE UPPER MEMBER
- 13.Weld the front bulkhead.
- 14.Finish the welded area. Use a hammer and a dolly to even the side bulkhead and front side frame flanges for a close fit with the surface of the front wheelhouse and damper housing.
- 15.Apply sealer (see section 5) to the mating surface of the lower dashboard and front side frame, etc.
PDF p. 1622 · 4-13
- 16.Apply the paint. See Paint Repair section.
- 17.Apply the undercoat. Undercoat the front floor, etc., and apply anti-rust agent to the inside of the welding section of the front side frame, lower dashboard, and upper member, etc., (see section 7).
- 18.Install in the parts in the reverse order in which they were removed.
- 19.Inspect, check, and make adjustments.
- Measure the front wheel alignment.
- Inspect the brake system.
- Adjust the headlight aim.