PDF p. 1614 · 4-5
- 1.Remove the related parts.
- Front bumper.
- Right and left headlights.
- Right and left front fenders.
- Radiator, condenser.
- Hood latch.
- 2.Roughly pull out and straighten the damaged area.
- Check the damage to the front wheelhouse and front side frame before removing the front bulkhead. Use the frame straightener to roughly pull out and repair the damaged bulkhead before removing the bulkhead.
NOTE: Check the fit of the door, taking care not to pull the damaged area out more than necessary.
- Use the horizontal pinch weld clamps and attach the car to the frame straightener at the clamping points securely.
- 3.
Keep the body level.
Jack up the body, and place safety stands at the four designated places of the side sills.
NOTE: Refer to the HR-V Shop Manual for safety stand location points.
- 4.Cut and pry off the front bulkhead.
- Centre punch around the spot weld imprints.
- Use the special spot cutter to drill holes at the spot weld nuggets on the front wheelhouse and front side frame.
NOTE: When drilling holes, be careful not to drill through the front wheelhouse or side frame.
- Cut off the bulkhead with an air chisel, leaving the welding flanges intact.
- Level and finish the burrs from the pried off spot welds with a disc sander.
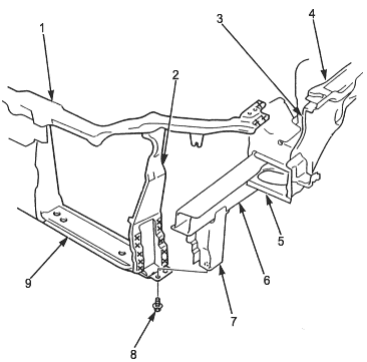
- 1. BULKHEAD UPPER FRAME
- 2. BULKHEAD EXTENSION
- 3. WHEELHOUSE EXTENSION
- 4. FRONT FENDER SUPPORT
- 5. FRONT WHEELHOUSE
- 6. FRONT SIDE FRAME
- 7. BULKHEAD LOWER CROSS-MEMBER BRACKET A
- 8. MOUNTING BOLT 6 x 1.0 MM
- 9. FRONT LOWER CROSS-MEMBER
- 5.Check the front side frame, front wheelhouse and wheelhouse extension for position and damage. If necessary, replace the bulkhead lower cross-member bracket A.
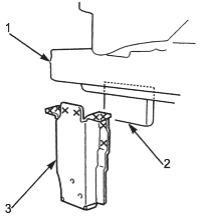
- 1. FRONT SIDE FRAME
- 2. BULKHEAD LOWER CROSS-MEMBER BRACKET B
- 3. BULKHEAD LOWER CROSS-MEMBER BRACKET A
PDF p. 1615 · 4-6
- 6.Straighten the damaged related parts.
- Use a hammer and dolly to mold the damaged areas of the front wheelhouse and side frame.
- Even out the welding flanges with a hammer and dolly.
- Fill all drilled holes by MIG or gas welding.
- 7.Set the new front bulkhead and bulkhead lower cross-member bracket A.
- Grind both sides of the welding section of the bulkhead with a sander to remove the undercoat and to expose the steel plate.
- Clamp both the right and left sides with the vice-grips
NOTE: Apply the spot sealer to the welding surface when spot welding.
- Check the front bulkhead position using the body dimensional drawings (see section 6).
- 8.Measure the front compartment diagonally with a tracking gauge or convex tools as shown to check it for twisting or bending.
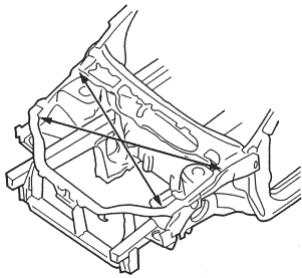
- 9.Tack weld the new front bulkhead.
Spot weld the clamped sections.
NOTE: Make sure that the right and left bulkheads are in line with each other.
- 10.Temporarily assemble the hood, headlight, front fender and front bumper, then check the clearances and level differences.
- 11.Perform the main welding.
- plug weld the holes in the bulkhead lower cross-member bracket A with a MIG welder.
- Spot weld the bulkhead as shown.
- Make 20% to 30% more spot welds than there were holes drilled.
NOTE: If there is no room for spot welds, compensate by using MIG welds.
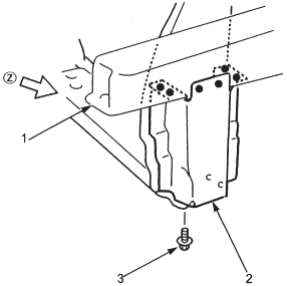
- 1. FRONT SIDE FRAME
- 2. BULKHEAD LOWER CROSS-MEMBER BRACKET A
- 3. MOUNTING BOLT 6 x 1.0 mm
PDF p. 1616 · 4-7
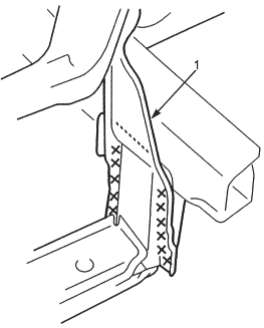
- 1. BULKHEAD SIDE STAY
VIEW Z
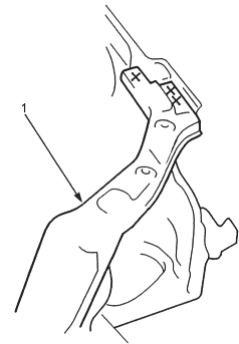
- 1. BULKHEAD UPPER FRAME
- 12.Finish the welds. Use a hammer and dolly to even out the front wheelhouse extension and bulkhead lower cross-member bracket A flanges for a close fit with the surface of the front bulkhead.
- 13.Apply the undercoat (see section 7).
- 14.Attach the front fender.
- 15.Lower the body.
- 16.Apply the paint. See Paint Repair Section.
- 17.Install the related parts.
- 18.Inspect, check and make adjustments.
- Adjust the headlight aim.
- Check that the electrical components light up and operate properly.
- Replenish radiator coolant and inspect for leaks.