PDF p. 1607 · 3-2
The zinc-plated steel plate used in some panels of the HR-V requires different repair techniques than ordinary steel plate. Refer to “Body Construction” (see page 4-2) for the location of the zinc-plated panels.
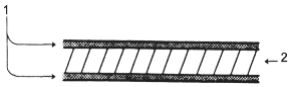
- 1. ZINC PLATING (5 ~ 6 microns)
- 2. Steel plate
- 1.Before spot welding the zinc-plated steel plate, remove the paint from both sides of the flange to be welded. Apply sealer to the flange after welding.
NOTE: Seal the sanded surfaces thoroughly to prevent rust.
- 2.
The electric continuity properties of zinc-plated steel plate are different from ordinary steel plate. When spot welding, increase the current by 10-20%, or increase the resistance welding time. Increase the weld spots by 10-20%.
NOTE: The MIG welding procedures for zinc-plated steel plate are the same as for ordinary steel plate.
- 3.
Before applying putty or body filler to the zinc-plated steel plate, sand the zinc plating thoroughly to promote adhesion and to prevent blistering.
NOTE:
- Use only epoxy-based putties and fillers on zinc-plated steel plate.
- Follow the manufacturer’s specification.
- 4.When performing paintwork, apply caulking to the ground wire mounting hole to keep the paint out.
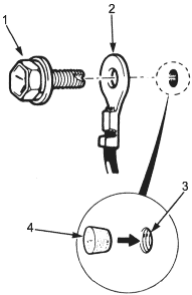
- 1. SPECIAL BOLT
- 2. GROUND WIRE
- 3. GROUND WIRE MOUNTING HOLE
- 4. CAULKING
PDF p. 1608 · 3-3
Avoid using putty as much as possible when repairing a new vehicle. Use alternative methods if possible.
| Operation | Tools/Materials | Procedure | Remarks | |
|---|---|---|---|---|
| 1. | Prep the repair area. | Double-action sander, #80 | Sand the area with a | |
| sandpaper | double-action sander and #80 | |||
| sandpaper. | ||||
| Clean with wax and grease | ||||
| remover. | ||||
| 2. | Apply putty. | Epoxy-based putty. | Apply in several thin coats if | |
| NOTE: Putty can be | Mix the putty and hardener | necessary. Try to avoid | ||
| applied after priming as | according to the | leaving pinholes in the putty. | ||
| described in step 4. | manufacturer's directions. | Follow the manufacturer's | ||
| Polyester resin putty. | recommendations for | |||
| Body filler. | preparation. | |||
| 3. | Sand and clean the | Double-action sander, orbital | Rough-sand the area with a | |
| puttied area. | sander, hand sanding file, | double-action sander and #80 | ||
| #80, #120, #240 sandpaper, | sandpaper, then sand with | |||
| wax and grease remover, | #120 sandpaper. | |||
| shop towels. | Featheredge with #240 | |||
| sandpaper. | ||||
| Clean with wax and grease | ||||
| remover. | ||||
| 4. | Coat with primer. | Epoxy-based primer and | Apply 2 - 4 coats, allowing | Spray to a thickness |
| NOTE: Apply to bare | hardener, epoxy thinner: | sufficient flash time between | of 30 - 35 microns. | |
| sheet metal and puttied | Mix and thin the primer | coats. | ||
| area. | according to the | Force dry at 140 - 158°F (60 - | ||
| manufacturer's directions. | 70°C) for at least 30 minutes. | |||
| 5. | Sand and clean the | Double-action sander, #300, | Sand the repair area by hand | |
| whole area. | #400 sandpaper, wax and | with #300, #400 sandpaper. | ||
| grease remover, shop towels. | Blow off with compressed air. | |||
| Clean with wax and grease | ||||
| remover. | ||||
| 6. | Apply intermediate coat | Polyester/urethane resin | Apply 2 - 4 coats, allow | Spray to a thickness |
| to the whole area to be | primer/surfacer or top-coat | sufficient flash time between | of 30 - 35 microns. | |
| repainted. | enamel: | coats. | ||
| Mix and thin the primer | Force dry at 140 - 158°F (60 - | |||
| according to the | 70°C) for at least 30 minutes. | |||
| manufacturer's directions. | ||||
| 7. | Sand and clean the | Hand sanding file, | Sand the repair area by hand | |
| whole area to be repainted | double-action sander, #400, | with #400 sandpaper until it is | ||
| #600 sandpaper, wax and | level. Sand the whole area to | |||
| grease remover, shop towels. | be repainted with #400 - 600 | |||
| sandpaper. | ||||
| Clean with wax and grease | ||||
| remover. | ||||
| 8. | Top-coat the whole | Acrylic urethane resin top | Apply 2 - 4 coats allowing | Spray to a thickness |
| area to be repainted. | coat paint, hardener and | sufficient flash time between | of 40 - 50 microns. | |
| thinner: | coats. | |||
| Mix and thin the paint | Force dry at 140 - 158°F (60 - | |||
| according to the | 70°C) for at least 30 minutes. | |||
| manufacturer's directions. | ||||