PDF p. 2073 · 4-10
- 1.Remove the related parts.
- Rear bumper.
- Tailgate.
- Taillight.
- Rear seat.
- Rear seat belt.
- Trim, trim panel and luggage compartment fitting.
- Fuel fill pipe (left side only).
- 2.
Pull out and straighten the damaged area.
NOTE: Carefully check the inner pillar and rear pillar gutter for position and damage. Pull out the inner panel by cutting the outer if necessary.
- Jack-up the body and place safety stands at the four designated support points.
- Pull out the damaged rear side outer panel with the frame straightener, then pull out and straighten the inner panel and rear wheelhouse.
NOTE: Be careful not to pull out more than necessary.
- After pulling, check the inner pillar and rear panel gutter position using the body dimensional drawings (see section 6).
- 3.
Peel off the undercoat.
Heat the undercoat at the weld areas of the rear wheel house with a gas torch and peel off the undercoat with metal spatula.
- 4.Cut and pry off the rear side outer panel.
- Cut at the quarter pillar, rear pillar and side sill with a handsaw.
- Cut the panel from the body with a chisel, leaving the weld flange at the inner panel intact.
NOTE: Do not cut or damage the centre pillar lower stiffener, inner panel, rear damper stiffener and rear pillar gutter.
- Cut at the side sill or wheel arch according to the extent of the damage.
- Centre punch around the spot weld imprints on the remaining flange.
- Drill out the spot welds with the spot cutter.
- Pry off the welded flange sections using a chisel.
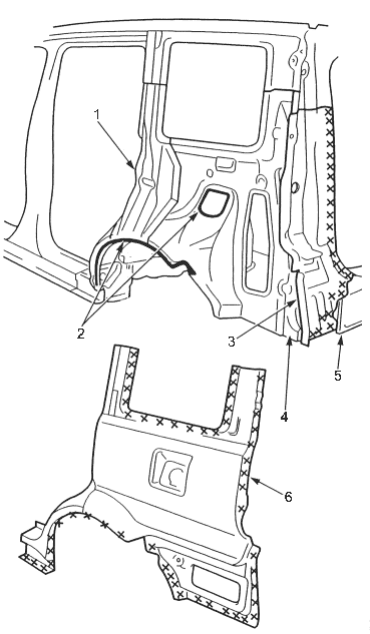
- 1. REAR DAMPER STIFFENER
- 2. MASTIC SEALERS
- 3. REAR PILLAR GUTTER
- 4. REAR PILLAR STIFFENER
- 5. REAR PANEL
- 6. OUTER PANEL
PDF p. 2074 · 4-11
- 5.Check the rear pillar gutter for position and damage. Replace the rear pillar gutter if necessary.
- 6.Cut and drill out the spot welds and pry off the rear pillar gutter.
- Cut the rear pillar gutter at under portion from the outer panel cut line.
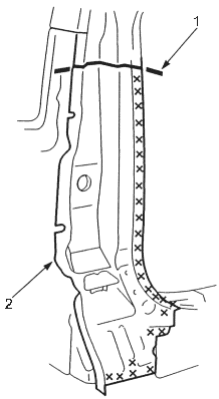
- 1. Cut line
- 2. REAR PILLAR GUTTER
- 7.Straighten the inner panel and related parts.
- Use a slide hammer to even out the damaged areas of the rear wheel arch.
- Fill the holes drilled by MIG or gas welding.
- Level and finish burrs, etc. with a disc sander.
- 8.Cut the new rear pillar gutter so it overlaps the body side gutter by approximately 20 mm (0.8 in).
- Cut the rear pillar gutter at under portion from the outer panel cut line.
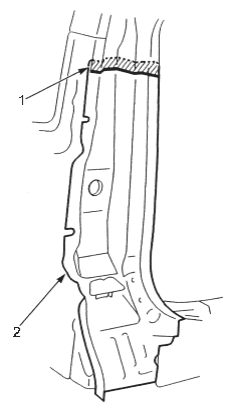
- 1. Overlap 20 mm (0.8 in)
- 2. REAR PILLAR GUTTER (New part)
- 9.Clamp and check the rear pillar gutter in its correct position using the body dimensional drawings.
- Remove the undercoat from both sides of the weld flange with a sander to expose the steel plates.
NOTE: Apply the spot sealer to the weeelding surface and the clamped positions.
- 10.Temporarily spot weld the rear pillar gutter at he clamped positions.
PDF p. 2075 · 4-12
- 11.Cut and clamp the repair part.
- Cut so that the repair part overlaps the side sill by 30 mm (1.2 in.).
- Remove the undercoat from both sides of the weld flange with a sander to expose the steel plate.
- 12.Check the position of the repair part using the body dimensional drawings (see section 6).
- 13.Remove the repair part and weld the new centre pillar stiffener and the new rear pillar gutter.
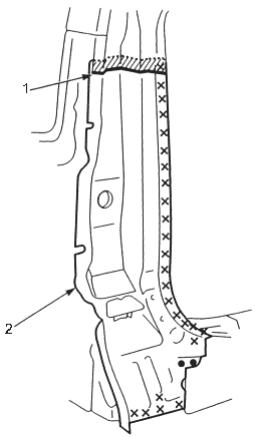
- 1. Fillet welding
- 2. REAR PILLAR GUTTER (New part)
- 14.Apply body paint to the back of the repair part.
- See Paint Repair section.
- 15.Apply the reinforcement tape to the inside face of
the repair part as shown (right side only).
NOTE:
- Before applying, clean the repair part surface with a sponge dampened in alcohol.
- After applying, heat the reinforcement tape equally for about 30 minutes with a drier.
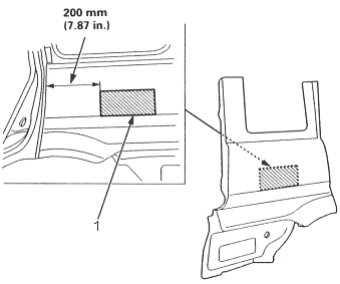
- 1. REINFORCEMENT TAPE (P/N 67112-S50-310)
PDF p. 2076 · 4-13
- 16.Set and tack weld repair part.
- Attach the patch at cut section of the quarter pillar and rear pillar (body side) and plug weld it.
NOTE: Apply the spot sealer to the welding surface when spot welding.
- 17.
Remove the vice-grips and check the alignment of the taillight, door, rear bumper and tailgate.
NOTE:
- Check for flushness of the front fender, door and the rear fender, taillight, rear bumper and make sure that the body lines flow smoothly.
- 18.Perform the main welding.
- Make 20% to 30% more spot welds than there were holes drilled.
NOTE: If there is not room for spot welds, compensate by using MIG welds.
- Make 5 mm (0.2 in.) holes in the MIG weld hole with the repair part and the rear pillar gutter with a MIG welder.
- Weld the outer panel at the quarter pillar, rear pillar and side sill with a MIG welder.
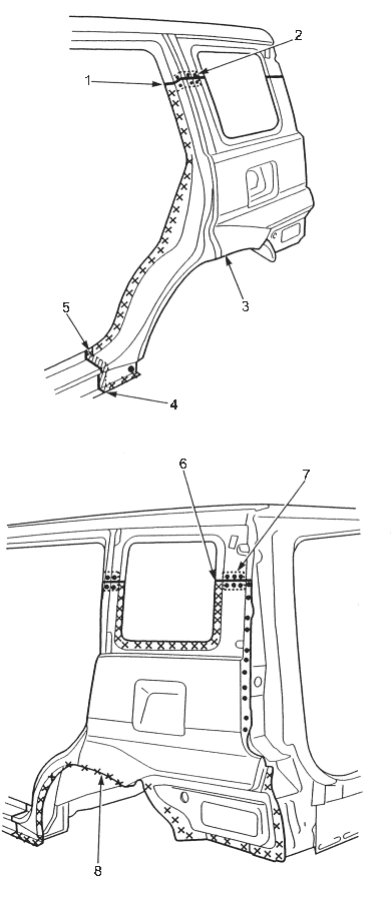
- 1. Butt welding
- 2. PATCH
- 3. OUTER PANEL (Repair part)
- 4. Fillet welding
- 5. Overlap 30 mm (1.2 in.)
- 6. Butt welding
- 7. PATCH
- 8.OUTER PANEL (Repair part)
PDF p. 2077 · 4-14
- 19.Finish the welded areas.
- Level the MIG welded areas with a disc sander.
- Even out high areas with a hammer. Be careful not to deform them.
- Even out the spot welded flange areas with a hammer and dolly.
- Fill in deformations and level differences of the welded areas with solder or putty, then finish.
- 20.
Apply the sealer (see section 5).
Apply sealer to the fuel filler sections, tailgate opening joint and around the taillight area of the rear pillar gutter.
- 21.Apply paint. See Paint Repair section.
- 22.
Apply the undercoat.
Apply undercoat to the wheelhouse and apply anti-rust agent to the inside of the outer panel and rear pillar gutter.
- 23.Install the related parts in the reverse order in which they were removed.
- 24.Inspect, check and clean.
Adjust the clearance with the door and tailgate then adjust the level differences and fit.
Check operation.
- Test for leaks in the trunk and passenger compartments.
- Check the quarter glass for water leaks.
- Clean the trunk floor.