PDF p. 2068 · 4-5
- 1.Remove the related parts.
- Doors (remove according to part damaged).
- Side trim panel.
- Door opening trim and door sill moldings.
- Carpet.
- Door switch.
- Seat belt.
- 2.
Pull out and straighten the damaged area.
Damage may extend to the inside sill and floor. Determine the extent of the damage first, so that the frame can be pulled out properly.
- 3.Cut and pry off the side sill.
- Check the damage on the outer side sill, then cut the repair outer side sill so it will overlap by 30 mm (1.2 in.) in the front and back.
- Cut the side sill with a handsaw.
NOTE: Be careful not to cut the inside sill, side sill stiffener, centre pillar stiffener and wheel arch extension. This could result in extensive repair.
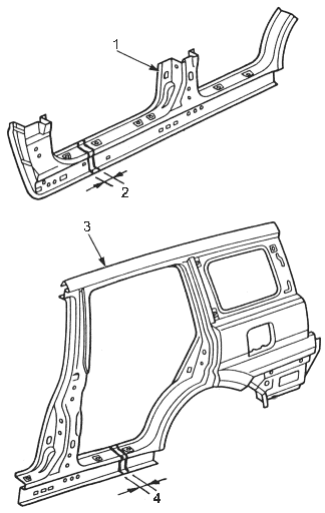
- 1. REPAIR PART
- 2. Overlap 30 mm (1.2 in)
- 3. REPAIR PART
- 4. Overlap 30 mm (1.2 in)
- Centre punch around the spot weld imprints on the welded flange.
- Drill holes using the spot cutter.
- Pry of the welded flange with a chisel.
NOTE: Be careful not to let the holes penetrate down to the inner section.
- If the damage involves part of the centre pillar and rear wheel arch, cut them as shown with a handsaw.
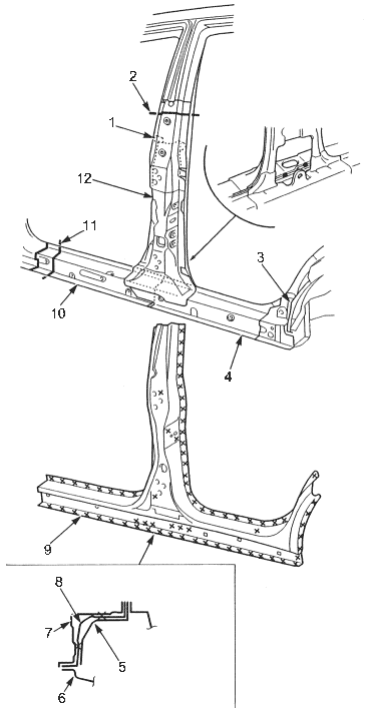
- 1. CENTRE PILLAR UPPER STIFFENER
- 2. Cut line
- 3. WHEEL ARCH EXTENSION
- 4. CENTRE PILLAR LOWER STIFFENER
- 5. CENTRE PILLAR LOWER STIFFENER
- 6. INSIDE SILL
- 7. OUTER PANEL
- 8. SIDE SILL STIFFENER
- 9. OUTER PANEL
- 10. SIDE SILL STIFFENER
- 11.Cut line
- 12.CENTRE PILLAR STIFFENER
- 4.Check the side sill stiffener and centre pillar stiffener for position and damage. If necessary, replace them.
PDF p. 2069 · 4-6
- 5.Straighten the related parts.
- Fill any holed areas by MIG or gas welding.
- Level and finish burrs at welded areas with a disc sander, then even them out with a hammer and dolly.
- Sand off the undercoat from both sides of the flange to be welded.
- 6.Set the new side sill stiffener and centre pillar stiffener.
- Cut the new stiffener so it overlaps the body side stiffener by approximately 20 mm (0.8 in).
- Sand off the undercoat from both sides of the welded flange with a sander to expose the steel plate.
NOTE: Apply the spot sealer to the welding surface when spot welding.
- Clamp the new side sill stiffener, centre pillar stiffener and check the position of it using the body dimensional drawings (see section 6).
- Tack weld the new side sill stiffener and centre pillar stiffener.
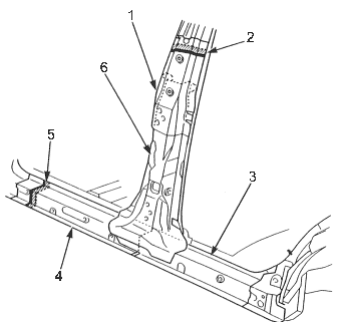
- 1. CENTRE PILLAR UPPER STIFFENER (New parts)
- 2. Overlap 20 mm (0.8 in)
- 3. CENTRE PILLAR LOWER STIFFENER (New parts)
- 4. SIDE SILL STIFFENER (New parts)
- 5. Overlap 30 mm (1.2 in)
- 6. CENTRE PILLAR STIFFENER (New parts)
- Clamp the repair part and temporarily install the front and rear doors and check the door hinge mounting position.
- Remove the repair parts.
- 7.Weld the new side sill stiffener and centre pillar stiffener.
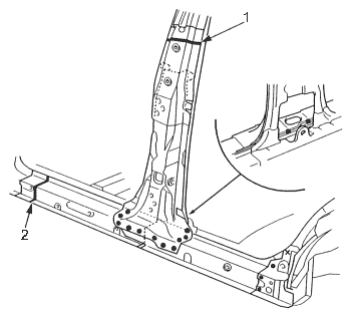
- 1. Fillet welding
- 2. Fillet welding
- 8.Set the repair part (outer panel).
- Attach the patches at the cut sections of the centre pillar (body side) and wheel arch (body side) and plug weld them.
- Sand off the undercoat from both sides of the welded flange on the repair part.
- Clamp the repair part in place with vice-grips.
NOTE: Apply the spot sealer to the welding ssurface when spot welding.
- Check the body dimensions.
PDF p. 2070 · 4-7
- 9.Tack weld the repair part.
- Remove the vice-grips and install the front fender and door. Check for differences in level and clearance.
- 10.Perform main welding.
- Weld the side sill and rear side outer joints with a MIG welder.
- Spot weld the side sill flanges.
- Make 20% to 30% more spot welds than there were holes drilled.
NOTE: If there is no room for spot welds, compensate by using MIG welds.
- Make 5 mm (0.2 in.) holes in the MIG weld holes with the new outer panel, and weld the centre pillar lower stiffener and side sill stiffener with a MIG welder.
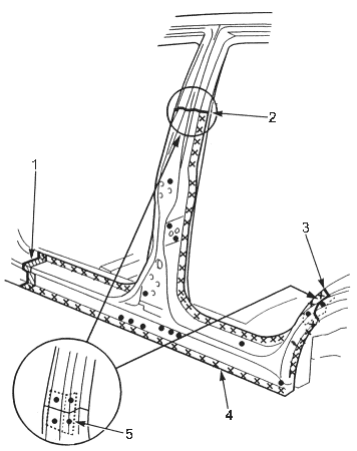
- 1. Fillet welding
- 2. Butt welding
- 3. Butt welding
- 4. OUTER PANEL (Repair part)
- 5. PATCH
- Level the weld beads at the front and rear with a disc sander. Hammer down the projections, then fill with solder or putty to finish it.
- 11.Apply sealer to the mating surfaces of the floor and inside sill.
- 12.Apply the paint. See Paint Repair section.
- 13.
Apply the undercoat.
Undercoat the front floor, and apply an anti-rust agent to the inside of the side sill and centre pillar.
- 14.Install the related parts.
- Install in the reverse order of removal.
- Check the doors for proper installation and level differences from the fender.
- 15.Clean the passenger compartment and check for water leaks.